Easiest Power Automate Sequential Approval Flow Pattern

With a Power Automate sequential approval you can use a single approval action to send approval requests to multiple people in sequence. We can also track the sequential approval history including the name of each approver, their response, the approval request date and when they responded. This is useful for invoice approvals, paid-time off requests, etc. when approvals must happen in a specific order.
Table of Contents
• Introduction: The Travel Request Sequential Approval Flow
• Enable Get New Features Early Setting For The Environment
• Setup The SharePoint List
• Trigger The Sequential Approval Flow When An Item Is Created
• Add A Sequential Approval Action To The Flow
• Record The Sequential Approval Outcome
• Test The Sequential Approval Flow In Power Automate
• View The Sequential Approval History In The SharePoint List
Introduction: The Travel Request Sequential Approval Flow
Employees at a manufacturing company use Power Automate sequential approvals to get travel requests approved by management. Every travel request must be approved by the employee’s manager and their department head.
The sequential approval history is tracked in a SharePoint list.

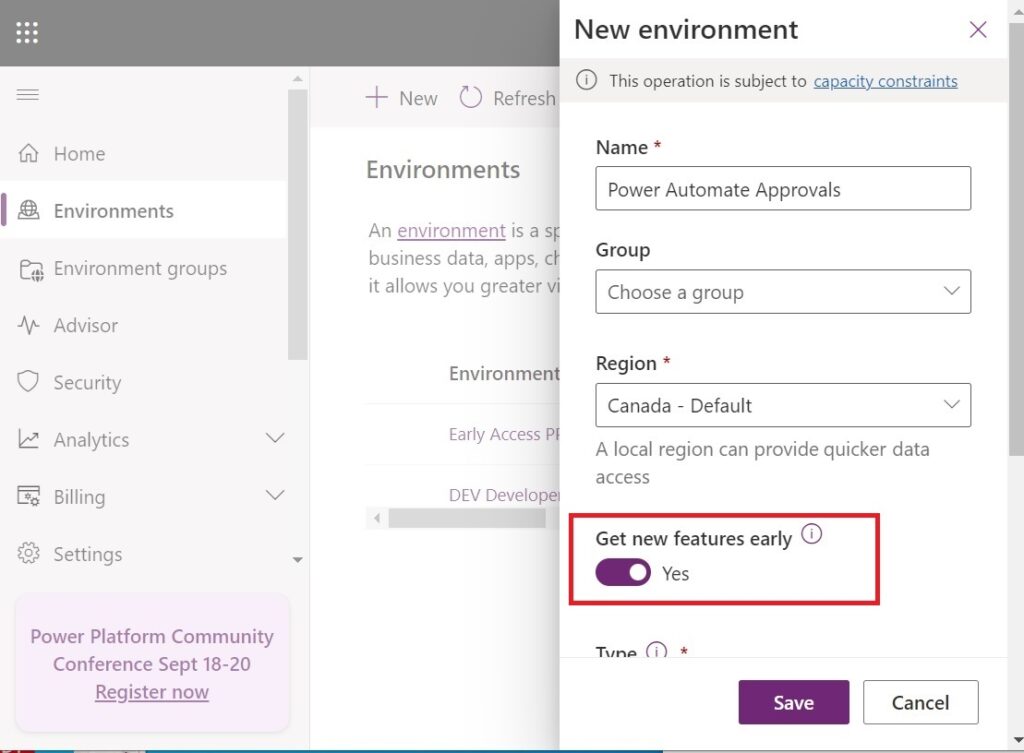
Enable Get New Features Early Setting For The Environment
At this time Power Automate sequential approvals are only available in preview. To enable preview features go to admin.powerplatform.com an create a new environment. Toggle on the Get new features early setting.
Setup The SharePoint List
Create a new SharePoint list named Travel Requests with the following columns and types:
- Destination (single line text)
- Start Date (date only)
- End Date (date only)
- Budget Amount (number)
- Requested By (person)
- Request Outcome (choice: new, submitted, approved, rejected)
- Approver 1 (person)
- Approver 2 (person)
- Approval History (multiple lines of text)
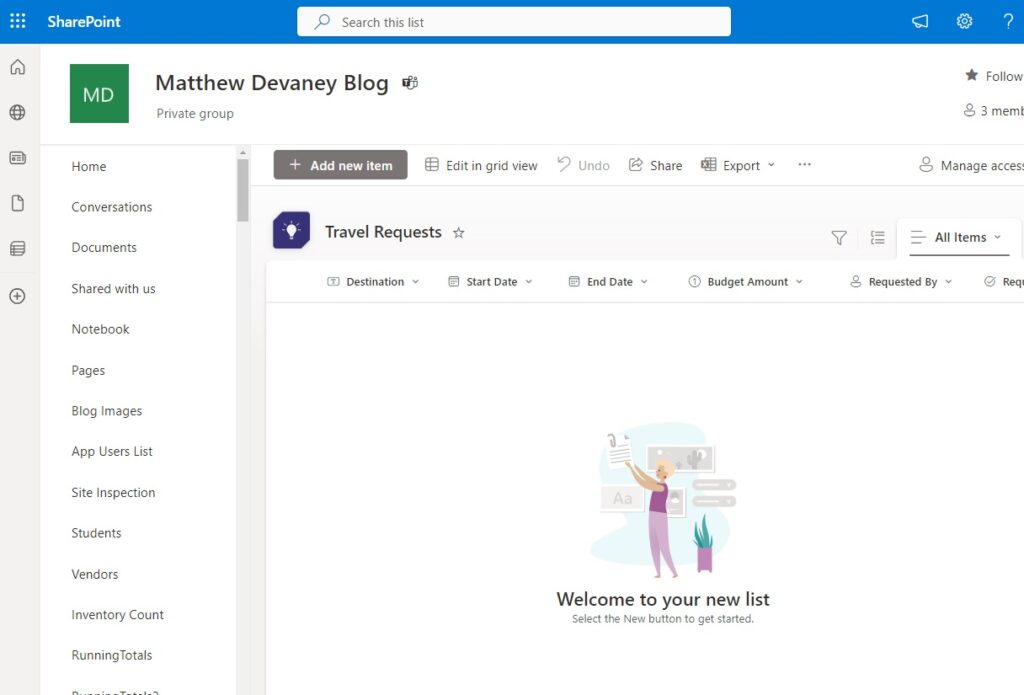
As an example, a new travel Request entered into the list the data will look like this:
Trigger The Sequential Approval Flow When An Item Is Created
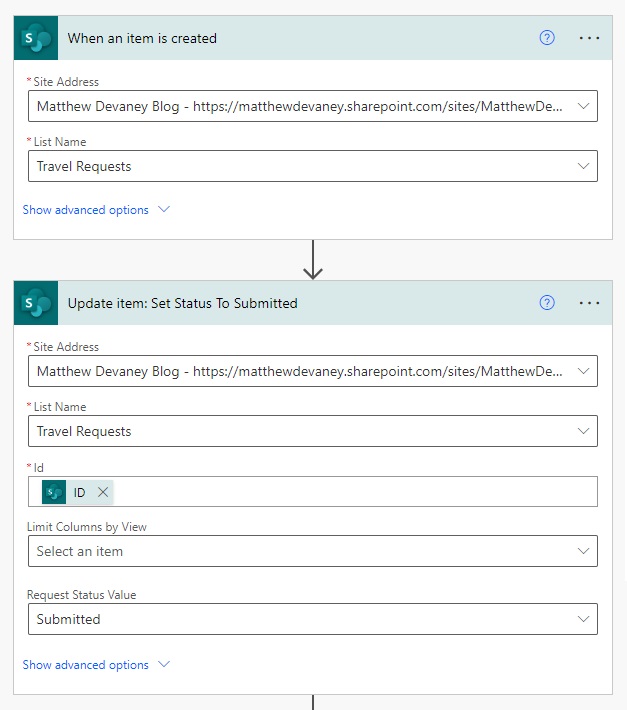
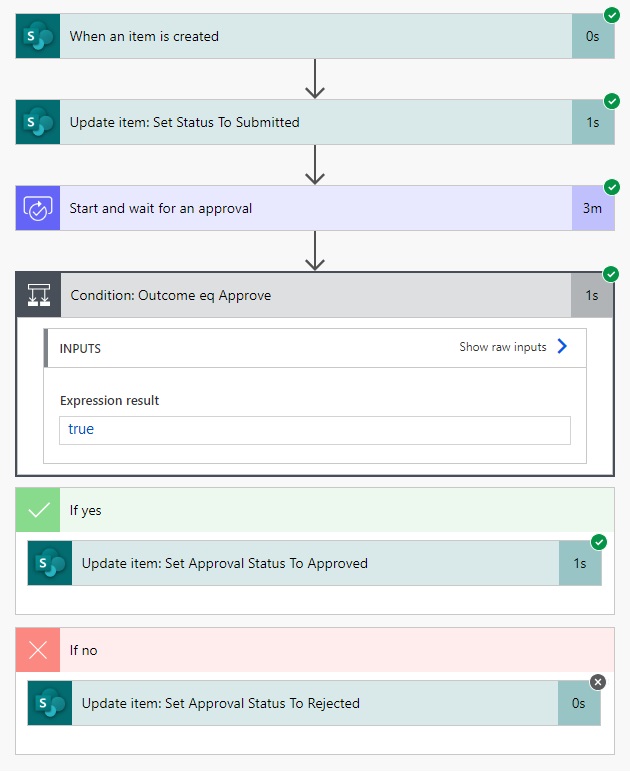
Open Power Automate and start a new automated flow. Select the SharePoint – When an item is created trigger and input the site address and list name.
We want to track the current approval status within the SharePoint list. Add a SharePoint – Update Item action directly after the trigger and set the Request Status field to submitted. This will let anyone who can view the list item know than an approval is in progress.
Add A Sequential Approval Action To The Flow
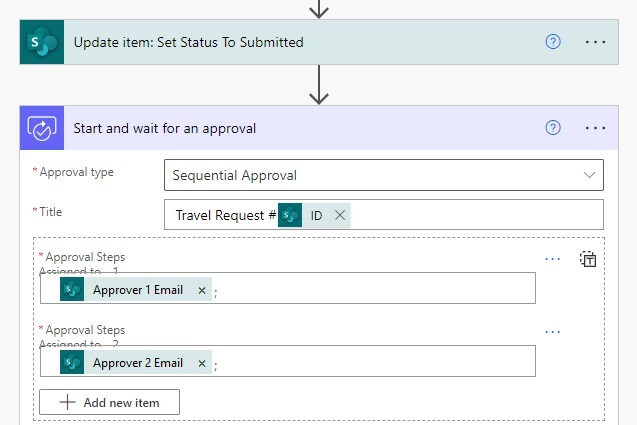
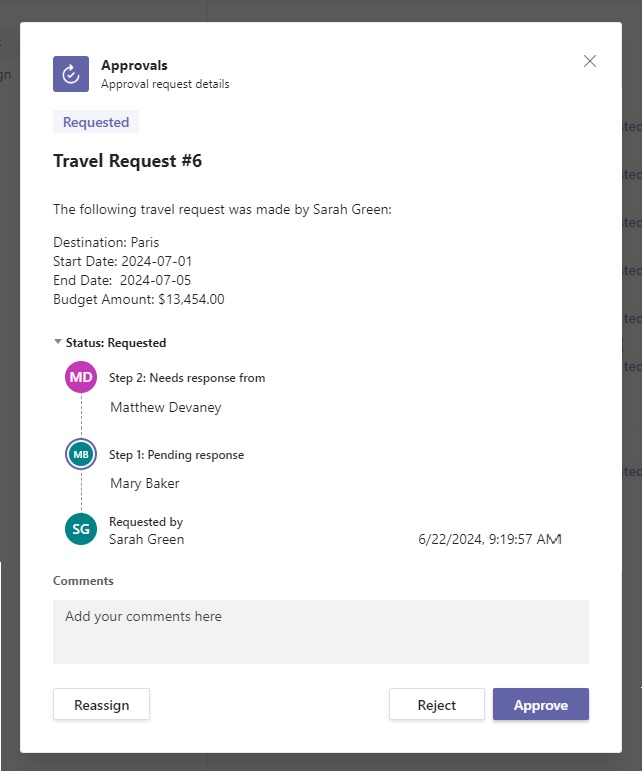
We want to send a Travel Request to two managers for approval one after the other. To do this add an Approvals – Start and wait for an approval action to the flow and select the approval type Sequential Approval. Load the Approver 1 Email into the Approval Steps – Assigned To 1 field. Then add another approval step and apply the Approver 2 Email.
Input additional details about the Travel Request to help the approvers make a decision. Include the Requested By Email in the Requestor field.
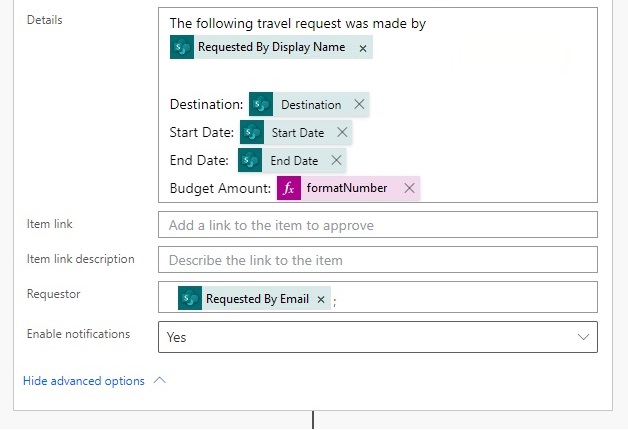
Use this expression to format the Budget Amount value as a currency with a dollar sign and two decimal places.
formatNumber(triggerOutputs()?['body/BudgetAmount'],'C2')
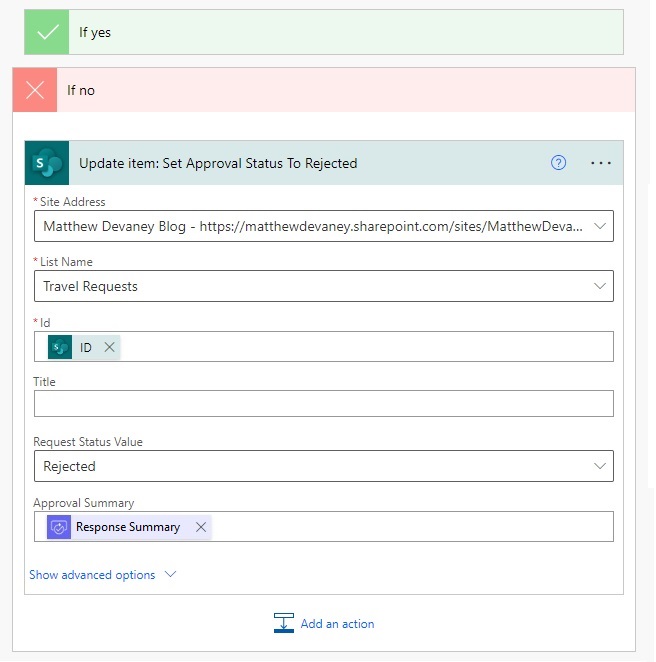
Record The Sequential Approval Outcome
After the sequential approval is completed we will want to know whether the approval was accepted or rejected. We also want to track the approval history including each approver, their response, when they received the approval request and when they responded.
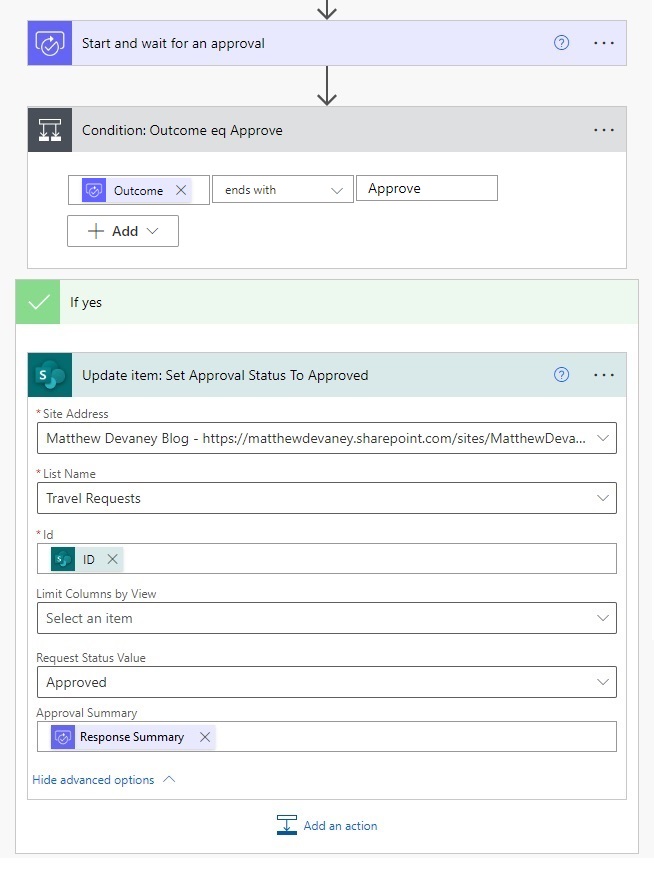
Add a condition action and check whether the outcome of the sequential approval ends with Approve. The outcome is a comma separated text string with the values Approve or Reject in order from the first approval to the last.
Then add a SharePoint – Update Item action inside of the Yes block. Set the Approval Status to Approved and the Approval Summary to the Response Summary dynamic value.
Inside of the No block set the Request Status to Rejected and also update the Approval Summary.
Test The Sequential Approval Flow In Power Automate
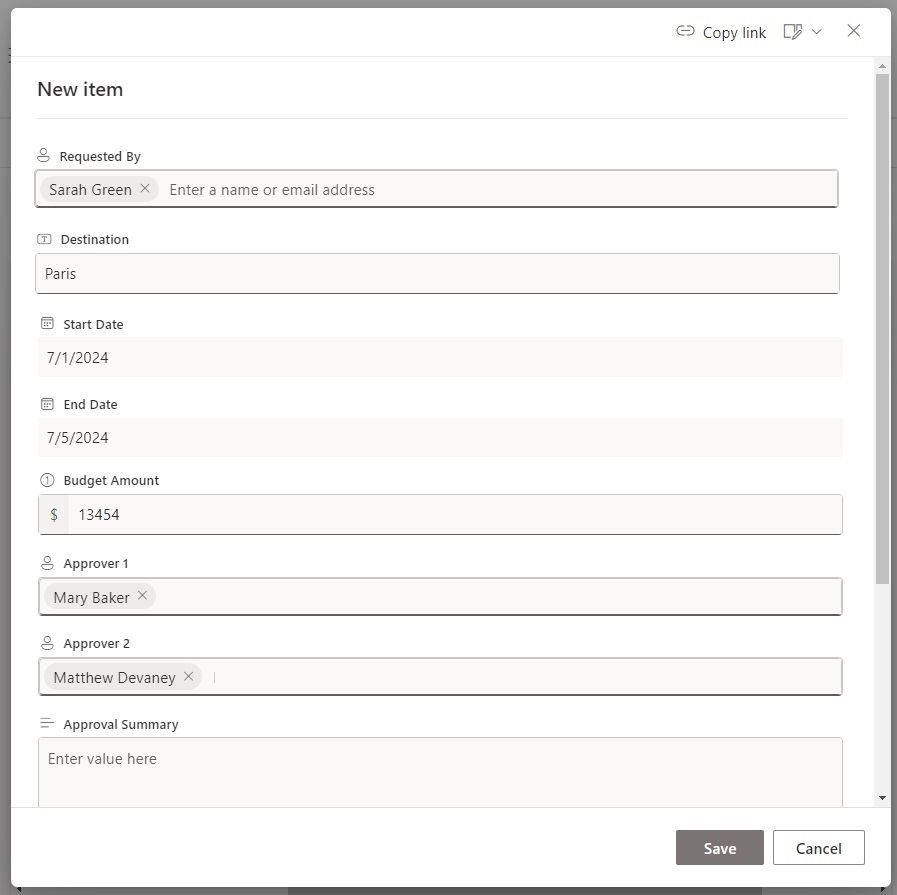
We’ve now built our sequential approval flow in Power Automate. Let’s test it out! Go to the SharePoint list and create a new item with the values shown below. Use the names of actual approvers within your own organization. Press save once finished.

After the SharePoint list item is created the approval will be sent to the first approver on the list.
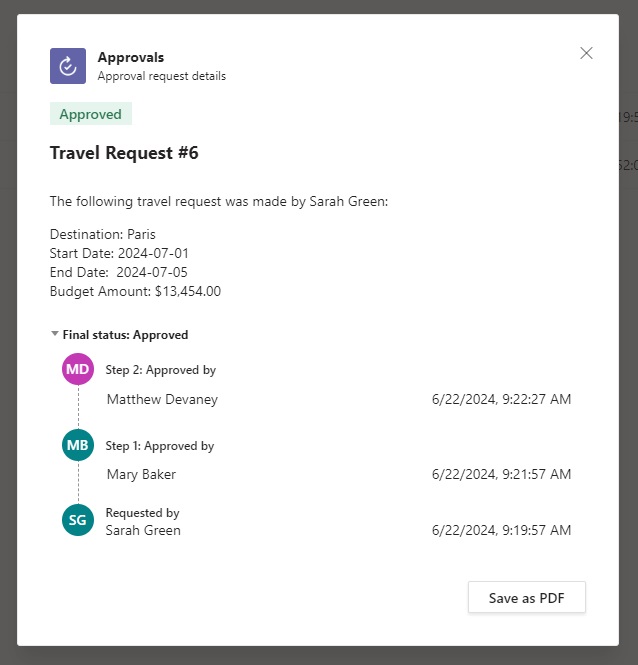
As the sequential approval is completed by each approver their responses a tracked along with a timestamp. The final outcome will be either Approved or Rejected.
View The Sequential Approval History In The SharePoint List
Once the sequential approval flow is completed we can view the approval history in the SharePoint list.
The history includes the final outcome, the approvers, their responses, approval request dates and response dates.

Did You Enjoy This Article? 😺
Subscribe to get new Power Apps & Power Automate articles sent to your inbox each week for FREE
Questions?
If you have any questions or feedback about Easiest Power Automate Sequential Approval Flow Pattern please leave a message in the comments section below. You can post using your email address and are not required to create an account to join the discussion.


Hello Matthew, I read your Tutorial about approvals and I want to congratulate you. But I have doubts about approvals. How to set the maximum approval date? Example:
Approval 1: Deadline for approval: 06/23, if I don’t approve, I send an email with delay information. It’s possible?
Another question: Is it possible to create a group of approvers: where all members see the request but only one approves it?
Tks.
Tiago Siqueira
Tiago,
Yes, its possible to send approval reminders. I have an upcoming article on this subject. If you wanted to set a due date where the flow expires you’d have to do that by updating the approval header record in Dataverse.
And yes again. Sequential approvals support a group of approvers where all members see the request but only one approves.
What a beautiful tutorial. She needed something similar to what you teach.
But one question: how and where can I create groups of approvers?
I need to notify 3 people per approval stage but when 1 approves, follow the flow to the next stage.
Gedean,
That’s what should be happening here. I believe one approval should be all it needs to advance to the next stage. If not, let me know and I’ll contact Microsoft about it.