Data Validation For Power Apps Forms

Data validation should be implemented in every Power Apps form. Ensuring information is received in the proper format means less work to standardize it later. Data accuracy is also important when creating trustworthy reports. But perhaps the most satisfying part is: when done well, data validation can improve the user experience by giving timely feedback.
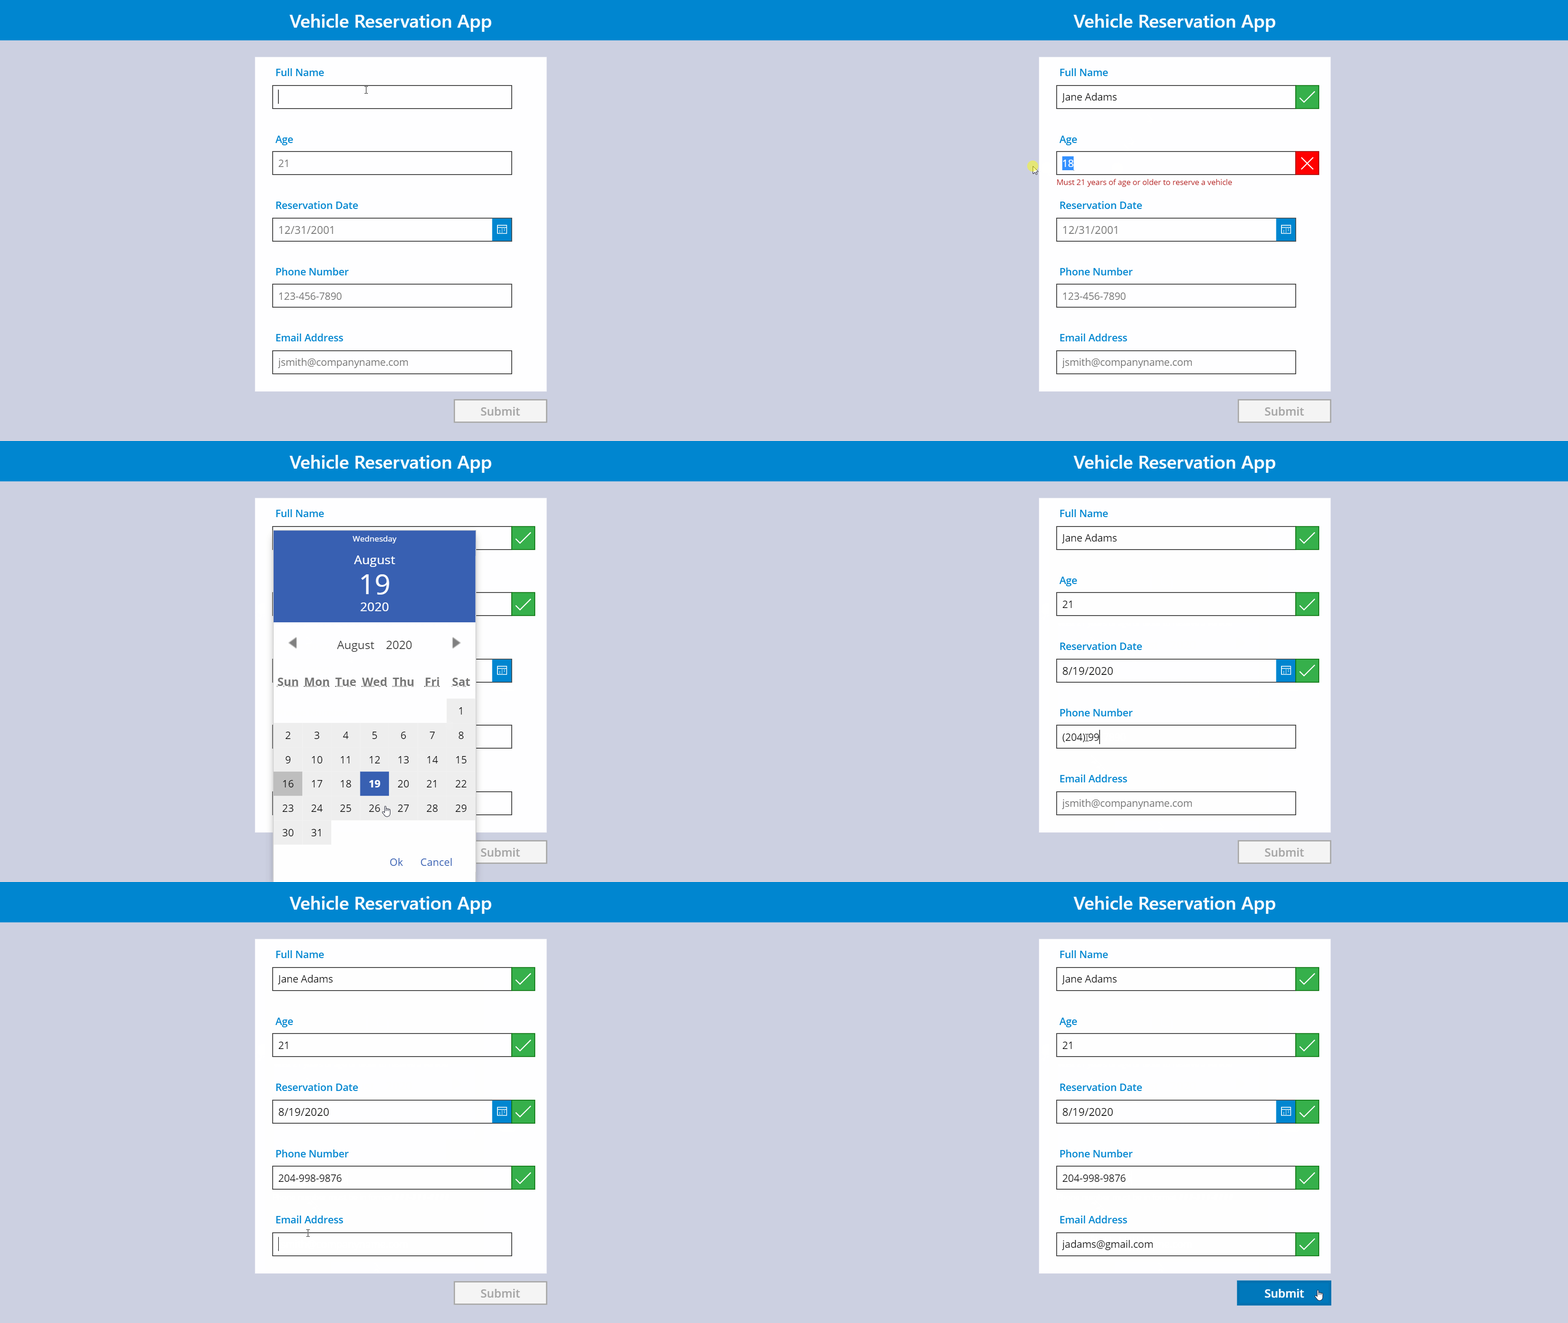
I will show you my simple method for performing data validation in Power Apps forms as seen in the image below.
Introduction: The Vehicle Reservation App
The Vehicle Reservation App allows employees to book a company car. Employees fill-in a form with information subject to the following criteria:
- Full Name – cannot not be blank
- Age – must be 21 years old or greater
- Reservation Date – can book only Monday-to-Friday. Must be a future date.
- Phone Number – must be in the format ###-###-####
- Email – must be in the format [email protected]

We want to data validation to occur at exactly the right-time to provide the best user experience. The moment a user leaves the current field and moves onto the next one they should be made aware of an error. Waiting until a form has been submitted is too late. Evaluating input while the user is still typing is too early.

Create The ‘Reserve A Vehicle’ Form
Open Power Apps Studio and create a new app from blank. Then make a variable called locShowValidation holding a true/false value for each field name to control when data validation is shown to the user. Initially, all fields are set to false and change to true when the OnChange property of an input field is triggered.
Put this code in the OnVisible property of the screen.
UpdateContext({
    locShowValidation: {
        FullName: false,
        Age: false,
        ReservationDate: false,
        PhoneNumber: false,
        EmailAddress: false
    }
});Code language: JavaScript (javascript)
Data Validation With Logical Expressions
The most common way to perform data validation is by using a logical expression: a statement that evaluates to either true or false.
Validating A Full Name Field
‘Full Name’ is a required field that cannot be blank. Place an icon control beside the Text Input for ‘Full Name’. Its symbol will change if validation was passed: a checkmark for success and an ‘X’ for failure

Write this code in the Icon property of the Icon.
Icon: If(!IsBlank(txt_FullName.Text), Icon.Check, Icon.Cancel)Code language: CSS (css)
Then style the icon by adding this code to each specified property.
BorderColor: If(Self.Icon=Icon.Check, DarkGreen, DarkRed)
Color: White
Fill: If(Self.Icon=Icon.Check, Green, Red)
Visible: locShowValidation.FullNameCode language: HTTP (http)
The icon should only appear once the user has entered data into the ‘Full Name’ text input and leaves the field. Make this happen by using the code below inside the OnChange property of the Text Input.
UpdateContext({locShowValidation:
    Patch(locShowValidation, {FullName: true})
});Code language: CSS (css)
When the ‘X’ icon is showing a failure the user should be told what changes need to happen. Insert a new label directly below the text input for ‘Full Name’ with this code in each property.
Text: "Field cannot be blank"
Visible: ico_FullName.Icon=Icon.Cancel And ico_FullName.Visible
Color: RedCode language: HTTP (http)
Once completed, data validation will now be working for the ‘Full Name’ field.
Validating The Age Field
An employee cannot reserve a vehicle unless they are 21 years of age or older.

Use the same method to create an Icon for ‘Age’ as was shown for ‘Full Name’ but change the logical expression in the Icon property to this instead.
If(Value(txt_Age.Text) >= 21, Icon.Check, Icon.Cancel)
Likewise, create a label underneath the text input for ‘Age’ using the previously shown method while having this text instead.
"Must 21 years of age or older to reserve a vehicle"Code language: JSON / JSON with Comments (json)
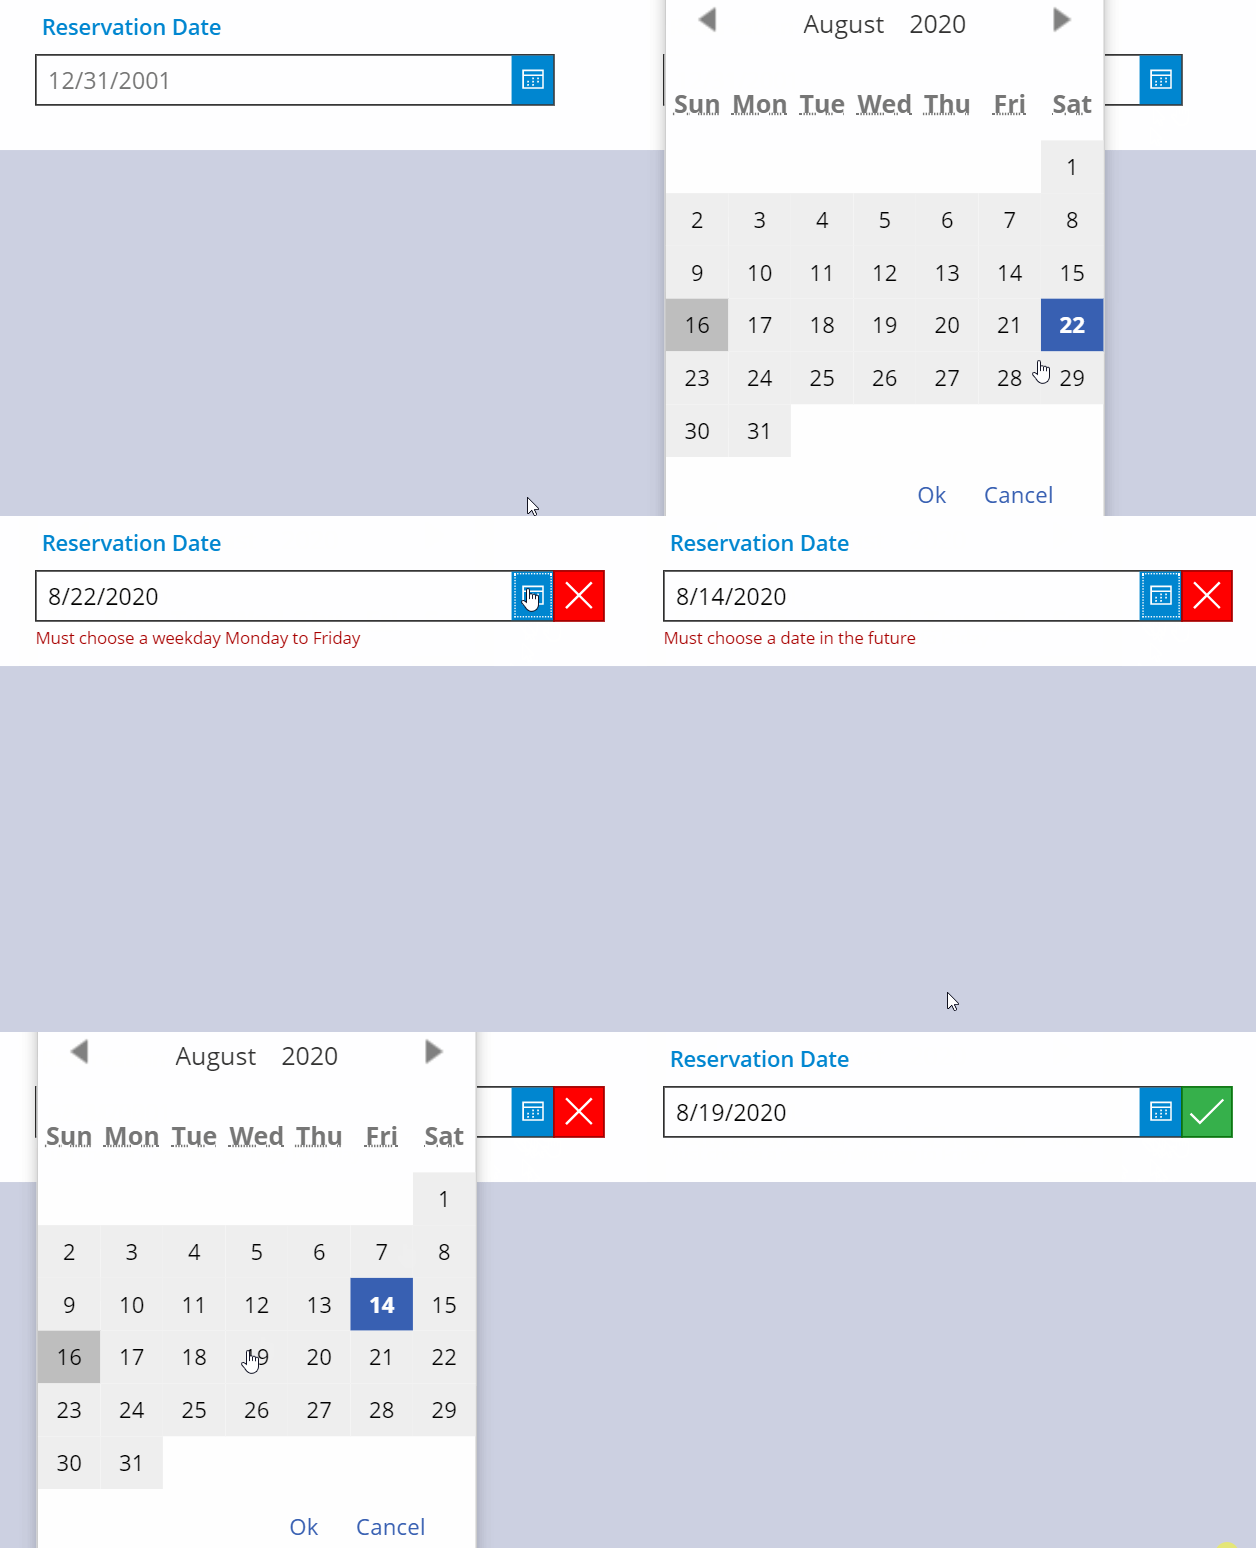
Validating The Reservation Date Field
Reservations may only be made for Monday-to-Friday and the booking must be for a future date.

Write this code in the Icon property of the Icon to ensure the input date matches both conditions
If(
    Weekday(dte_ReservationDate.SelectedDate, StartOfWeek.Monday) <= 5
    And dte_ReservationDate.SelectedDate > Today(),
    Icon.Check, Icon.Cancel
)Code language: HTML, XML (xml)
Then write a multi-condition IF function in the Text property of the error message label to describe which requirement was not fulfilled.
If(
    Weekday(dte_ReservationDate.SelectedDate, StartOfWeek.Monday) > 5,
    "Must choose a weekday Monday to Friday",
    dte_ReservationDate.SelectedDate <= Today(),
    "Must choose a date in the future",
    "No reservation date was selected"
)Code language: JavaScript (javascript)
Data Validation With Pattern Matching
A more sophisticated data validation technique can detect whether an input value has the required letters, numbers and symbols all in the correct positions. This technique is known as pattern matching.
Validating A Phone Number Field
Phone numbers must be entered in the format ###-###-####.

The ISMATCH function can be supplied a pattern of letters (Match.Letter), numbers (Match.Digit) and symbols joined together as a text-string to form a pattern. Explaining how to write patterns would require an entire article itself so I will refer you to the official documentation for the ISMATCH function instead.
Place this code in the Icon property of the Icon for ‘Phone Number’.
If(
    IsMatch(
        txt_PhoneNumber.Text,
        Match.Digit&Match.Digit&Match.Digit&"-"&
        Match.Digit&Match.Digit&Match.Digit&"-"&
        Match.Digit&Match.Digit&Match.Digit&Match.Digit
    ),
    Icon.Check,
    Icon.Cancel
)Code language: CSS (css)
Use this string as the text for the error message.
"Phone number must be in format ###-###-####"Code language: CSS (css)
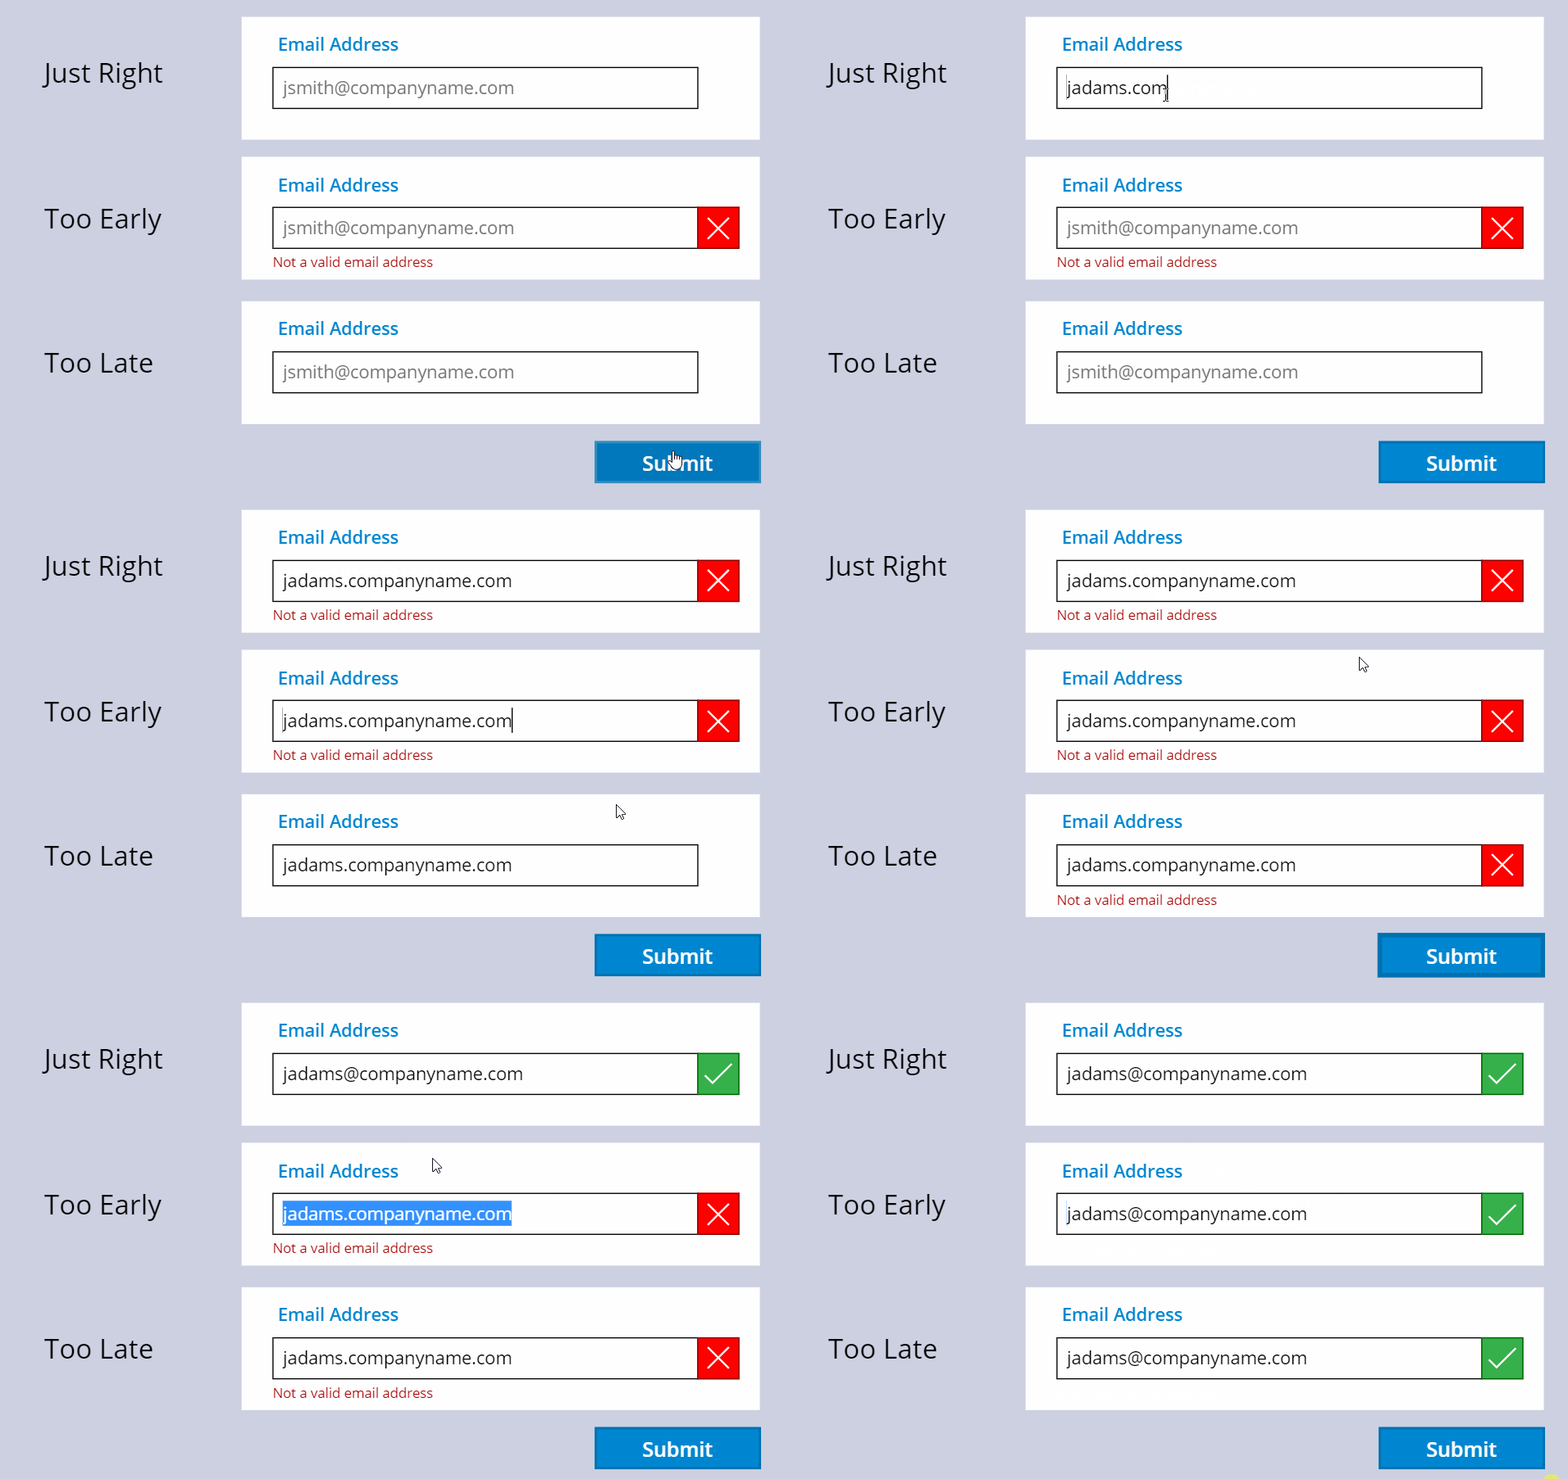
Validating An Email Address Field
An email address must be in the format [email protected]

Conveniently, a predefined matching pattern already exists for email addresses. Use this code in the Icon property of the icon for ‘Email Address’.
If(
    IsMatch(txt_EmailAddress.Text, Match.Email),
    Icon.Check,
    Icon.Cancel
)Code language: CSS (css)
This error message should be displayed if the pattern is not matched.
"Not a valid email address"Code language: JSON / JSON with Comments (json)
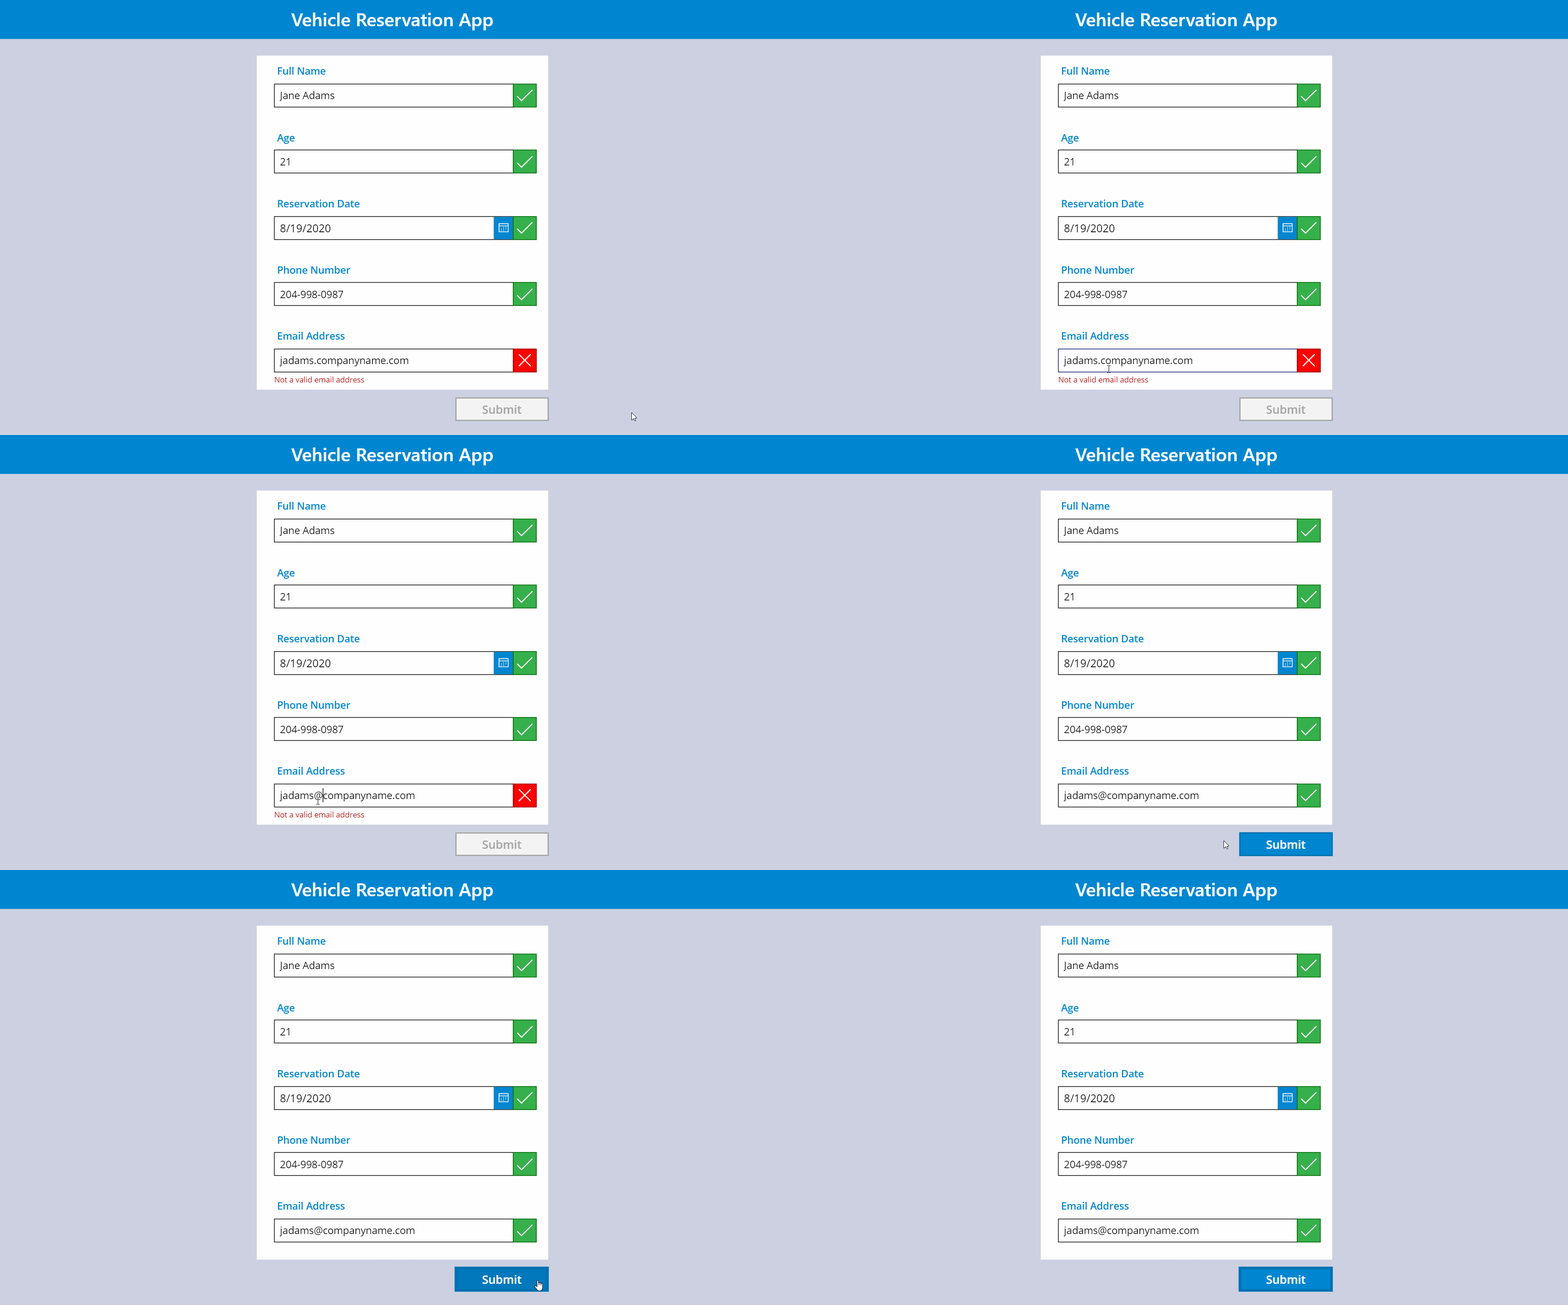
Submitting The Form
Users should only be allowed to submit the form once all fields have passed data validation.

Write this code in the DisplayMode property of the Submit button.
If(
    ico_FullName.Icon=Icon.Check
    And ico_Age.Icon=Icon.Check
    And ico_ReservationDate.Icon=Icon.Check
    And ico_PhoneNumber.Icon=Icon.Check
    And ico_EmailAddress.Icon=Icon.Check,
    DisplayMode.Edit,
    DisplayMode.Disabled
)
Did You Enjoy This Article? 😺
Subscribe to get new Copilot Studio articles sent to your inbox each week for FREE
Questions?
If you have any questions or feedback about Data Validation In Power Apps Forms please leave a message in the comments section below. You can post using your email address and are not required to create an account to join the discussion.


Wait… what is this?
UpdateContext({
    locShowValidation: {
        FullName: false,
        Age: false,
        ReservationDate: false,
        PhoneNumber: false,
        EmailAddress: false
    }
});
I don’t see an example of that in the docs. Looks like an array maybe?
Hi Ed,
locShowValidation is actually a ‘record’ type variable: 1 row of data with several columns. Per the docs, a variable may hold a single value, a record, a table, an object reference or a result from a formula.
Here’s the link to where I found this information.
https://docs.microsoft.com/en-us/powerapps/maker/canvas-apps/functions/function-set
Hope this helps!
Very nice. Well crafted.
Thank you for taking the time to read each week Krishna!
Very well written. Simplified the concept greatly. Thanks a ton.
Hi Matt,
Very nice article! Easy to understand. I tried for the date validation , it worked well !! . Thank you for posting this article!.
I just wanted to know how this can be achieved if i have a similar requirement on PowerApps form ? I’m not able to add locShowValidate inside any property on form.
Your help will be greatly appreciated! Thank you.
Hello Almeida,
My example uses locShowValidation inside a PowerApps form. Is it possible for you to try building my app as an example? You could then compare my app to yours and determine why locShowValidation is not working on your side.
Let me know what you think of this idea.
Hi Matthew… great article! I am implementing this approach on my PA forms. One question though, I have some combo boxes with no “Selected” value just HintText. Would I need to add a default selected value to be able to check validity manually like you do above?
What is the “valid” condition for your ComboBox? Is it simply that the ComboBox is required to be filled in? If you can give me all information needed to replicate one of them I’m happy to assist.
Yes, just a required value (value/id from a SharePoint List). I just did a quick insert form pointing to the SP List. So trying to remove clunky validation to something more pleasing to the eye lol.
I’ve had some time to think about your question and make a proof-of-concept app. What I found is: making a ComboBox required is exactly the same as making a text box required with one simple change.
Using my example for ‘Full Name’ in the article as a guide you would need to replace this code found in the OnChange property…
If(!IsBlank(txt_FullName.Text), Icon.Check, Icon.Cancel)
And put this code in the OnChange property of your ComboBox instead…
If(!IsBlank(ComboBox1.Selected), Icon.Check, Icon.Cancel)
All other code for the ComboBox would be exactly the same as the ‘Full Name’ text box.
Wow…thank you, would not have thought about the OnChange event. Thanks for your time Matthew! I look forward to learning from your examples!
Hi Matthew,
what would you recomend when we want to remove special character but also match them whith there non special correspondance ?
é => e
à => a
ç => c
…
Currently i’m using regex to validate the input but it’s not perfect and i’m not able to to the “translation”.
Any advice where i should look at ?
Thx for your time 🙂
I will share a general example of how to convert special characters in the word “éçolé” into normal characters. This process is called normalization.
// table of special characters mapping to normal characters
ClearCollect(colSpecialCharacters,
{Special: “é”, Normal: “e”},
{Special: “à”, Normal: “a”},
{Special: “ç”, Normal:”c”}
);
// Loop through all letters in the word éçolé and replace with normal characters
Set(colNormalizedWord,
Concat(
ForAll(Split(“éçolé”,””) As SplitWord,
If(SplitWord.Result in colSpecialCharacters.Special,
LookUp(colSpecialCharacters, Special=SplitWord.Result, Normal),
SplitWord.Result
)
),
Value
)
)
Thx for sharing and didn’t know about that process 🙂 Thx for the code too, very cool
Great article. I’m having an issue when I go in to edit the form (other fields not required for validation), I cannot submit due to the validation not occurring (my validation field is already populated). Do you have a solution for this please? Thanks
So maybe I am missing something here but if the textbox is blank to begin with or has a hint text and the person skips over it or even clicks the field and then out or tabs through then the onChange event is never fired. Am I missing something?
Hi Michael,
Did you ever solve this?
This solution is PERFECT (as are all of Matthew’s posts), but I’m having the same issue.
Thanks,
Steve
I still can’t think of a way to do this with a blank field that gets tabbed through Steve. At least me can make a disabled submit button at the end if all fields are not filled.
Is there currently any way of doing more advanced validation on these forms, specifically checking a value against another source (database/api)? In cases where a user is providing some kind of code, you can add regex to ensure the format is correct, but it would be great to validate the code actually exists before the form submission is complete
Hey Matthew, I’m still pretty new to PowerApps and your website is a real goldmine to get ahead!
I have been able to successfully implement these form validations in my app, but have a question:
Is there a way to reset “locShowValidation”? When I exit the form and reopen it, the “old” validations are still active, which is not so nice.
Thanks for your help & merry christmas!
Emile,
Yes, use this code right after the code you use to exit the form.
UpdateContext({
locShowValidation: {
FullName: false,
Age: false,
ReservationDate: false,
PhoneNumber: false,
EmailAddress: false
}
});
thank you so much! this worked out for me 🙂
Emile,
You’re welcome. I hope to write more on this topic in the future.
Nice article with very useful content. I used it and worked perfectly.
Thank You for putting all this hard efforts.
Hi Matthew, I’m still relatively new to PowerApps and have been learning quite a bit from here.
I have a form that allows users to update data previously submitted. What I’d like to do is to validate all the text inputs (Around 20), and see if any changes made to the data. If no changes made at all, the ‘Update’ button would be disabled. The moment, one of the text input is modified, the button would be enabled.
Any suggestions on how to do that?
Thanks!
Jin,
Suppose that your form has item property with a record called ‘varFormData’
You could use some code like this in the DisplayMode property of your Update button to change it from disabled to enabled.
If(Or(TextInput_Field1.Text <> varFormData.Field1, TextInput_Field2.Text <> varFormData.Field2, TextInput_Field3.Text <> varFormData.Field3), DisplayMode.Edit, DisplayMode.Disabled)
Thanks! but I’m confuse where i put this code ? and how to set variable locShowValidation? please provide details the other your methods are clear
UpdateContext({
locShowValidation: {
FullName: false,
Age: false,
ReservationDate: false,
PhoneNumber: false,
EmailAddress: false
}
});
Berihun,
You must do this in the OnVisible property of the screen. The paragraph directly above the mentions this.
Thank you Matthew Devaney! and one more question where I put the variable ‘locShowValidation’?
Hi Matt, love this solution and it works really well! Except in the case of a combo box… I have set the locShowValidation for this combo box to true on the OnChange event, and to false everywhere else, including on selecting an item in the gallery to display in the form in edit mode. For some reason, the behaviour of the combo box triggers the OnChange event each time a new record is selected, even if the value selected is the same as the previous record! Therefore it shows the valid icon when the other icons do not show, it looks inconsistent and is confusing. Just wondering if you have any thoughts on this? Many thanks! 🙂
Hi,
All the validations worked for me, but the error check mark is visible when new form is opened.
I am using SharePoint online as a data source.
Can you please give me some idea?
Thank you!
Meskerem,
Change the Visible property of the checkmarks so that it is not visible while the form is in ViewMode.
Visible property:
Form1.Mode<>FormMode.View
Hi there, Matthew, Thanks for this great tutorial! All is working well except for one thing.
When a form is in New Mode, all of my combo boxes are showing the error message and the red x marks upon opening. When I change the combo box to the selection, then the x turns to a check mark and turns green.
All other fields work perfectly. The check marks do not show up until I exit or bypass a field.
Any idea what the issue might be?
Hi Matthew, Thanks for much for this information, it has been incredibly helpful.
However, please can you explain what the Visible property in your text below is doing? What does ico_FullName.Icon mean please?
Unfortunately I get an error saying that ico_ProjectName- is not a valid name.
Text: “Field cannot be blank”
Visible: ico_FullName.Icon=Icon.Cancel And ico_FullName.Visible
Color: Red
Any help you can provide would be greatly appreciated.
Thanks.
Pete
Peter,
ico_FullName is the name of an icon object that sits beside the full name field. “Icon” is a property of the icon object that defines which icon it displays.
Great Tutorial. Very clean and easy-to-follow validation that I have used in a form with many input fields. This is the best way I have found to display errors and prevent them being entered.
Ben,
Thank you for saying this 👆 😊
Hi Matthew,
Great tutorial as always and very easy to follow and replicate. I also did a test validating the user picks an item from a drop-down menu.
For e.g. So instead of DataCardValue1.text it would be DataCardValue.SelectedItems.
How did you get the UpdateContext to true in the OnSelect to work on the dropdown?
Mine remains false even though I have this code:
UpdateContext({locShowValidation:
Patch(locShowValidation, {Subject: true})
});
If I set Visible to true, I can see the Icon change from green to red etc. So I know that part is working.
Hi Matthew Devaney,
I know the post is long ago, but wanted to ask is there a way to know exactly the field not filled or edit on the form? I try Form.unsaved is always true even not edited the form and what is the best approach? thanks
Excellent tutorial. Thank you for providing this. Any thoughts on how you would validate an attachment control? I have an app that requires an attachment to be included with a submission. Appreciate your expertise.
JCH.
I would use this logic to check for an empty attachments field:
!IsEmpty(AttachmentControlName.Attachments)