Make A Power Apps Approvals Form

One of the most common uses for Power Apps is creating a form for employees to fill-in and have it approved by multiple people. A quick of example of this is a Vacation Request app where time-off must by approved by a manager and by the human resources department. Building a form to collect information for this app would be straightforward but how can you send the form to each approver and get them to sign-off?
In this article I will show you how to make a Power Apps approvals form with multiple approvers, send approval requests via email and visualize the approvals progress with a progress indicator component.
I/T Equipment Requests App
The I/T Equipment Requests App allows employees of a company to ask for a new Desktop PC, Laptop, Monitor or Keyboard & Mouse. All requests must be approved by the direct manager of the employee and the I/T manager before they are fulfilled.
Create a new SharePoint list called ‘I/T Equipment Orders with the following columns:
| Column | Type | Description |
| Equipment | Choices | Include these choices: Desktop PC – $1000 Laptop – $1500 Monitor – $300 Keyboard & Mouse – $80 |
| Status | Choices | Include these choices: New Submitted Approved By Manager Rejected By Manager Approved By IT Manager Rejected By IT Manager |
| Request Date | Date | Date the original request was made |
| Employee | Person | Employee who made the request |
| Manager | Person | Manager of the person who made the request |
| IT Manager | Person | IT Manager of the company |
| Comments | Multiline Text | Employee can provide a justification for the request of new equipment |
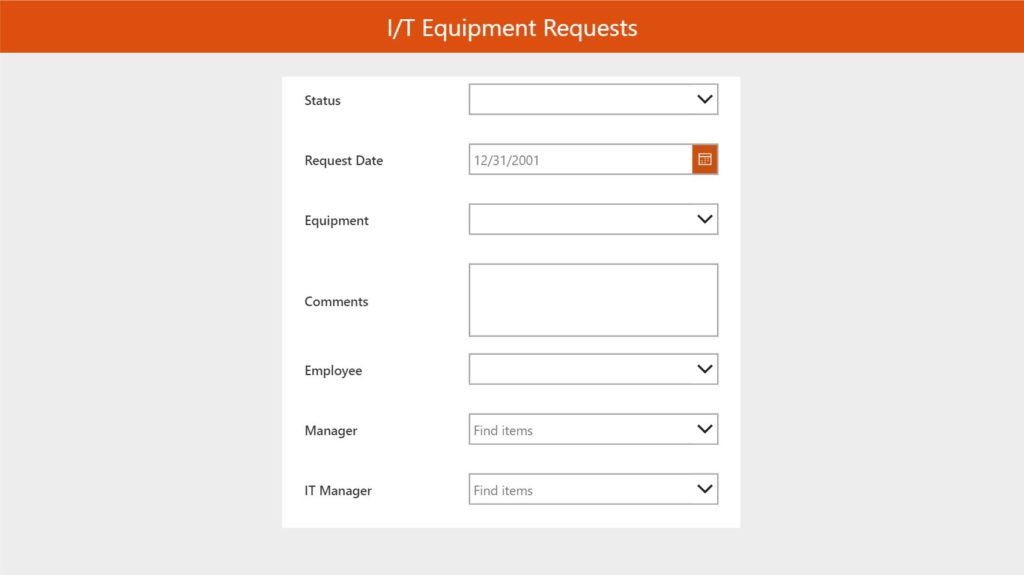
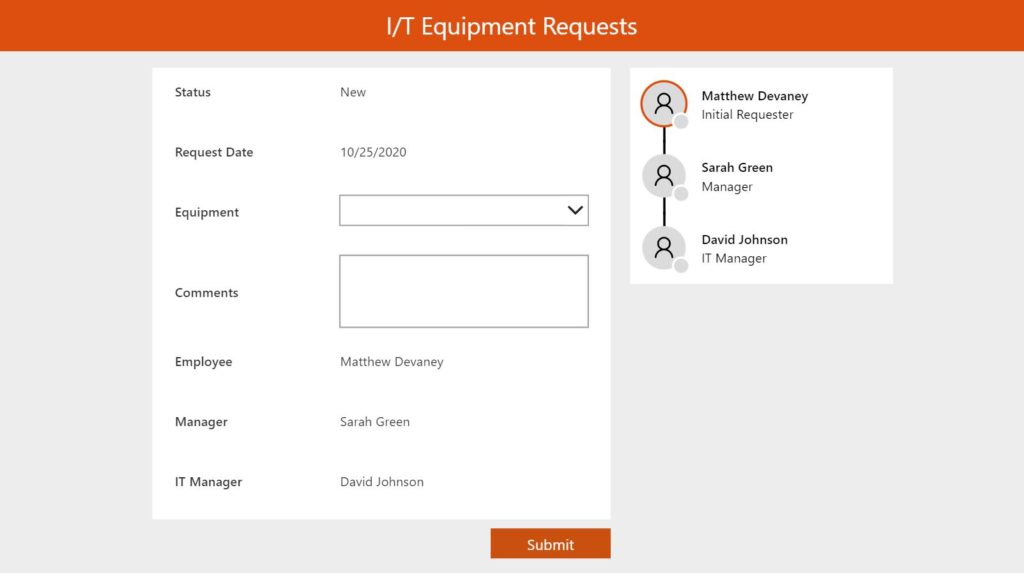
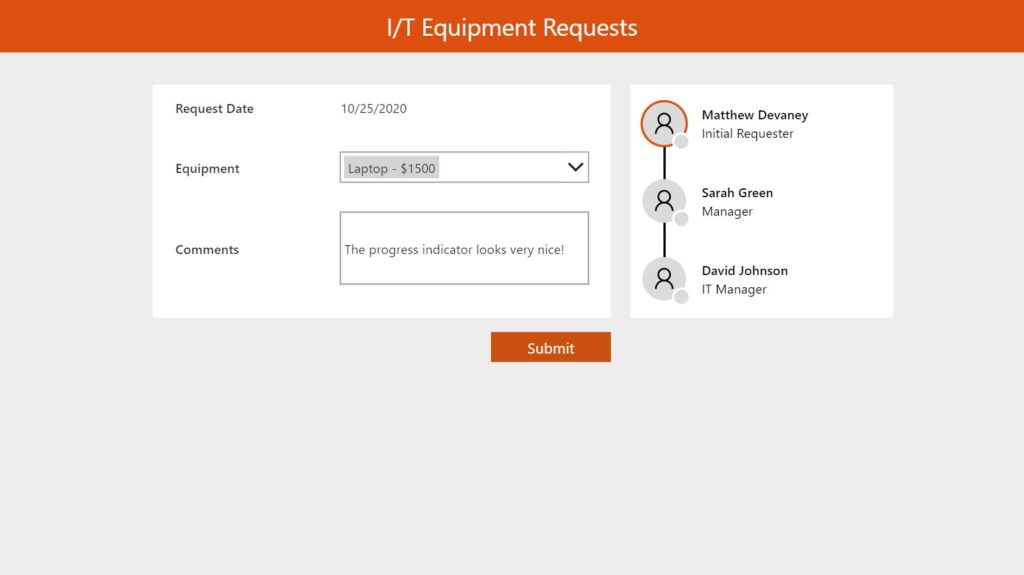
Start a new canvas app from blank in Power Apps Studio called IT Equipment Requests App. Connect your IT Equipment Orders SharePoint list to the app and add an Edit Form to the screen. Arrange the form’s fields in a single column as shown below.
Submit A New Request
An employee chooses the equipment they would like to request, writes a justification in the comments field and clicks submit to send the form to their manager for approval. The other fields of the form should be filled-in automatically to prevent data-entry errors.
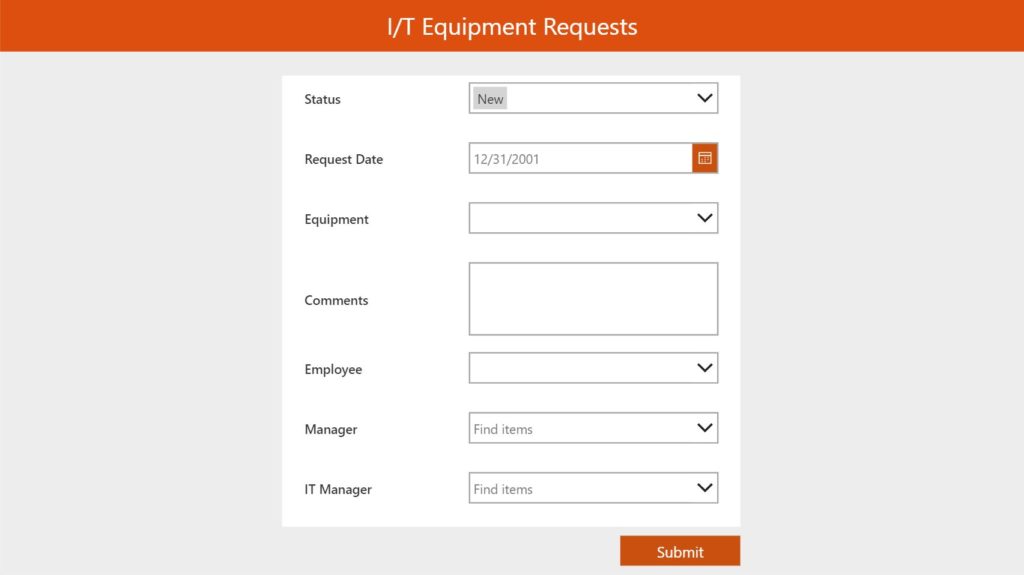
Status Field
The request status should be ‘New’ prior to submission and then switch to ‘Submitted’ when the employee clicks a button. Use this code in the Default property of the Status card
If(
    frm_Request.Mode=FormMode.New,
    {Value: Coalesce(varStatus, "New")},
    ThisItem.Status
)
Then create a submit button at the bottom of the form and include this code in the OnSelect property.
Set(varStatus, "Submitted"); SubmitForm(frm_Request);
Now the request form should look like this.
Request Date
The request date should always be the day the employee submitted the form. Type this code into the Default property of the Request Date card.
If(frm_Request.Mode=FormMode.New, Today(), ThisItem.RequestDate)
Employee Field
The employee field should automatically populate with the name of the person who is submitting the form. To write person type data to the SharePoint list we must use some special code in the Default field of the Employee card.
If(
    frm_Request.Mode = FormMode.New,
    {
        '@odata.type': "#Microsoft.Azure.Connectors.SharePoint.SPListExpandedUser",
        Claims: "i:0#.f|membership|" & User().Email,
        Department: "",
        DisplayName: User().FullName,
        Email: User().Email,
        JobTitle: "",
        Picture: ""
    },
    ThisItem.Employee
)
Manager Field
The manager of the employee making the request can be found by using the Office365Users connector. Add this connector to your app and use this code in the Default property of the Manager card
With(
    {wManager: Office365Users.ManagerV2(User().Email)},
    If(
        frm_Request.Mode=FormMode.New,
        {
            '@odata.type':"#Microsoft.Azure.Connectors.SharePoint.SPListExpandedUser",
            Claims:"i:0#.f|membership|" & wManager.mail,
            Department:"",
            DisplayName: wManager.displayName,
            Email: wManager.mail,
            JobTitle:"",
            Picture:""
        },
        ThisItem.Manager
    )
)
IT Manager
The IT Manager field should default to the name of the company’s IT Manager. We will hard-code this information into the app but in the real-world this information would likely be obtained from another SharePoint list holding the names of people in key company roles. Put this code in the Default property of the IT Manager card.
If(
    frm_Request.Mode=FormMode.New,
    {
        '@odata.type':"#Microsoft.Azure.Connectors.SharePoint.SPListExpandedUser",
        Claims:"i:0#.f|membership|" & "[email protected]",
        Department:"",
        DisplayName: "David Johnson",
        Email:"[email protected]",
        JobTitle:"",
        Picture:""
    },
    ThisItem.ITManager
)
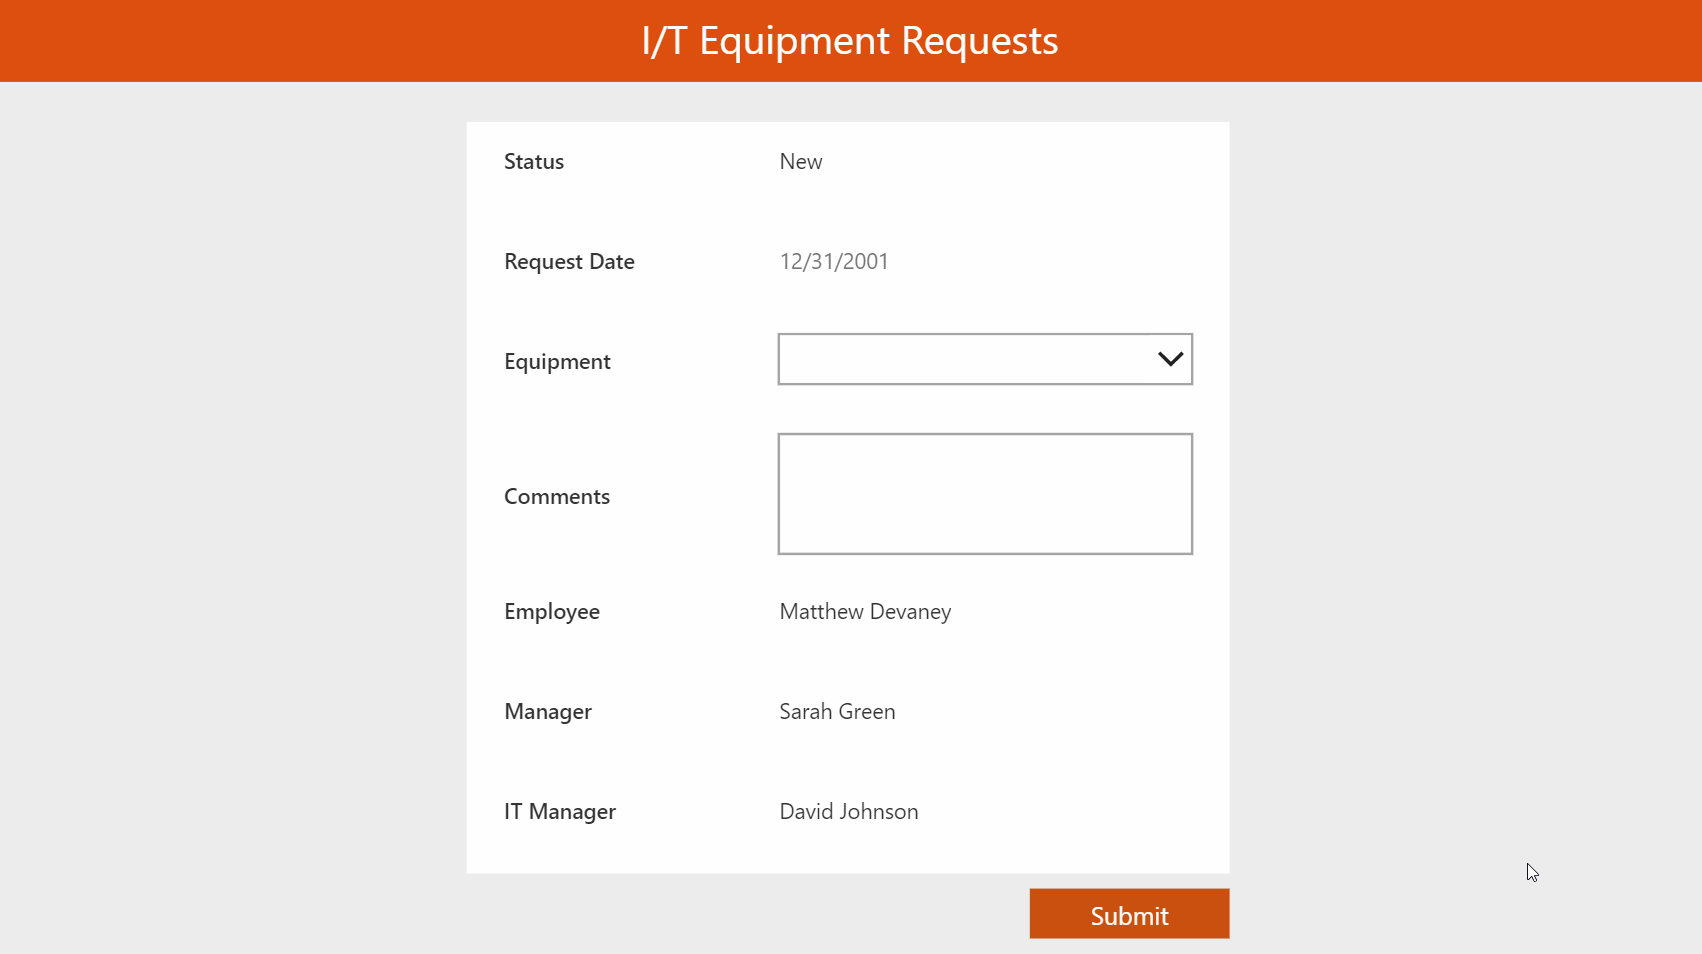
Preventing Data Entry In Fields
We do not want employees to change the default values in Status, Request Date, Employee, Manager and IT Manager fields. Turn off the ability to make edits by updating the DisplayMode property to this code in each of their cards
DisplayMode.View
The I/T Equipment Requests App should now look like this.

Finishing Touches
A few more lines of code are needed to make the form submit a new request. Write this code in the following properties of the form
DefaultMode:
FormMode.New

Item:
varRequest

OnSuccess:
ViewForm(frm_Request);
Set(varRequest, frm_Request.LastSubmit);
Finally, we want to make the Submit button disappear when the form has been submitted. Put this code in the Visible property of the button.
Form_EquipmentRequest.Mode=FormMode.New
Now an employee can submit the form.
Approvals By Managers
When an employee creates a new request an email is sent to their direct manager asking for a approval. The manager clicks on the link in the email which opens Power Apps to the filled-in request form.
Two new buttons appear on the screen: ‘Approve’ and ‘Reject’. Approving the form will send an email to the IT Manager. If they also approve the employee will receive a notification that their request was approved. Or, if either of the managers click Reject then the employee will get an email stating that the request was denied.
App OnStart Setup
To facilitate the sending of email with links to open the app place the following code in the OnStart property of the app. You should use your own App Play URL rather than the one I’m showing here.
// store the app play url in a variable
Set(varAppID, "https://apps.powerapps.com/play/d475e8ac-6b20-3ad2-e1e1-45cecad28c1d?tenantId=g1b6b210-30a6-4b5d-7e47-cg3d4f7c11ff");

// lookup the request by id number and store in a variable
Set(varRequest, LookUp('IT Equipment Orders', ID=Value(Param("recordid"))));

// open the app in view-only mode if a matching request id is found
If(IsBlank(varRequest), NewForm(frm_Request),  ViewForm(frm_Request));
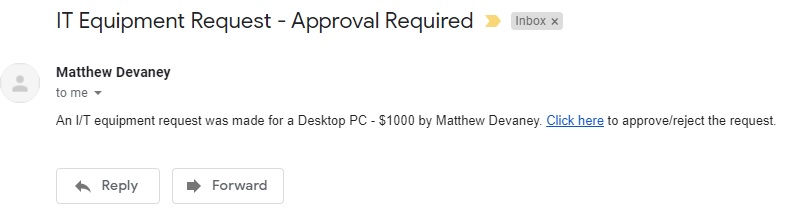
Email When A New Request Is Submitted
To send emails directly from Power Apps add the Office365Outlook connector. Then write this code in the OnSuccess property of the form. This code will send an email to the manager when a new request is submitted.
ViewForm(frm_Request);
Set(varRequest, frm_Request.LastSubmit);
If(varRequest.Status.Value="Submitted",
    Office365Outlook.SendEmailV2(
        varRequest.Manager.Email,
        "IT Equipment Request - Approval Required",
        "An I/T equipment request was made for a "&varRequest.Equipment.Value&" by "&varRequest.Employee.DisplayName&".  <a href="""&varAppID&"?recordid="&varRequest.ID&""">Click here</a> to approve/reject the request."
    )
)
The email generated by the code above will appear like this in the manager’s inbox.
Approve & Reject Buttons
The approve and reject buttons should replace the submit button at the bottom of the form when the request is being reviewed. Place two buttons at the bottom of the form as shown in the image below.

When the approve is clicked an email will be sent to the next person in the approvals process. Copy and paste this code into the OnSelect property of the approval button.
If(
varRequest.Status.Value="Submitted",
Set(varRequest, Patch('IT Equipment Orders', LookUp('IT Equipment Orders', ID=varRequest.ID), {Status: {Value: "Approved By Manager"}}));
Office365Outlook.SendEmailV2(
varRequest.ITManager.Email,
"IT Equipment Request - Approval Required",
"An I/T equipment was made for a "&varRequest.Equipment.Value&" by "&varRequest.Employee.DisplayName&". <a href="""&varAppID&"?recordid="&varRequest.ID&""">Click here</a> to approve/reject the request."
),
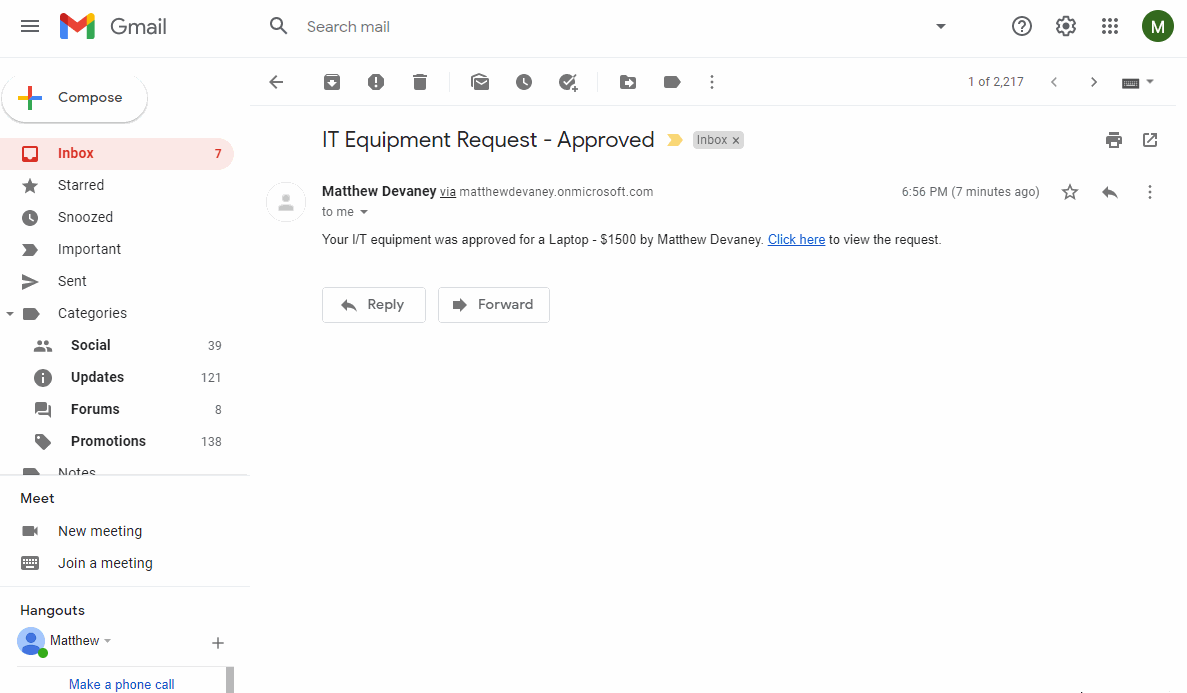
varRequest.Status.Value="Approved By IT Manager",
Set(varRequest, Patch('IT Equipment Orders', LookUp('IT Equipment Orders', ID=varRequest.ID), {Status: {Value: "Approved By IT"}}));
Office365Outlook.SendEmailV2(
varRequest.Employee.Email,
"IT Equipment Request - Approved",
"Your I/T equipment was approved for a "&varRequest.Equipment.Value&" by "&varRequest.Employee.DisplayName&". <a href="""&varAppID&"?recordid="&varRequest.ID&""">Click here</a> to view the request."
)
)
Oppositely, when the reject button is pressed the approvals process will stop and the employee will be notified about the declined request. Copy and paste this code into the OnSelect property of the Reject button.
If(
    varRequest.Status.Value="Submitted",
    Set(varRequest, Patch('IT Equipment Orders', LookUp('IT Equipment Orders', ID=varRequest.ID), {Status: {Value: "Rejected By Manager"}}));
    Office365Outlook.SendEmailV2(
        varRequest.Employee.Email,
        "IT Equipment Request - Rejected",
        "Your I/T equipment was rejected for a "&varRequest.Equipment.Value&" by "&varRequest.Employee.DisplayName&".  <a href="""&varAppID&"?recordid="&varRequest.ID&""">Click here</a> to view the request."
    ),

    varRequest.Status.Value="Approved By Manager",
    Set(varRequest, Patch('IT Equipment Orders', LookUp('IT Equipment Orders', ID=varRequest.ID), {Status: {Value: "Rejected By IT Manager"}}));
    Office365Outlook.SendEmailV2(
        varRequest.Employee.Email,
        "IT Equipment Request - Rejected",
        "Your I/T equipment was rejected for a "&varRequest.Equipment.Value&" by "&varRequest.Employee.DisplayName&".  <a href="""&varAppID&"?recordid="&varRequest.ID&""">Click here</a> to view the request."
    )
)
The email sending feature has now been completed. All that is needed is this final piece of code to show the buttons only when the request is being reviewed by a manager. Put this code in the Visible property of both buttons.
(varRequest.Status.Value="Submitted" And User().Email=varRequest.Manager.Email) Or (varRequest.Status.Value="Approved By Manager" And User().Email=varRequest.ITManager.Email)
Go ahead and test the app to make sure the send email and approve/reject features we implemented work.
Progress Indicator Component (Optional)
The approvals form will be functional at this point but it could still benefit from some additional styling. I have created a component to visualize the status of an Approval which you can download for free from the Power Apps Community.
If you would like to add the component to your app click here and then import it into your Power Apps environment. The component looks like this
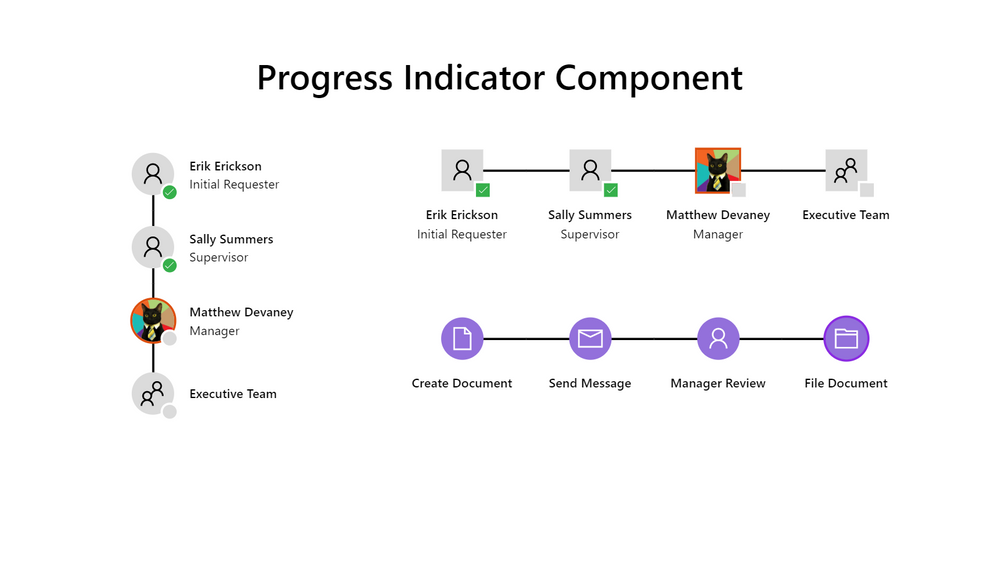
Insert the vertical progress indicator component next to the request form and place this code into the Items property. This tells the component how to behave as it changes statuses.
Table(
    {
        Title: ComboBox_Employee.Selected.DisplayName,
        Subtitle: "Initial Requester",
        Icon: Icon.Person,
        Image: Blank(),
        Status: If(ComboBox_Status.Selected.Value = "New", Blank(), "Success"),
        IsCurrent: ComboBox_Status.Selected.Value = "New"
    },
    {
        Title: ComboBox_Manager.Selected.DisplayName,
        Subtitle: "Manager",
        Icon: Icon.Person,
        Image: Blank(),
        Status: If(
            ComboBox_Status.Selected.Value in ["Approved By Manager", "Approved By IT Manager", "Rejected By IT Manager"],
            "Success",
            ComboBox_Status.Selected.Value = "Rejected By Manager",
            "Fail",
            Blank()
        ),
        IsCurrent: ComboBox_Status.Selected.Value = "Submitted"
    },
    {
        Title: ComboBox_ITManager.Selected.DisplayName,
        Subtitle: "IT Manager",
        Icon: Icon.Person,
        Status: If(
            ComboBox_Status.Selected.Value = "Approved By IT Manager",
            "Success",
            ComboBox_Status.Selected.Value = "Rejected By IT Manager",
            "Fail",
            Blank()
        ),
        Image: Blank(),
        IsCurrent: ComboBox_Status.Selected.Value = "Approved By Manager"
    }
)
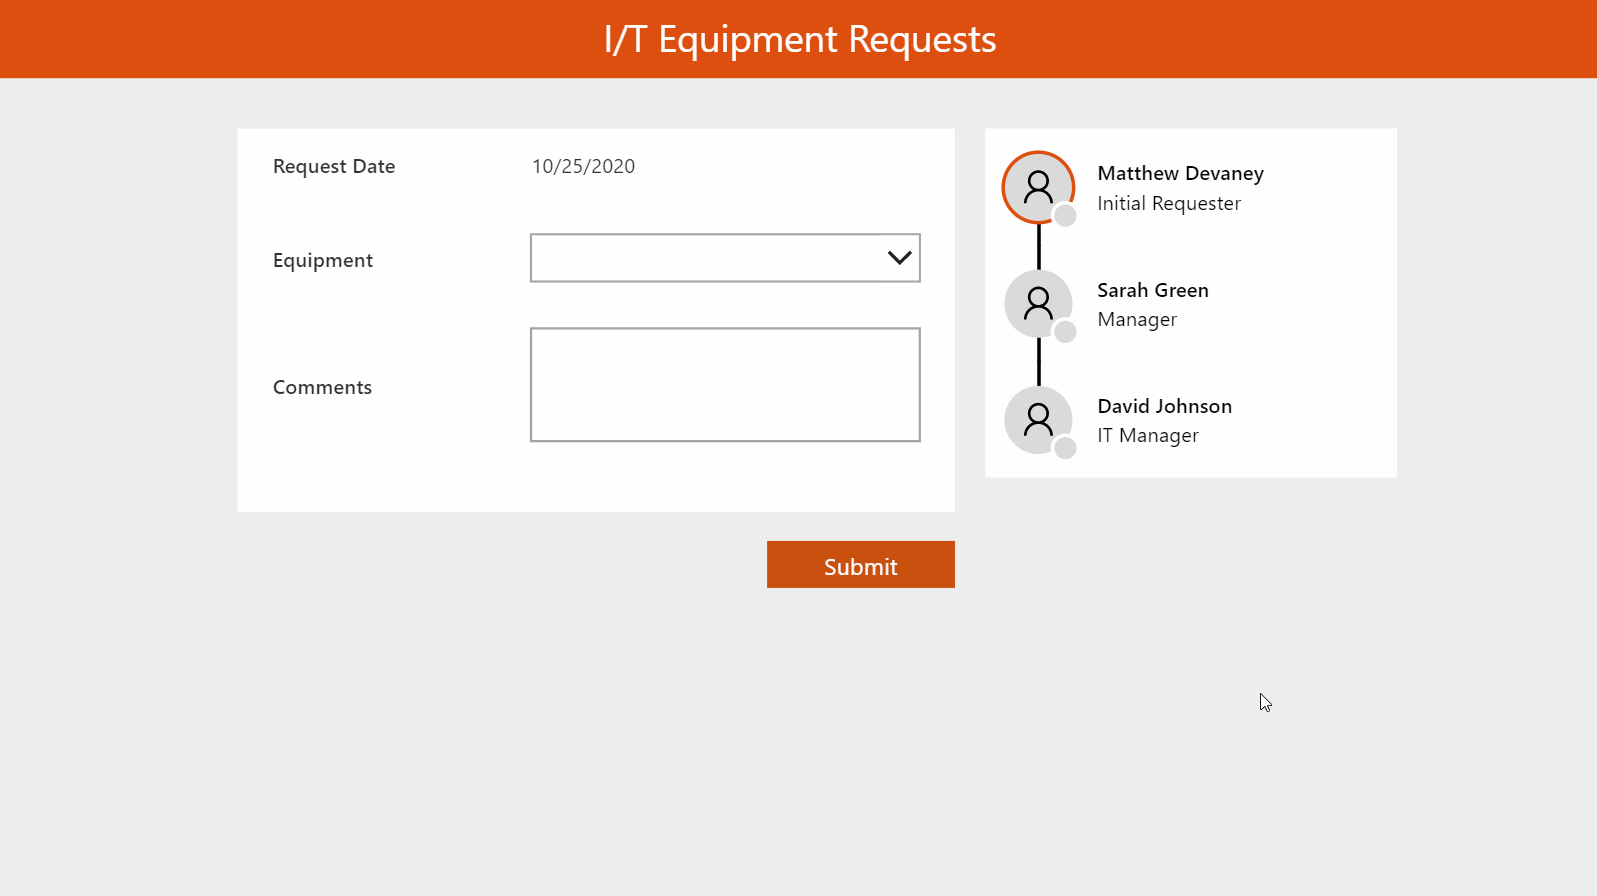
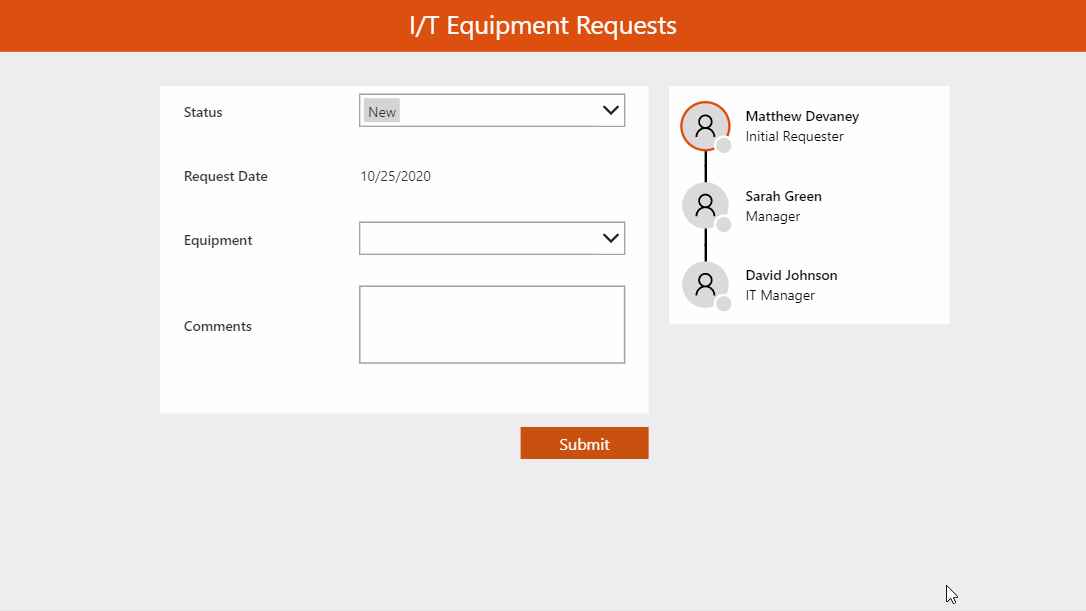
After updating the items property the app appears as shown below. Please note, the progress indicator has the ability to show the person’s Office 365 user image but I have chosen to simply use icons instead.
We no longer need to show the form’s fields for Status, Employee, Manager and IT Manager because they are visualized by the component. Go to the the Visible property for each of their cards and set it to false. Now the app user can understand the status of the approval process much more quickly.
Here’s how the progress indicator shows for each status. (I have unhidden the status ComboBox temporarily in this picture to change the status).
Did You Enjoy This Article? 😺
Subscribe to get new Power Apps articles sent to your inbox each week for FREE
Questions?
If you have any questions or feedback about Make A Power Apps Approvals Form please leave a message in the comments section below. You can post using your email address and are not required to create an account to join the discussion.


Hello Matthew,
Thanks for sharing this amazing blog.
I was trying to implement the above I got an error with the formula of the Default property of the Manager Card, and I have modified the formula as below to make it work:
With(
    {wManager: Office365Users.ManagerV2(User().Email)}, // Here you forgot the comma

    If(
        frm_Request.Mode=FormMode.New,
        {
            '@odata.type':"#Microsoft.Azure.Connectors.SharePoint.SPListExpandedUser",
            Claims:"i:0#.f|membership|" & wManager.mail,
            Department:"",
            DisplayName: wManager.displayName,
            Email: wManager.mail,
            JobTitle:"",
            Picture:""
        },

    ThisItem.Manager // This should be inside "IF" scope
    )
)
Thanks again!!
Julien,
I would like to say thank you so much for taking the time to give me this feedback. Its hard being my own editor and I would not have caught this small syntax error without you. Its now been corrected and I owe you a debt of gratitude.
Hey Matt
Great article. Your Progress Indicator Component is awesome, so simple and effective.
Keep up the excellent work.
Matt
I’m glad you enjoy the Progress Indicator component Matt. Thank you for giving it a vote on the Power Apps community webpage!
I’m getting an issue with the display of the initial requestor stage in the horizontal version. The role label appears to be overlapping the name label partially obscuring it. The vertical variant of the component displays fine. It displays fine in preview mode but not when playing the app. I have posted to the Power Apps galleries site with a screen shot.
Dean,
I was not able to find your post on the forums so I sent a message to your email. Hopefully you can send me a copy of the app so I can see the issue for myself.
Hi love this it is truly a great app, I have an issue though. it all works until I try to open the email to accept or reject, the link will open the app but not to the required record, the on success seems to work but the
Set(varRequest, LookUp(‘IT Equipment Orders’, ID=Value(Param(“recordid”))));
Doesn’t seem to be working, any suggestions?
Thank you
Hello Matthew, Awesome illustration, please any ideas how to use to component for multiple statuses. For instance, i have like 6 statuses Submitted, Checked by Admin, Approved by Legal, Rejected By Legal, Approved By Finance, Rejected By Legal, Completed……Would really appreciate. Thanks
Hello Ade,
I think you would just need to put the status of the stage into the status field on its record, right? Please check out the first code block in the section titled ‘Progress Indicator Component (Optional)’.
Hi Matthew, thanks for making this post and all of your others.
I was wondering if it would be possible, if rejected, the requestor can edit their original request and resubmit it, rather than start a new request each time?
Ben,
Yes, that’s possible. In fact I do it all the time! It requires a small re-write to the logic but essentially you’ll want to set the Form Mode to Edit for the original requestor once if the status is rejected. Then it will allow a resubmit. A little more refactoring… and it’ll work.
Hi I have an issue though.when I try to open the email to accept or reject, the link will open the app but not to the required record, the on success seems to work but the
Set(varRequest, LookUp(‘IT Equipment Orders’, ID=Value(Param(“recordid”))));
Doesn’t seem to be working, any suggestions?
Thank you
Hi Matthew,
Thanks for the sharing.
I have a question. The user should have edit access of sharepoint to use the power app. What if the user go to sharepoint and change the status directly? Thanks.
Eric,
The user should not go to SharePoint and change the status directly. There are ways to hide the SharePoint list from the user. I will write about this eventually. You can do it using PowerShell.
You should also communicate to the user that they should not change anything from the SharePoint list.
Thanks Matthew! I followed your steps. And it’s working fine. I will use the same approach to create several approvals forms for the business users.
I ill have to try the suggested:
ViewForm(frm_Request);
Set(varRequest, frm_Request.LastSubmit);
If(varRequest.Status.Value=”Submitted”,
Office365Outlook.SendEmailV2(
varRequest.Manager.Email,
“IT Equipment Request – Approval Required”,
“An I/T equipment request was made for a “&varRequest.Equipment.Value&” by “&varRequest.Employee.DisplayName&”. <a href=”““&varAppID&”?recordid=”&varRequest.ID&”““>Click here</a> to approve/reject the request.”
)
)
although I think I saw a minor syntax tweak.
What I was going to do is try to send on the submit button, onselect after the submit/save form commands BUT had issues with formula/syntax. on sucess seems like a better trigger anyway.
I want to email the form sharepointform1 but to a specific email address, title/subject, full form (submitted in body)
What is that string/syntax please?
I dont want to rely on an alert from the SPO list etc.
Thanks
Joe
Also can someone exoplain or provide a URL that does as to:
Office365Outlook.SendEmailV
or Office365Outlook.SendEmailV2
what do the diffrent sendemails do?
I gather you cant just employ mailto:
and you must have an outlook or exchange connector of course
Joseph,
Office365Outlook.SendEmail vs Office365Outlook.SendEmailV2 are different versions of the same connector. V2 has more actions, takes different inputs and outputs the results in a different way from V1 in some actions. I disagree about using mailto:, its best to use the connector built by Microsoft specifically for the purpose of sending email.
Helloo,
Thanks for posting this! was very helpful.
I was just playing around with this app and tried to change the equipment column to accept multiple values in SharePoint and in power apps. (allow multiple set to true)
After doing this though, the whole app stopped submitting. (it will submit if no values are added to equipment drop down)
I’m thinking this is an issue with the update property of the card not accepting the right values.(equipment is now a table column not a record)
Would anyone happen to know a way around this so that i can submit multiple equipment choices to one record in a list?
Thanks!
Hello,
Sorry but I’ve a silly question (I’m a newbie at Power Apps) but what is the varStatus? I’ve tried the code
If(
frm_Request.Mode=FormMode.New,
{Value: Coalesce(varStatus, “New”)},
ThisItem.Status
)
In the default property of my status card (Status_DataCard2) and also my Status Card value (DataCardValue11) but I keep getting the errors ‘Invalid Argument Type (Text).Expecting a Control value instead.’
I am also getting same error.
Paste this code Set(varStatus, “Submitted”); SubmitForm(frm_Request); in OnSelect Property of the button. Then the error will be disappear.
Hello
thanks so much for sharing such grate efforts .
i tried to use the same in my app . but i am facing a problem to map the Employee Fieldto my app . would you please help what shall i replace in Employee Field code to match my app ?
Abdo,
You mentioned you are facing a problem. What’s the problem? Do you have an error message to share?
Well, I have a form and along with it the user will gonna add Dynamic approvers to its request, It can be 5 – 10 approvers.
and those approvers will get approvals one by one and only if the first approver, approves…
I want to create a form along with adding mutiple approvers and saving them it into different lists.
FormList for Form Details and ApproversList for that Form Details ID.
any Guide?
Mustafa,
I do not currently have such a tutorial for dynamic sequential approvals.
Oh Thanks, well if you ever make this kind of scenario, please kindly post
This is amazing! Thank you so much for all your work. Just a quick question. If I want to make this part of a single app for my work unit rather than an app on its own can I still put the provide syntax in ‘onstart’ or should it go on the ‘invisible’ control for the screen?
Melissa,
I don’t understand what code you are asking about 🙁
Sorry the section:
App OnStart Setup
To facilitate the sending of email with links to open the app place the following code in the OnStart property of the app. You should use your own App Play URL rather than the one I’m showing here.
I’m wondering if I should put the code you mention here in the ‘on visible’ control for the screen as my is part of a bigger app.
I got an error: Invalid operation: division by zero.
I have attached a varible var_statur for “Status” below:
Items
Table(
{Title: “A”, Subtitle: “A”, Icon: Icon.Person, Image: Blank(), Status: var_status},
{Title: “B”, Subtitle: “B”, Icon: Icon.Person, Image: Blank(), Status: var_status}
)
But when I firstly open app I have an error Invalid operation: division by zero.
Can Table not init when open app
Quyet,
I suggest you open the Monitor tool to see where the error is happening for divide by zero and fix that code.
Hi Matthew, excellent post!
I was wondering if it would be possible, if “rejected”, the requestor can edit their request and resubmit it to the approver who rejected it, rather than start a new request each time?
what do i need to change in the code? Could you help me, please?
Ramon,
You can accomplish it by changing the Status back to its previous value.
Hi Matthew, I am encountering a network error when using the SubmitForm function. The Error is “Netwrok error when using Patch function: the request operation is failed”. Can you explain where am doing mistake?
Thank You Matt !
Hi Matt, When Submitting the data, [Onselect: Submitform(frm_Request)] it is throwing an error “Netwrok error when using Patch function: the request operation is failed“. I worked in plethora of ways but didn’t find solution.
Hello Matthew,
If it’s not too much trouble i’d like to request for help regarding the status,approval,reject and submit buttons. They are invisible and never show when i use your code, In addition the request date is stuck on 12/31/2001 as well as It manager isn’t working. Any help would be really appreciated
Aeri,
More details needed. Show me the code in the Visible property of your buttons. Then show me what each part of the code evaluates to using screenshots.