Power Apps Component With An OnSelect Property

This week Power Apps components received an important update: they now support behavior properties such as OnSelect & OnChange. Ever since components were released it was seen as missing feature. Power Apps developers had to resort to work-arounds to trigger code in an app based on when a behavior-property fired. Well, no more. The true potential of canvas app components is now unlocked!
In this article I will teach you how to build a Power Apps Component with an OnSelect property.
Table Of Contents
Introduction: Pop-Up Menu Component
Enable Enhanced Component Properties
Add A Behavior Property For The Cancel Button
Cancel Button OnSelect Property In The App
Add A Behavior Property For The OK Button
OK Button OnSelect Property In The App
Introduction: Pop-Up Menu Component
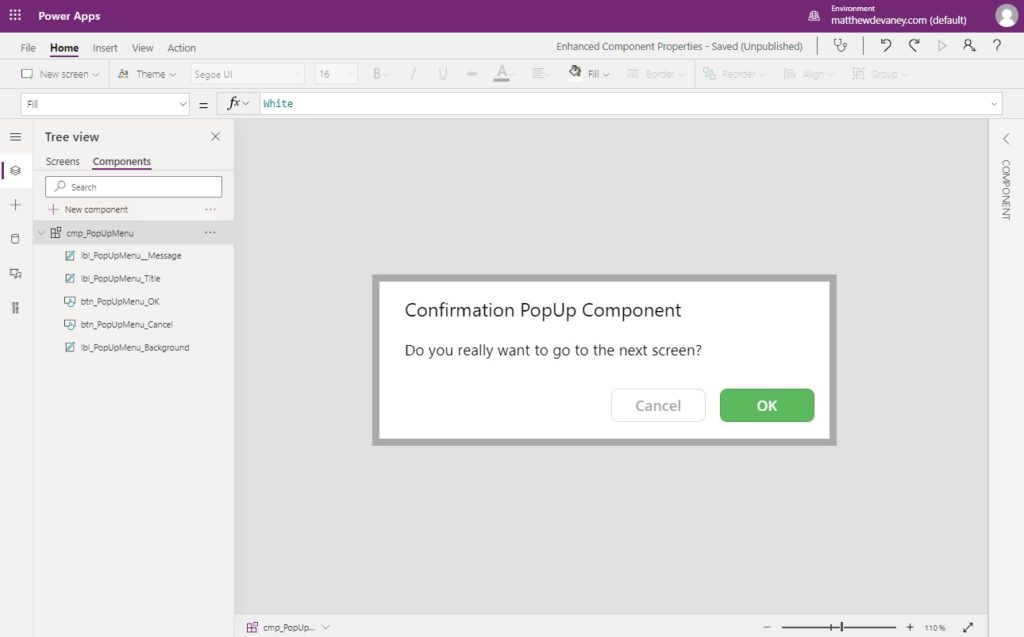
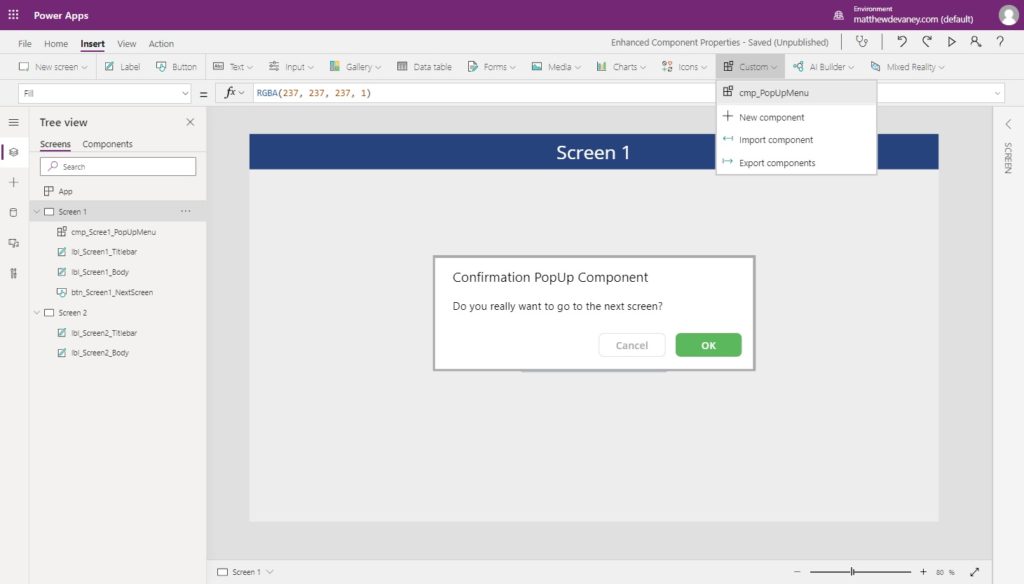
In the sample app we will build together the user clicks a button on Screen 1 to navigate to Screen 2. When the button is clicked a pop-up menu component appears and asks “do you really want to go to the next screen?” The user can choose either OK to proceed or Cancel to stay on the same screen.

Enable Enhanced Component Properties
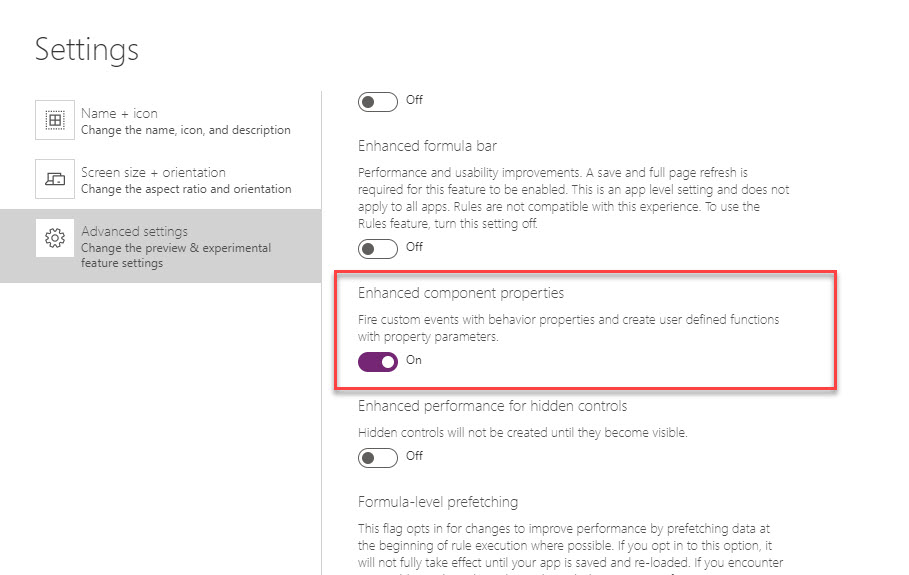
Behavior type custom properties are an experimental feature at this time. To use them you must open the advanced settings menu and turn on Enhanced Component Properties.
Add A Behavior Property For The Cancel Button
Open Power Apps Studio and create a new canvas app from blank. Then go to the components editor and create a new component named cmp_PopUpMenu. Insert a label onto the screen to show the Title, another label for the pop-up message and two buttons with the text OK & Cancel. You can also place another label at the bottom of the component with a dark-colored border to define its edges.
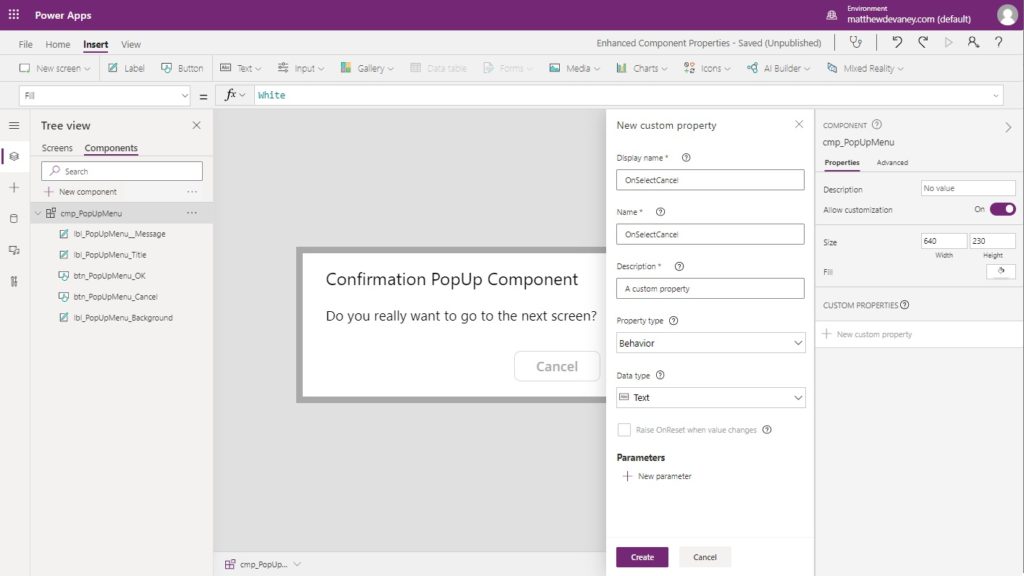
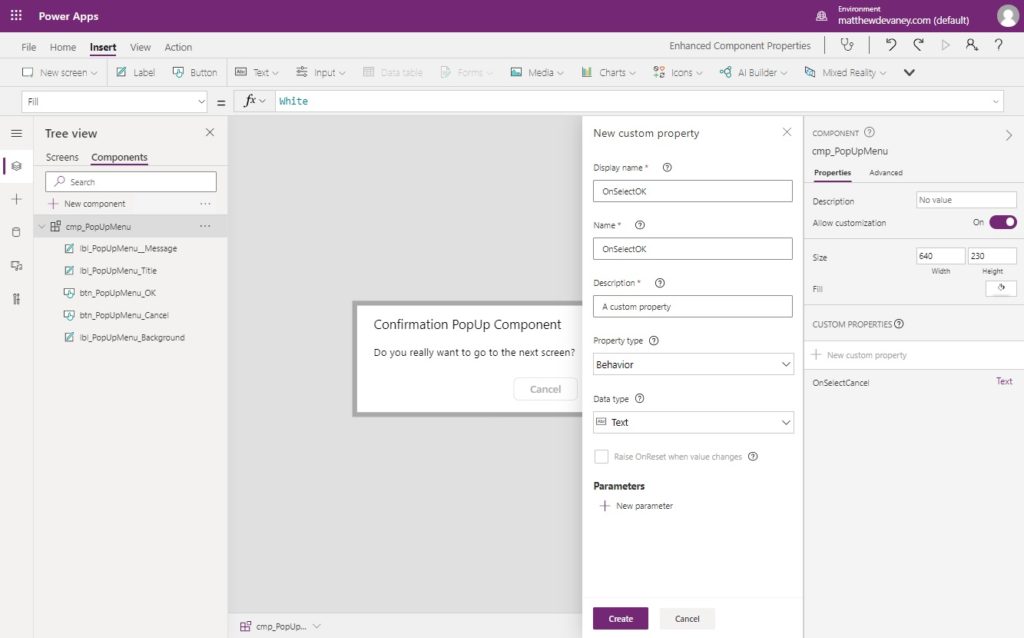
Next, create a new custom property called OnSelectCancel. Choose the Behavior property type then click Create.
In the OnSelect property of the Cancel button…
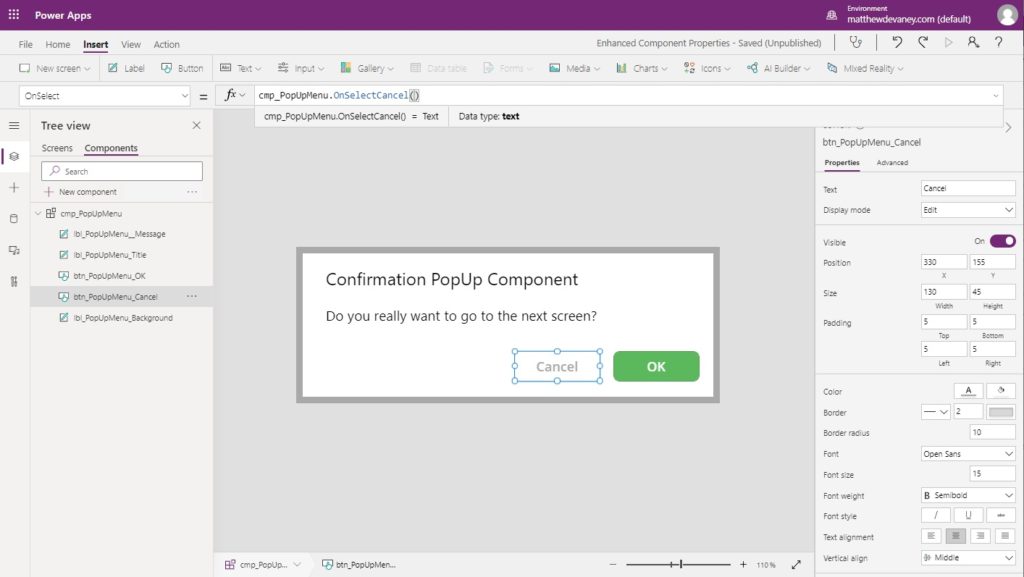
…write this code. Now when we place the pop-up menu component inside an app the OnSelect property of the cancel button will be exposed.
cmp_PopUpMenu.OnSelectCancel()
Cancel Button OnSelect Property In The App
When the user clicks a button on Screen 1 and pop-up button appears and asks “do you really want to go to Screen 2”. The next thing we will do is create Screen 1.
Open Screen 1 and add a large button in the center of the screen with the text “Go to Screen 2.”
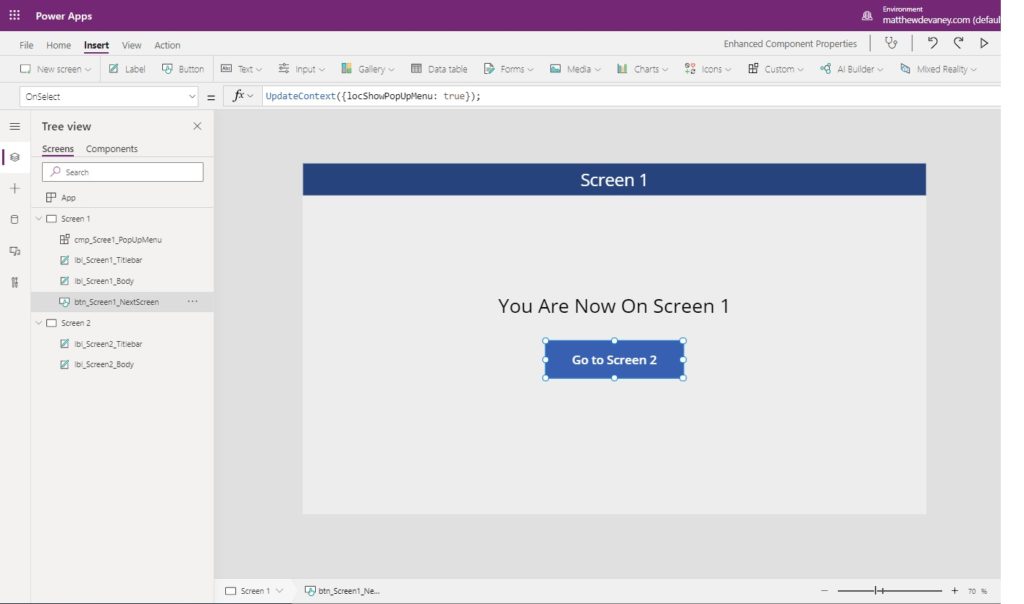
Add this code to the OnSelect property of the button. We can use the variable it sets to true to control the pop-up menu’s visibility
UpdateContext({locShowPopUpMenu: true})
Go to the Custom button on the ribbon and select the cmp_PopUpMenu component. Place it directly over top of the button.
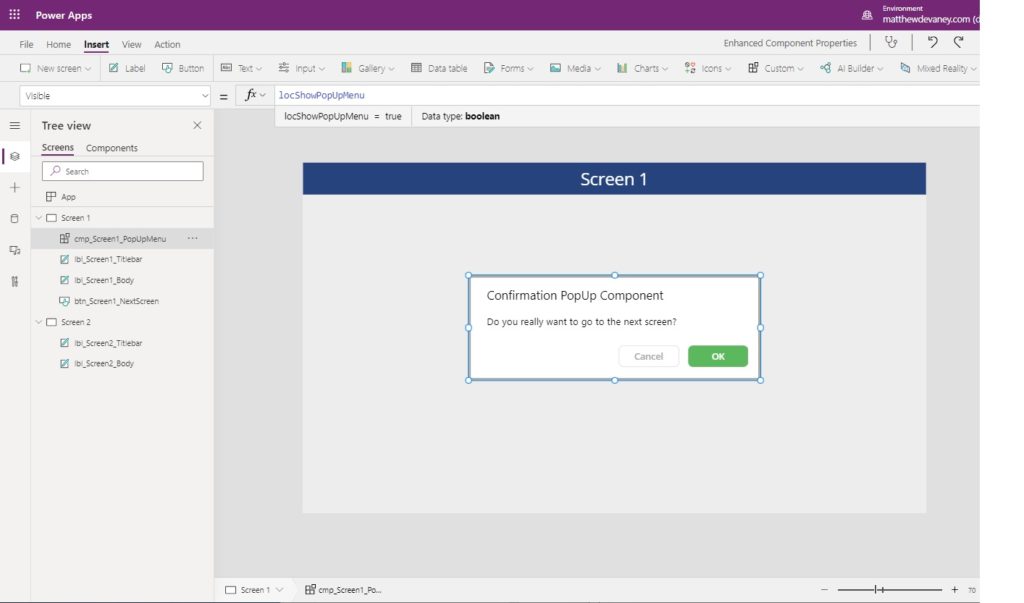
Change the Visible property of the component to locShowPopUpMenu. It will show the menu when the variable’s value is true and hide it when false.
Now we can write some code to tell the app what to do when the Cancel button is clicked. Select the OnSelectCancel property of the component…

…and write this code to change the locShowPopUpMenu variable to false.
UpdateContext({locShowPopUpMenu: false});
Clicking the Cancel button will cause the pop-up menu to disappear. By using a behavior property we have managed to successfully trigger the Cancel button’s OnSelect property from inside the component and update a variable value in the app!

Add A Behavior Property For The OK Button
We are half-way done. The next step is to create a behavior property for the OK button. Go back to the component and add a new custom property called OnSelectOK. Choose the Behavior property type and click Create.
Select the OK button…
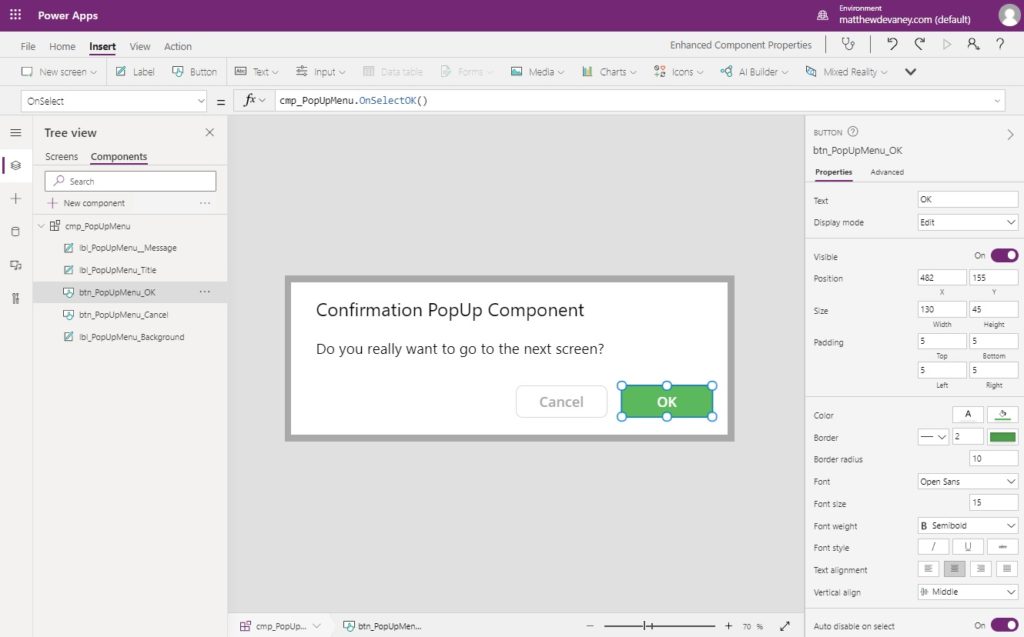
…and put this code in the OnSelect property to expose the OK button to the app.
cmp_PopUpMenu.OnSelectOK()
OK Button OnSelect Property In The App
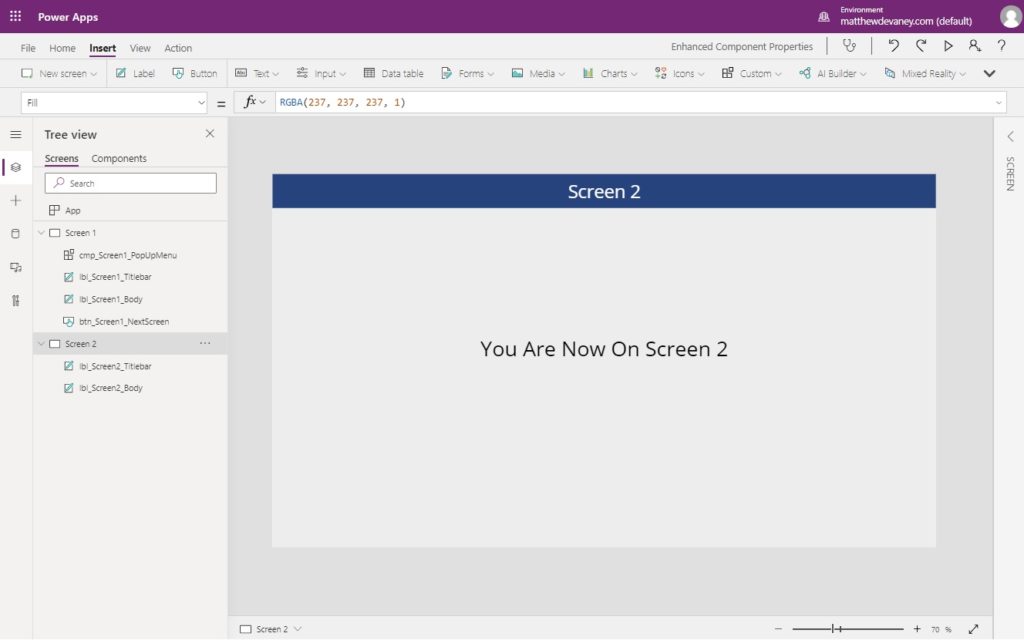
Before we code the OK button we’ll need to create a 2nd screen. Insert a new screen and call it Screen 2.
Go back to screen one and select the pop-up menu component.
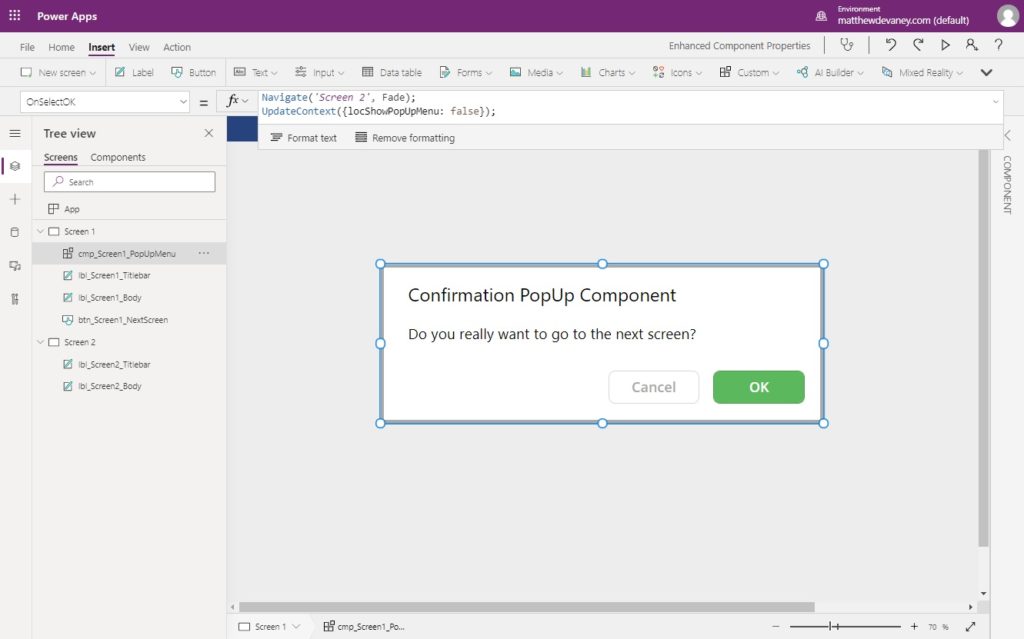
Then write this code in the OnSelectOK property.
Navigate('Screen 2', ScreenTransition.Fade);
UpdateContext({locShowPopUpMenu: false});
When the OK button is clicked it the app will take the user to Screen 2.
Want To Learn More About Power Apps Canvas Components?
This tutorial is part of a free online course called Learn Power Apps Canvas Components By Making 5 Components. The best way to learn isn’t by watching videos, or by reading articles. The best way to master Power Apps canvas components is by building real-world projects. So that’s exactly what we’ll do. Go ahead and get started on the other lessons below. I know you’re going to get alot of this free course.
Did You Enjoy This Article? 😺
Subscribe to get new Power Apps articles sent to your inbox each week for FREE
Questions?
If you have any questions or feedback about Power Apps Component With An OnSelect Property please leave a message in the comments section below. You can post using your email address and are not required to create an account to join the discussion.


Thank you Matthew, very cool feature.
Thanks for this although even after turning this on in Enhanced Component Features the behaviour option still isnt available for me.
Ben,
This feature is still in experimental mode so maybe its a bug… sorry to hear that.
thanks!!!!, forgive my google English, I had been looking for exactly this for more than fifteen days, but… I want to put the buttons in a gallery, I pass the texts with a Collection where I also put the possible OnSelect that it has to execute on each button, but it ignores me. Can be done? greetings and thanks
Joan,
I am sorry, I’ve reviewed your question a few times but I don’t understand what you are asking. Perhaps you can share a screenshot and give a specific example.
Hi Matthew, I send you a summary of what I’m trying to do, put the code instead of the number, so you don’t have to remember which number corresponds to each option each time, greetings and thanks,
Hi Matthew, how would I add an OnChange for a Component? I have a Calendar Component and I want it set that if the date changes to reset a dropdown.
Thanks.
Scott,
I would create a behaviour property called “OnChangeXYZ”.
Then in the component editor put this code in the OnChange property of the control that will trigger the change (example: a text input) – cmp_YourComponentName.OnChangeXYZ.
Place the component onto a screen and write your code in the OnChange property.
Lets pretend the component has a text input which already has an OnChange property. In the OnChange property
Is it possible to Update a Global or Context Variable in the App that isn’t in the Common Component? I want the “OnSelect” and sometimes the “OnChange” to update a variable in the App. I also want to reuse this component many times in the App, and therefore, I need the Global or Context Variable name as an input parameter such that each instance of this Common Component will update different Global or Context Variables.
Ben,
You can’t change the global or context variable from inside the common component. Instead, you must program this in the ONSELECT property in each variable. This is by design. Components need to be re-usable across apps. Allowing a global variable inside a component to directly alter a global variable outside is not a feature of components.
Hello Mathew, cool feature and nicely explained. Thanks.
Btw, this is still considered as “experimental” with the disclosure that this may “change, break or disappear any time”. Do you know if this would move into “Preview” and eventually Production ready?
Janson,
The timeline for this feature coming out of experimental to preview is something only known by Microsoft at this point.
Excelent! tx for sharing such an amazing content.
Hello Matthew, big thanks for this article. As usual, it’s very interesting!
Small question for you about the component and the properties of them. Currently, I try to optimize a low code which is duplicated in my screen.
The behavior is pretty simple; I’ve a double galleries and when a case (represented by a “Text Input”) is changed, I need to make some checks and make an insert or an update (following the context) in the Dataverse
(so I need to use function as “Patch”, “Filter”, “Set” ==> so the only property I can use is “Behavior” because “Output” doesn’t allow these functions)
I can pass my parameter from my screen to the component without problem, I can make my logic in the component also… but, I can’t call this logic from my screen because I try to call a behavior component directly from my screen
Exemple:
I know that I can put a button in my component which call the logic when pressed but I would like to have an automation without button. It seems that is not possible ? Or I miss something ?
Hmmm… while writing my question I realize that the solution is, maybe, simply to put my logic in a button on my screen (and not to use the components here). It’s sometimes complicated to understand what to use for which scenario 🙂
Thanks
Hi Matthew, fantastic article as always! Just a minor typo on this page you may want to correct. I believe the text “Add A Behavior Property For The OK ButtonWe are half-way done. The next step is to create a behavior property for the **cancel** button.” should read “..for the **OK** button.”
Andy,
Fixed. I appreciate you reporting the typo.
Your Enable Enhanced Component Properties link in the Table of Contents is broken. Love your stuff
Austin,
Fixed. Thanks for reporting 🙂
Hi Matthew , Thank you for this. Would you know if there is way to trigger SELECT for component from code?
We have got label and we were triggering Select on this label through another button.
This label is now replaced with component. However, it seems there is no SELECT property to trigger against component.