Power Apps Display A User Photo Or Initials

Displaying a user photo in an app helps a user quickly identify a person. In most organizations not everyone has a user photo. So what can we do when this happens? I enjoy the Office 365 fallback method where a user’s initials are shown inside a circle shape with a unique color for the person. This design is not included in Power Apps out-of-the box but we can make it for ourselves.
In this article will show you how to display a user photo in Power Apps.
Table of Contents:
Introduction: The Messages App
Setup the SharePoint List
Create A Gallery With Tasks And Assigned By
Add The User Profile Picture
Display The User's Initials When No Photo Is Available
Assign A Fill Color For The Initials
Introduction: The Messages App
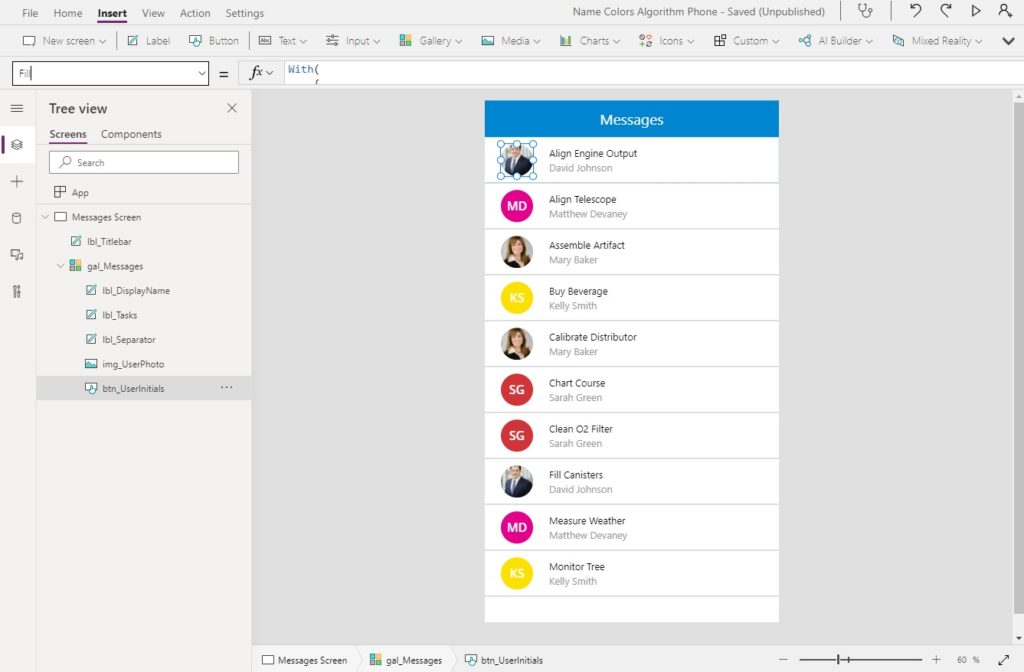
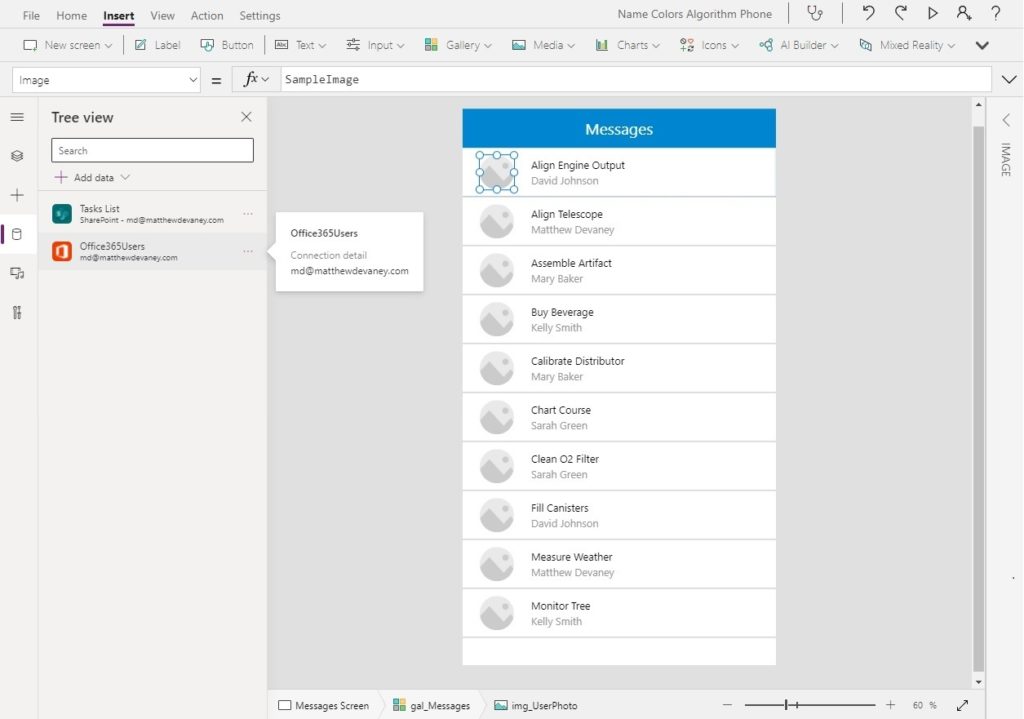
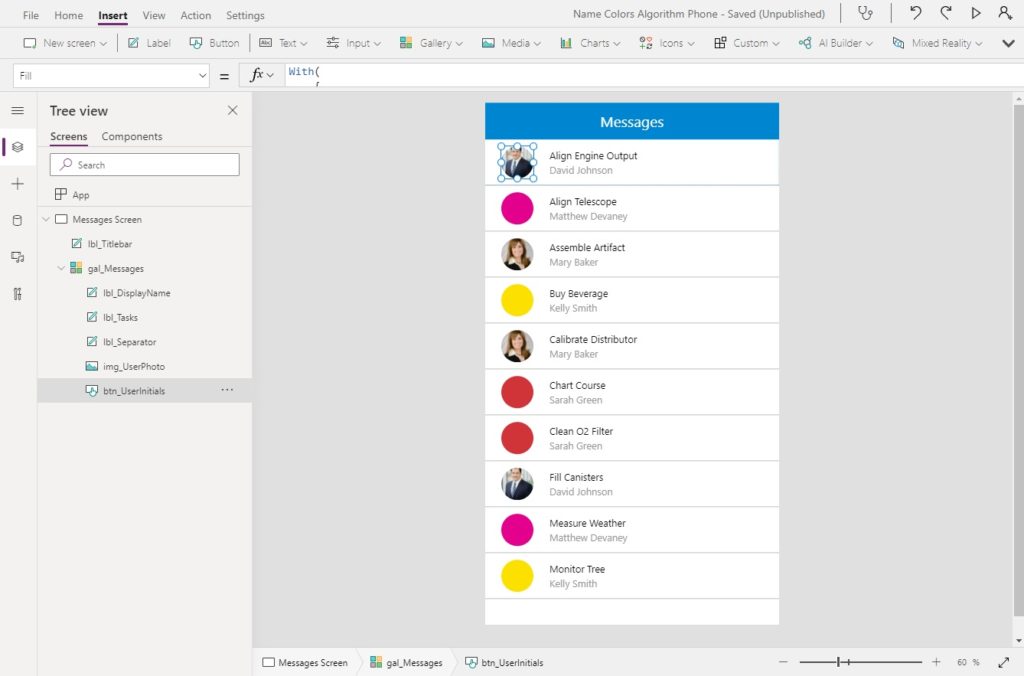
Workers at a research lab use the Messages App to assign to communicate and assign each other tasks. The profile picture of the person who sent the message is displayed beside the task name.
Setup the SharePoint List
Create a SharePoint list called Tasks List to hold all of the meetings with the following columns:
- Title (single-line text)
- Assigned To (person)
- Due Date (date & time)
Load the SharePoint list with this data:
| Title | AssignedBy | DueDate |
| Align Engine Output | David Johnson | 8/3/2021 |
| Align Telescope | Matthew Devaney | 8/5/2021 |
| Assemble Artifact | Mary Baker | 8/6/2021 |
| Buy Beverage | Kelly Smith | 8/6/2021 |
| Calibrate Distributor | Mary Baker | 8/10/2021 |
| Chart Course | Sarah Green | 8/13/2021 |
| Clean O2 Filter | Sarah Green | 8/16/2021 |
| Fill Canisters | David Johnson | 8/16/2021 |
| Measure Weather | Matthew Devaney | 8/18/2021 |
| Monitor Tree | Kelly Smith | 8/19/2021 |
Create A Gallery With Tasks And Assigned By
Open Power Apps Studio and create a new mobile app from blank. Insert a gallery onto the screen and add the Tasks List SharePoint list as a datasource.
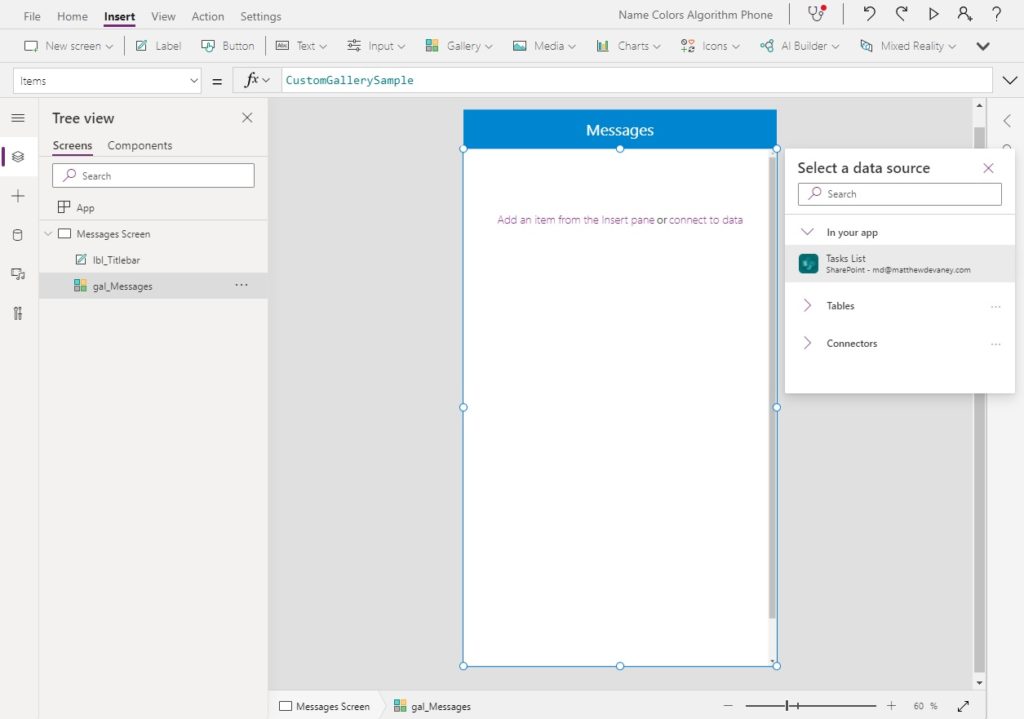
The Items property of the gallery should show this code.
'Tasks List'
Add two labels to the screen to display the task title and who it was assigned by. Then insert one more label with a gray Fill property to act as a separator between the gallery items.
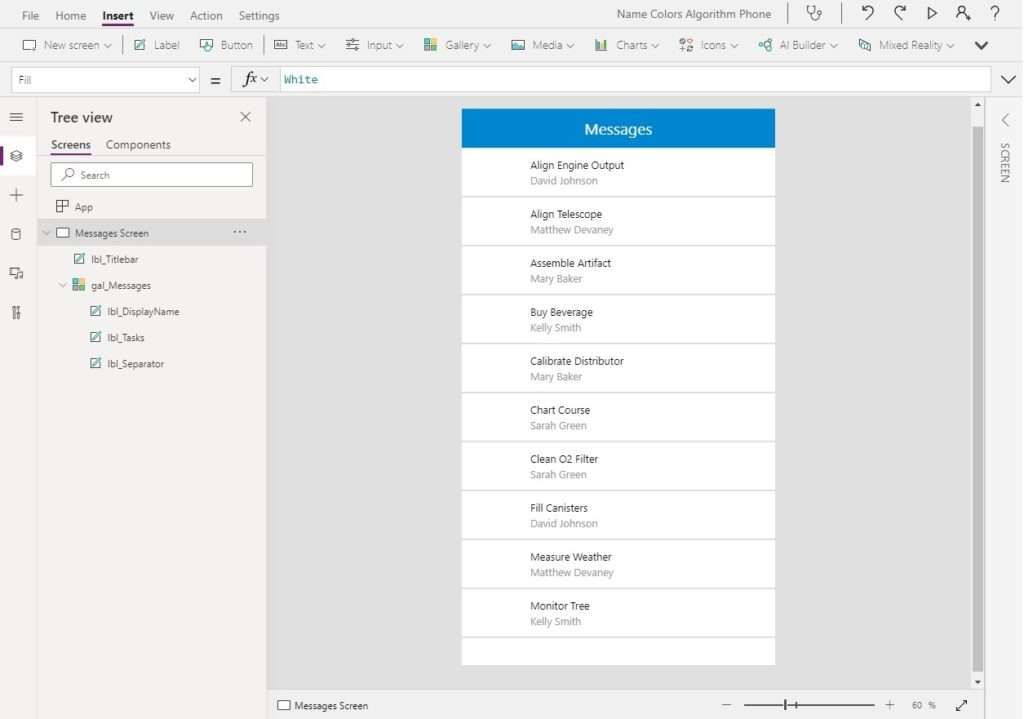
Write the following code in the Text property of the labels for Title & Assigned By respectively.
ThisItem.TitleThisItem.AssignedBy.Display Name
Add The User Profile Picture
Each gallery item shows a profile picture of the person who assigned the task.
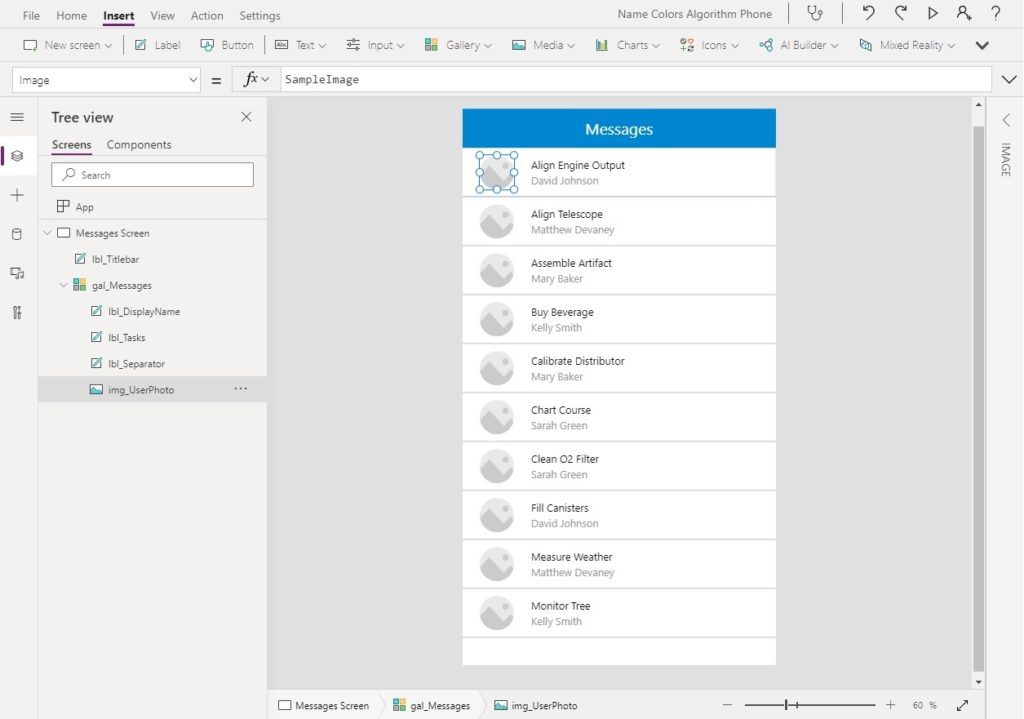
Insert an image control into the gallery. The image control will show as a square shape by default. Use these properties to change it to a circle shape instead.
Height: 70
RadiusTopLeft: 90
RadiusTopRight: 90
RadiusBottomLeft: 90
RadiusBottomRight: 90
Width: 70
To obtain the user profile picture we must use the Office365Users connector. Add it to the Messages app.
Then update the Items property of the gallery with this code to add profile pictures in a new column called UserPhoto. It is likely that some users in the organization will not have a photo and attempting to download a missing photo will cause a runtime error in Power Apps. To avoid this we can perform a check with the UserPhotoMetadata action of the Office365Users connector and only get the photos for users who have one.
AddColumns(
    'Tasks List',
    "UserPhoto",
    If(
        // check if the the user has an email and a profile picture
        !IsBlank(AssignedBy.Email)
        And Office365Users.UserPhotoMetadata(AssignedBy.Email).HasPhoto,
        // get the profile picture
        Office365Users.UserPhotoV2(AssignedBy.Email)
    )
)
Now we are ready to display the profile picture in the gallery.
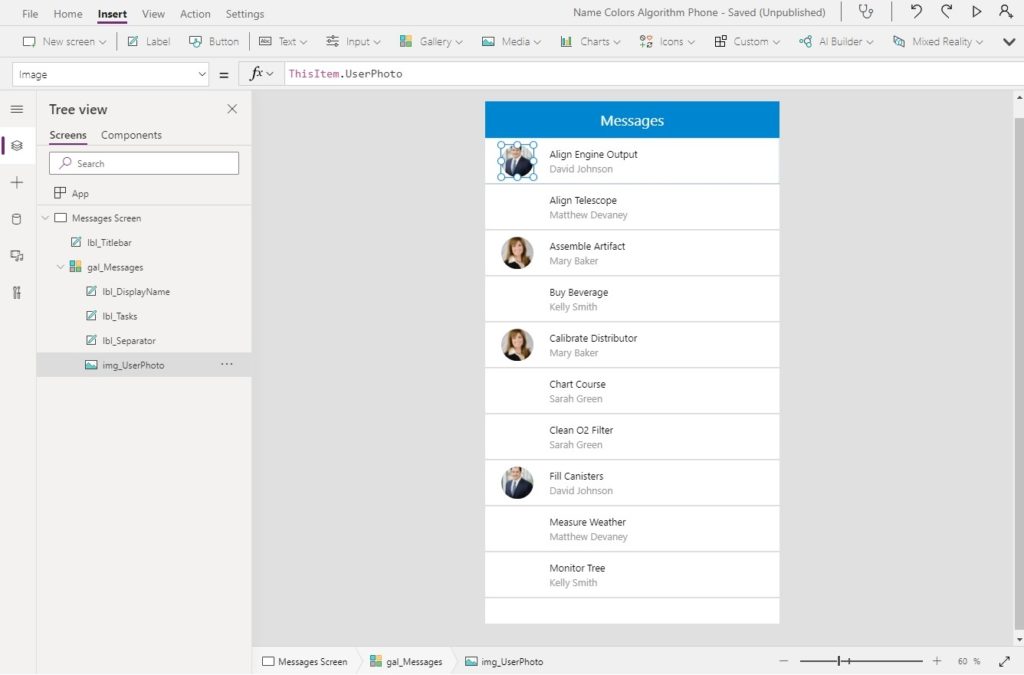
Go to the Image property of the Image control and use this code.
ThisItem.UserPhoto
Display The User’s Initials When No Photo Is Available
When no photo is available for a user we will display their initials instead just like in other Office 365 apps. Insert a new button into the gallery…
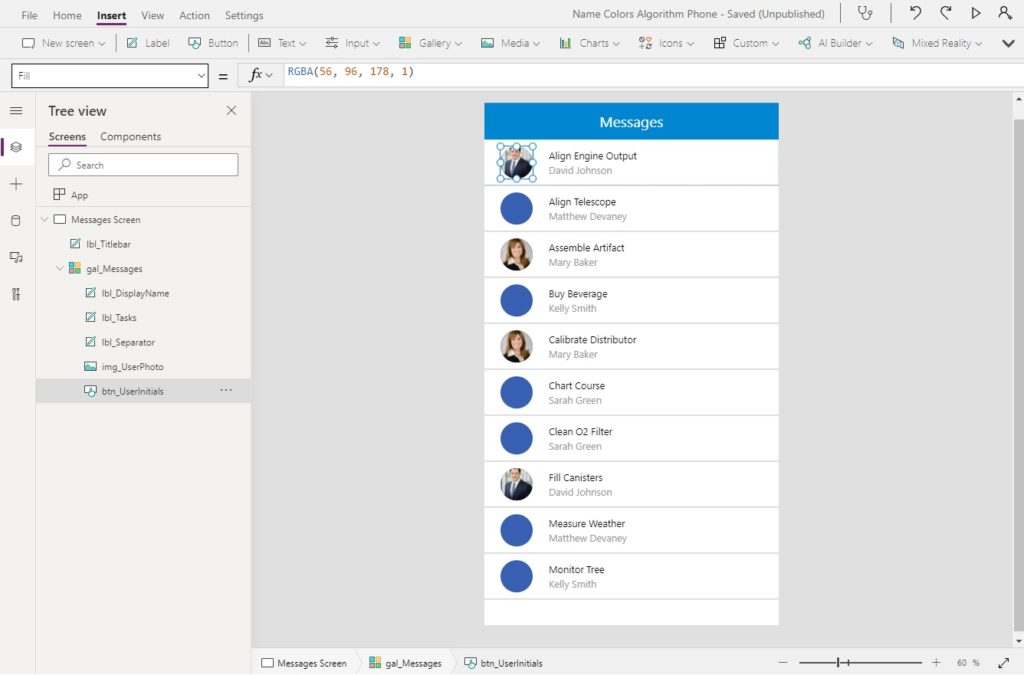
…and give it the properties below to make it a circle that is the same size as the profile picture. We reference the profile picture in the X & Y properties to ensure the button appears in exactly the same position. If a profile picture exists, the initials should not show so we check the photo with the IsBlank function in the Visible property of the button.
Color: White
DisplayMode: DisplayMode.View
Height: 70
RadiusTopLeft: 90
RadiusTopRight: 90
RadiusBottomLeft: 90
RadiusBottomRight: 90
Width: 70
X: img_UserPhoto.X
Y: img_UserPhoto.Y
Visible: IsBlank(ThisItem.UserPhoto)
Next, we will determine the user’s initials.
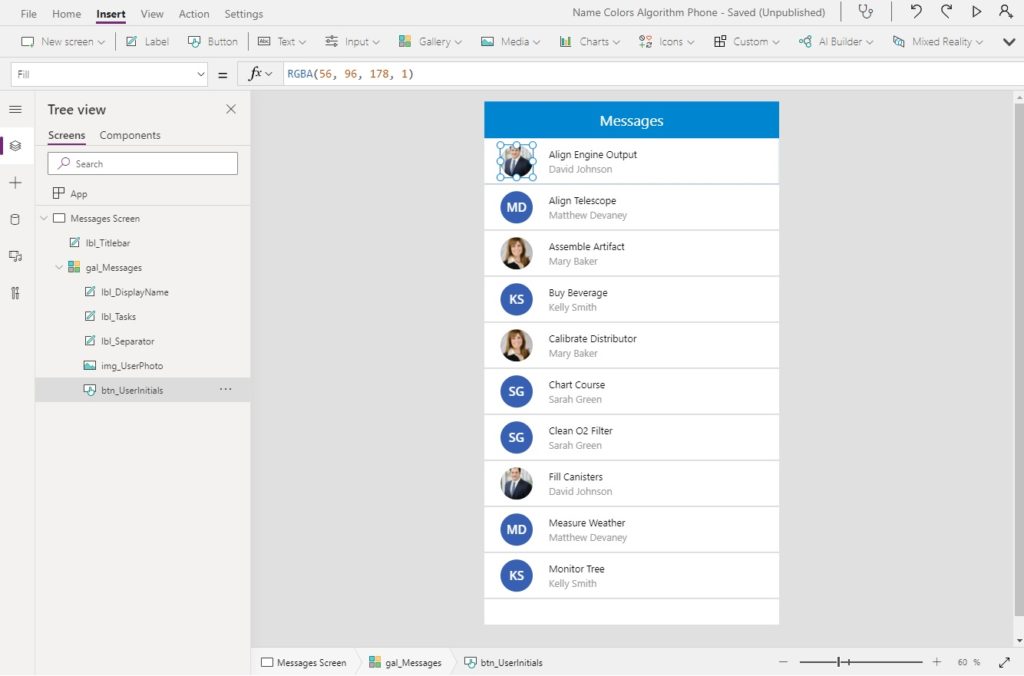
Once again, go to the gallery’s Items property and add the new code below. We get the user’s initials by looking at the givenName and surname properties of the user in Office 365.
AddColumns(
    'Tasks List',
    "UserPhoto",
    If(
        !IsBlank(AssignedBy.Email)
        And Office365Users.UserPhotoMetadata(AssignedBy.Email).HasPhoto,
        Office365Users.UserPhotoV2(AssignedBy.Email)
    ),
    // *** NEW CODE ***
    "Initials",
    With(
        {
            // get the user record
            varRecordUser: If(
                !IsBlank(AssignedBy.Email),
                Office365Users.UserProfileV2(AssignedBy.Email)
            )
        },
        // find the user initials
        Concatenate(
            Left(varRecordUser.givenName, 1),
            Left(varRecordUser.surname, 1)
        )
    )
)
Use this code in the Text property of the button to show the initials
ThisItem.Initials
Assign A Fill Color For The Initials
The initials should display a different color for each user in the gallery with no profile picture. This makes each user easier to identify.
Use this code in the Fill property of the initials button. If you’d like to use your own custom set of colors update the variable varColors with alternate values.
With(
    {
        varChar: ForAll(
            Sequence(26),
            {
                Letter: Char(64+Value),
                Number: Value
            }
        ),
        varColors: Table(
            {Color: "#d13438", ID: 1}, // Red 10
            {Color: "#ca5010", ID: 2}, // Orange 20
            {Color: "#fce100", ID: 3}, // Yellow 10
            {Color: "#0b6a0b", ID: 4}, // Green 20
            {Color: "#00ad56", ID: 5}, // Green Cyan 10
            {Color: "#00b7c3", ID: 6}, // Cyan 10
            {Color: "#0078d4", ID: 7}, // Cyan Blue 20
            {Color: "#5c2e91", ID: 8}, // Blue Magenta 30
            {Color: "#881798", ID: 10}, // Magenta 20
            {Color: "#e3008c", ID: 11}, // Magenta Pink 10
            {Color: "#69797e", ID: 12}  // Gray 20
        )
    },
    LookUp(
        varColors,
        ID=Mod(
            Sum(
                AddColumns(
                        Split(
                            Substitute(
                                Upper(ThisItem.AssignedBy.DisplayName),
                                " ",
                                ""
                            ),
                            ""
                        ),
                    "SumValue",
                    LookUp(
                        varChar,
                        Letter=Result,
                        Number
                    )
                ),
                SumValue
            ),
            12
        ) + 1,
        ColorValue(Color)
    )
)
The final result will look like this.
Did You Enjoy This Article? 😺
Subscribe to get new Power Apps articles sent to your inbox each week for FREE
Questions?
If you have any questions or feedback about Power Apps Display A User Photo Or Initials please leave a message in the comments section below. You can post using your email address and are not required to create an account to join the discussion.


Hi Matthew,
great method, but shouldn’t the Sharepoint column “Assigned To/By” a People column instead of single line text one as you are using DisplayName, First Name, Surname and Email properties of each listed person. Am I wrong?
anyway, thanks for all the great posts you create. Those are great sources of inspiration.
thanks,
Davide
Davide,
You are correct! I missed that during my review and now I have updated the article per your suggestion
Without your help I would not have noticed the error. Thank you for improving my work 🙂
Happy to help, even if I did nothing! ?
Great article Matthew (again :)) but I think using Office365Users.UserPhotoV2(AssignedBy.Email) with AddColumn can be very time consuming, especialy if you create your collection OnStart of the application
I have a 250 items SharePoint list and I used to call Office365Users.UserPhotoV2 directly in the Image property of the picture item in my gallery, It was not very clean because I might have to do it again on other screens but it has the advantage of be loaded asynchronously. So I can see items details in my galley quite fast
Is there any way to fill data in AddColumn in an asynchronous way?
Jean-Remy,
If you are finding its not performing as well as hoped you could try moving the UserPhoto code from add columns directly into the Image property of the image and it would have a “load after the gallery is loaded” effect. Give this a try and let me know.
This is what I did and this “load after the gallery is loaded” effect is really better for user experience. Thanks
Sorry, but I didn’t understand where to put the code:
AddColumns(
‘Tasks List’,
“UserPhoto”,
If(
// check if the the user has an email and a profile picture
!IsBlank(AssignedBy.Email)
And Office365Users.UserPhotoMetadata(AssignedBy.Email).HasPhoto,
// get the profile picture
Office365Users.UserPhotoV2(AssignedBy.Email)
)
)
Vladimir,
This code should go in the Items property of your gallery where the employee names are displayed.
I can see why you were confused. My instructions were not as clear as I had hoped. I have re-written that section of my article to provide greater clarity. Best of luck building your app 🙂
Hi Matthew, great tutorial, but could you clarify where to put the code? Perhaps with a picture. I’m unable to get this to work when I add the code to the “Items” of the Gallery
Kjell,
What code block are you trying to add to the Items property of the gallery?
AddColumns(
‘Tasks List’,
“UserPhoto”,
If(
// check if the the user has an email and a profile picture
!IsBlank(AssignedBy.Email)
And Office365Users.UserPhotoMetadata(AssignedBy.Email).HasPhoto,
// get the profile picture
Office365Users.UserPhotoV2(AssignedBy.Email)
)
)
Me chamo Roni e sou do Brasil!
Comecei com Power Plataform a mais ou menos 2 meses.
E gostaria de agradecer por compartilhar seu conhecimento.
Sou no com o LowCode, mas já entendo sua logica.
Estava eu procurando uma maneira de mostrar as fotos dos users, e BAMMMM!!! Eu vi seu blog. Todo dia olho uma matéria sua diferente, muitas me cativa a aplicar em meus Apps, espero que você possa sempre nos trazer mais e mais conteúdos fantásticos.
Vou deixar uma imagem de uma experiência para os usuários.
Se te interessar eu compartilho a experiência com você.
Uma galeria dentro de outra galeria.
O primeiro filtra pelo perfil, e a segunda pelo cod da empresa.
Roni,
I only speak English. Can you please translate?
Yes!,
Your article helped a lot, thanks.
In my case I don’t use a SharePoint list to get the users.
Here is how I create a Person picker.
I insert a Textinput (TextInput1) and a gallery (Gallery1) with image (Image1), title and subtitle
In the Items property for the gallery I type:
If(Len(TextInput1.Text)>2,
Office365Users.SearchUserV2({searchTerm:TextInput1.Text}).value
)
In the Visible property of the gallery I type:
In the Height property of the gallery I type:
In the OnSelect property of the gallery type:
In the Default property of the TextInput I type:
In the Clear Property of the TextInput type:
In the Text property of the Title I type:
In the Text property of the Subtitle I type:
In the Image property of the image I type:
Then I make the image round changing the properties:
I create the Button, send it to the back and change the properties:
In the Text property of the button, I use:
Left(Upper(ThisItem.DisplayName), 1) &
Mid(
  Upper(ThisItem.DisplayName),
  Find(" ", Upper(ThisItem.DisplayName)) + 1,
  1)
(This will convert the initials to uppercase)
For the Assign a fill color for the initials part I just use the following in the Fill property:
I am trying to add a Search box for my gallery in the items properties and it doesn’t seem to be liking that. Any ideas?
Trent,
A generic code example to create a search box would be something like this.
Filter(datasource, TextInput_SearchBox.Text in column_name)
Hi, how I do this for only for the current user? Not in a gallery. Thanks
Hi Matt,
I’m just following along, would I be correct that if my SharePoint list has 300 items, Office365Users.UserPhotoV2() would be called 300 times? If that’s the case would that 300 be considered API requests and therefore would count on our daily 6K requests per user/per day?
Daniel,
That’s a valid point. I like the UX I built but it would hit the API limits pretty fast.
Hi Matthew,
I am trying to use this, but getting the red squiggly underline on this part:
Office365Users.UserPhotoV2(AssignedBy.Email)
The message when I hover on it says:
Office365Users.UserPhotoV2 failed: The method ‘UserPhotoV2″ has an invalid value for parameter ‘id’
id is not one of the options provided by PowerApps, only Claims, Department, DisplayName, Email, JobTitle, and Picture, and none of those work.
Grateful for any assistance you can provide!
Cheryl,
I think your AssignedBy.Email does not contain a valid User Principal Name. Take a look at this forums post for how to potentially fix this:
https://powerusers.microsoft.com/t5/Building-Power-Apps/UserPhoto-and-UserPhotoV2-error/td-p/313735
Hi Matthew,
Thank you for this article, exactly what I was looking for. While testing with only a couple of accounts it worked great, but now that it has to load more profile pictures, I get a runtime error 503 Service unavailable. The total number of items in the gallery is between 15 and 20, but I’m only getting the error, if more than 7 profile pictures are loaded.
Do you have any idea how to get rid of that error?
Thanks!
Lena
Hi,
To get all initials in case you have multiple givenname or surname you can use the below formula:
Concat(ForAll(Split(varRecordUser.givenName&" "&varRecordUser.surName," "),{Initial:Left(ThisRecord.Result,1)}),Initial&" ")Letter=Result not recognized!
Abbas,
What are you asking here?
They are talking about this
“SumValue”,
LookUp(
varChar,
Letter=Result, ‘Name isn’t valid, ‘Result’ isn’t recognized
Number
)
I changed Letter=Result to Letter=Value
and it worked
Macheen,
This is because Microsoft decided to change the Power Apps language to use “Value” instead of “Result” after I wrote the article. Thanks for messaging me.
Wow, that made all the difference. I was looking for that as a variable and it was nowhere to be found. I see now that Result must be old and not used anymore. Oops! You said the same thing below…lol
Great article and I like that the way that turned out. So far the best solution for just replacing the image with something when one is not available. Great article Matthew, like always!
Thak you for your input
Hi Matthew,
First, thank you for the tutorial it has been great help, I was able to implement it for a part of my app, but now I’m trying to do something similar on another section, and I’m having some issues.
I’m working on a task assignment app, on this app I have a main table with task, and this table does a lookup to another employee table, to pick up the employees assigned to a task, so one task can have one or several employees.
I’m using a gallery to make a card view of all the tasks, and then a nested gallery to show the assigned employees.
Here ) is a picture to make it easier to understand.
The issue that I’m having is that the employees on the employee table are a people type column, so when you try to use this part of the code
AddColumns(
    'Tasks List',
    "UserPhoto",
    If(
        // check if the the user has an email and a profile picture
        !IsBlank(AssignedBy.Email)
        And Office365Users.UserPhotoMetadata(AssignedBy.Email).HasPhoto,
        // get the profile picture
        Office365Users.UserPhotoV2(AssignedBy.Email)
    )
)
It has issues checking for the email to see if it’s blank and then check for the image of the item, I tried using a Lookup code
And check if that’s blank, but it seems to not work, do you have any ideas as to what I could do to solve this?
Thank you again.
Hi Matthew,
How can i access Image from collection on screen image control ?
I am not able to access image from collection.
Please do the needful
Lala,
There’s no issue accessing images whether through a direct datasource reference or collection. It makes no difference.
Encountering errors.
Ali,
PowerFx code changed recently. Try removing the quote marks.
Nice! it’s working now. Thanks very much
Visible: IsBlank(img_UserPhoto) change to IsBlank(ThisItem.UserPhoto)
Bram
Good catch. I’ve updated it.
You are missing a color for id: 9