Power Apps Excel-Style Editable Table – Part 1

Excel is the most popular business app in the entire world. Everyone who works in an office understands what the app is and knows the basics of how to use it. Including an editable table that is designed similar to an Excel spreadsheet is an excellent addition to many Power Apps. It provides users an efficient way of doing data entry and makes them feel comfortable with a concept they already know. Unfortunately, Power Apps does not have this feature built-in.
In this two-part series I will show you how to build an Excel-style editable table in PowerApps. Part 1 will show you how to setup the table, edit values and save changes back to a datasource. Part 2 will focus on how to add new records and delete existing records.
Inventory Count App
The Inventory Count App is used by employees of a home improvement store to record the actual amount of each product the business owns. An employee clicks on the New button to record information about several items into a table and clicks Save once finished. If a correction is needed the item can edited or deleted from the table.
Create a new SharePoint list called ‘Inventory Count’ with 4 columns: ItemNumber (text), Description (text), Quantity (number) and Location (text).
| ItemNumber | Description | Quantity | Location |
| ELEC-1000 | Light Switch | 25 | Storefront |
| ELEC-1001 | Circuit Breaker 20 Amp | 17 | Storefront |
| PLUM-1002 | Copper Pipe 10-1/4 | 20 | Storefront |
| PLUM-1023 | Kitchen Faucet Silver | 5 | Storefront |
| LUMB-2001 | Plywood 8×4 | 43 | Lumber Yard |
| LUMB-2094 | Fence Post 8ft | 100 | Lumber Yard |
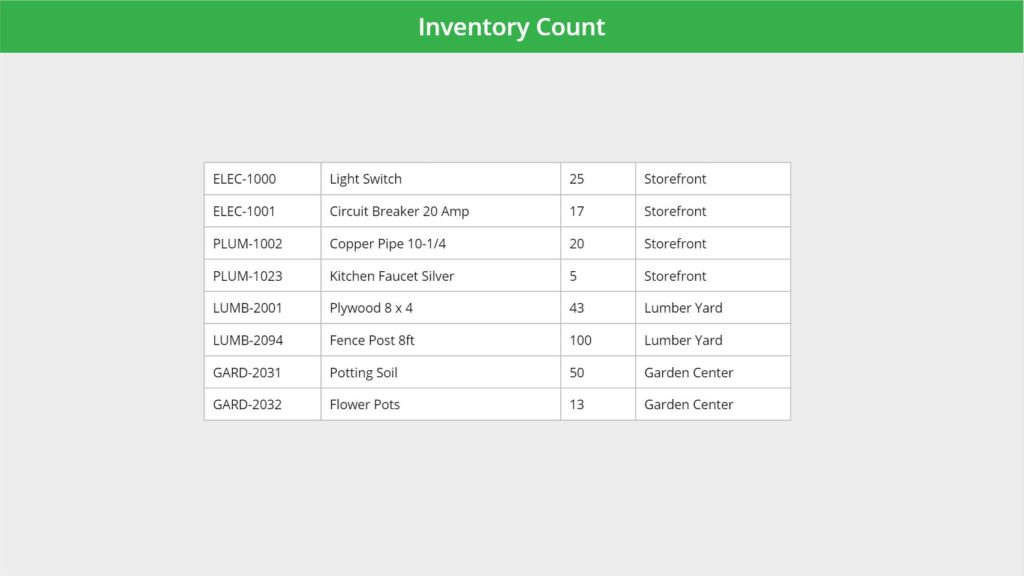
Open Power Apps and create a new Canvas App From Blank called Inventory Count App. Insert a gallery called gal_EditableTable onto the canvas with the ‘Inventory Count’ SharePoint List as the datasource.
Then place 4 text input controls inside the gallery named txt_ItemNumber, txt_Description, txt_Quantity and txt_Location and use this code in each of their Default properties respectively: ThisItem.ItemNumber, ThisItem.Description, ThisItem.Quantity, ThisItem.Location. The app will now look like the image shown below.
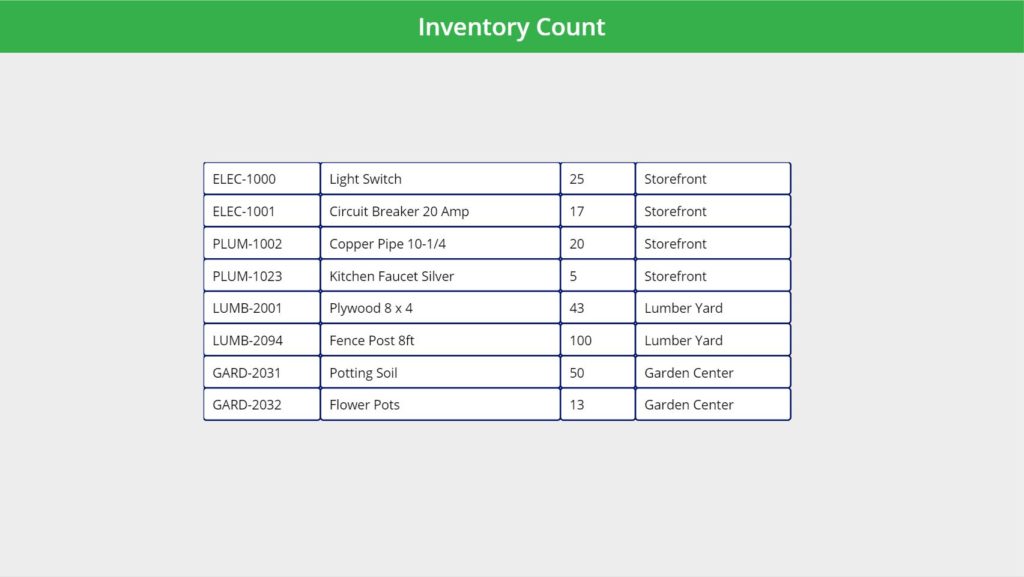
Now we will work on styling the gallery to make it appear like an editable table. Change gal_EditableTable to have these properties
TemplatePadding: 0
TemplateSize: 40
Then change txt_ItemNumber, txt_Description, txt_Quantity and txt_Location to reflect these properties.
BorderColor: DarkGray
BorderThickness: 1
Color: Black
Fill: White
FocusedBorderColor: Self.BorderColor
FocusedBorderThickness: Self.BorderThickness
HoverBorderColor: Self.BorderColor
HoverColor: Self.Color
HoverFill: RGBA(186, 202, 226, 1)
PressedBorderColor: Self.BorderColor
PressedColor: Self.Color
PressedFill: Self.Fill
RadiusBottomLeft: 0
RadiusBottomRight: 0
RadiusTopLeft: 0
RadiusTopRight: 0
Once the style changes are completed the gallery now looks like an editable table.
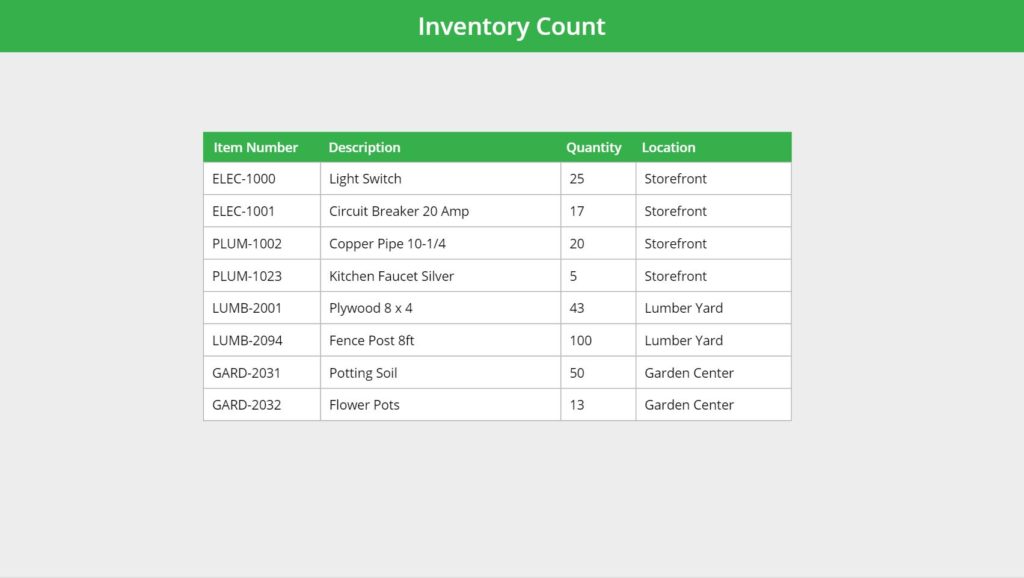
As a final touch we will add a label above the gallery with the column header names. Set the label’s Fill property to a color that matches your app’s theme and make the FontWeight bold. Our gallery now looks like an Excel spreadsheet.
Detecting Edited Rows
Employees require the ability to edit values in the table and save them back to the SharePoint list. To ensure the best app-performance possible we only want to update records that were changed. We will track this by inserting a toggle called tog_isChanged on the right-side of the gallery.
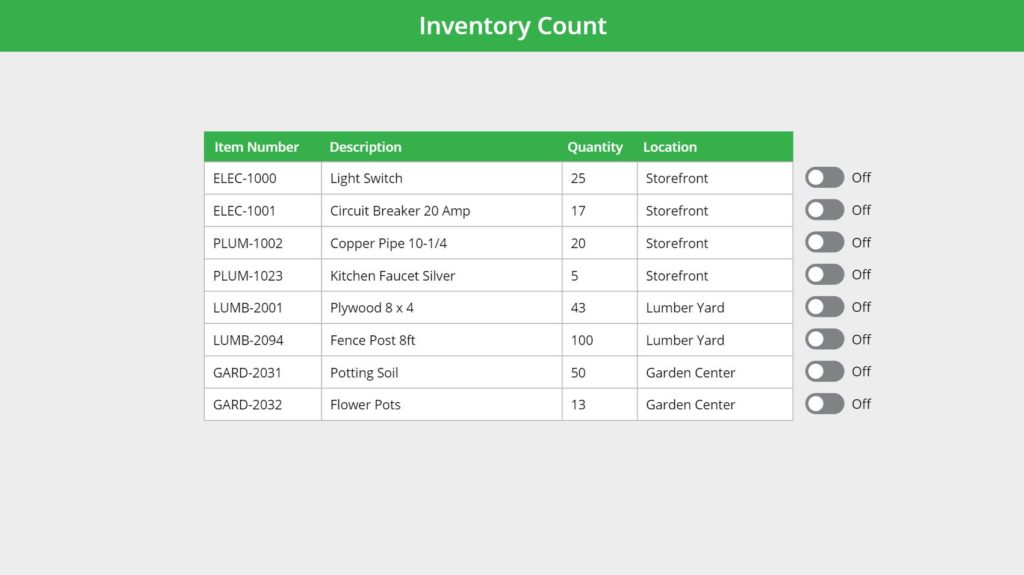
Put this code in the Default property of the toggle to control its behaviour.
ThisItem.ItemNumber<>txt_ItemNumber.Text
Or ThisItem.Description<>txt_Description.Text
Or ThisItem.Quantity<>Value(txt_Quantity.Text)
Or ThisItem.Location<>txt_Location.Text
Try changing a few values in the table to understand how the toggle works. When the toggle is in the ‘On’ position it means the row was modified. The ‘Off’ position tells us that the row remains unedited.

Once we are satisfied the toggle is working correctly we can hide it by changing the Visible property to False. The employee does not need to see the toggle.
Editing The Table and Saving Changes
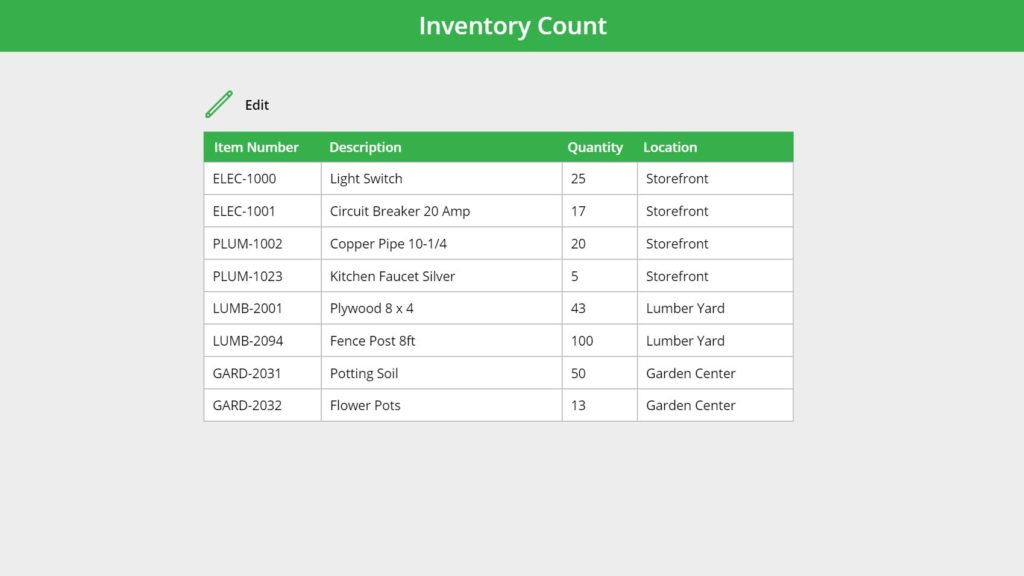
Initially, the table should be in a view-only state. The employee will click the Edit button to make the gallery editable. Place an ‘Edit’ icon and a label with the word “Edit” above the gallery.
Put this code in the following properties of both ico_Edit and lbl_Edit
OnSelect: Set(varGalleryMode, "Edit")
Visible: varGalleryMode=Blank()
Then use this code in the DisplayMode property of the Text Input controls: txt_ItemNumber, txt_Description, txt_Quantity and txt_Location.
If(varGalleryMode="Edit", DisplayMode.Edit,DisplayMode.View)
Now when we click on the Edit button the gallery changes from “View” mode to “Edit” mode.
Next we’ll add 2 more pairs of icon and labels for “Save” and “Cancel”.

They should only appear when the gallery is in “Edit” mode. Put this code in the Visible property of the icons and labels.
varGalleryMode = "Edit"
When the employee clicks “Save” any changes made should be written back to the SharePoint List. We will create a collection called colUpdates to store the modified records. The first step is to define the collection schema by placing this code in the OnStart property of the app.
ClearCollect(colUpdates,{
    ID: 1,
    ItemNumber: "A",
    Description:"A",
    Quantity: 1,
    Location:"A"
});
Clear(colUpdates);
Then insert this code into the OnSelect property of the Save icon and its associated label. It will loop through the gallery looking for any changed records, store them in the colUpdates collection and then patch multiple rows to SharePoint simultaneously to achieve the best performance.
// Create a collection to store updated values
ForAll(
    Filter(
        gal_EditableTable.AllItems,
        tog_isChanged.Value
    ) As ChangedRows,
    Patch(colUpdates,
    Defaults(colUpdates), {
        ID: ChangedRows.ID,
        ItemNumber: ChangedRows.txt_ItemNumber.Text,
        Description: ChangedRows.txt_Description.Text,
        Quantity: Value(ChangedRows.txt_Quantity.Text),
        Location: ChangedRows.txt_Location.Text
    })
);

// Update SharePoint with new values
Patch('Inventory Count', colUpdates);
Clear(colUpdates);

// Return gallery to view mode
Set(varGalleryMode, Blank());
Once the SharePoint list is updated the gallery returns to “View Only” mode.
Cancelling Changes
Finally, we want to allow employees to return to “View” mode without saving any of the changes they made. Put this code in the OnSelect property of the cancel icon and label.
// Reset text inputs to erase any edits made
Set(varResetTextInputs, true); Set(varResetTextInputs, false);

// Clear any changes from colUpdates
Clear(colUpdates);

// Return gallery to view mode
Set(varGalleryMode, Blank());
Then write this code in the Reset property of txt_ItemNumber, txt_Description, txt_Quantity and txt_Location.
varResetTextInputs
When the cancel icon is clicked all records are reset and show their original values.
Want To Read Part 2 Of This Series?
My next article will show you how to add new records and delete existing records using an editable table. Click here to read Power Apps Excel-Style Editable Table – Part 2.
Did You Enjoy This Article? 😺
Subscribe to get new Power Apps articles sent to your inbox each week for FREE
Questions?
If you have any questions or feedback about Power Apps Excel-Style Editable Table – Part 1 please leave a message in the comments section below. You can post using your email address and are not required to create an account to join the discussion.


Great job!!!
Thank you!!!
Looking forward for part 2
Works very well! Thank you!
Thank you Matthew, great tips. Looking forward to Part 2
HI MD
Patch(SP_Labour, col_LabourSheetUpdates); – says invalid argument type (Table) Expecting a Record value instead. What I am in missing please
Clear(col_LabourSheetUpdates);
Hello there F.G!
In the step prior to the code you shared the ‘collection schema’ must be defined in the OnStart property of the app. Then you must click ‘Run App OnStart’. Here’s the code I am referring to from my example. You will need to supply different column names if your SharePoint list is different from my example
ClearCollect(colUpdates,{
ID: 1,
ItemNumber: “A”,
Description:”A”,
Quantity: 1,
Location:”A”
});
Clear(colUpdates);
I hope this helps 🙂
Hi Matt,
What would the ‘collection schema’ look like for a people picker field in sharepoint? Is different to the above?
The collection schema for a people picker in SharePoint would look like this.
{
‘@odata.type’: “A”,
Claims: “A”,
Department: “A”,
DisplayName: “A”,
Email: “A”,
JobTitle: “A”,
Picture: “A”
}
Thanks very much!
Happy to be of service!
I have the same error msg. I have run the app onstart and verified that the blank collection exists. The error in the formula says that patch is expecting a record as the second parameter. I am authoring in powerapps for teams in case that makes a difference. Thanks for your assistance
Hello Mathew,
I have same error and I did the following:
It’s been 2 days and I am still looking at the error … please help of you can?
Hi Matthew!
Thanks a lot for the amazing guide! I am however having problems with patching changes correctly back to my SharePoint list, which is an existing list with a lot of columns already.
Problem is, when I save changes to an item, instead of applying the changes to the existing item, the function just creates a new item with those changes I made.
My code looks like this:
OnStart:
Refresh(‘Risikostyring-register’);; ClearCollect(colUpdates; ‘Risikostyring-register’) ;; Clear(colUpdates) ;;
The OnSelect-function on my save-icon looks like this:
ForAll(
Filter(
Gal_EditableTable.AllItems;
tog_isChanged.Value
) As ChangedRows;
Patch(
colUpdates;
Defaults(colUpdates);
{
Kategori: ChangedRows.TextInput1_15;
Risikobeskrivelse: ChangedRows.TextInput1_16.Text;
‘Deadline for handling’: ChangedRows.DatePicker1_2.SelectedDate
}
)
);;
Patch(
‘Risikostyring-register’;
colUpdates
);;
Clear(colUpdates);;
Set(
VarGalleryMode;
Blank()
);;
Can you from this see where I am doing something wrong?
Best regards,
Kasper
I think I might have found the issue finally. I guess I was missing the line “ID: ChangedRows.ID;”. Seems like that one is pretty important to include! ?
Thanks again for the guide!
/Kasper
I’m glad to hear it. One missing line of code can make all the difference.
Hi Matthew,
Thanks for the amazing description, and I am using this video to build an application. The only difference is I have many more columns than this and it gets a horizontal scroll. Can you suggest a way to achieve this. I am using containers for horizontal scrolls but not able to find controls that are in scrollable part of gallery.
Thanks in advance,
Shreyansh
I am unsure what you are asking.
Thanks Matthew! I’ve been struggling with this very thing since I started my Power App journey and this write up was the exact thing I needed. I have built this to the letter, but I have 2 date picker’s and 1 choice field and I’ve yet been able to figure out the collection schema and patch syntax. Hope you can help! PS. I’m a fellow Winnipeger!
Kevin,
I think this video by Reza Dorrani will help. Sorry for the super-late reply. I’d love to start a Winnipeg Power Apps user group someday. Let me know if you’re interested.
https://www.youtube.com/watch?v=8I0Pt_8I6k8
Hey Matthew,
Really appreciate these blogs that I have subscribed to and I am learning a lot from each of them. I received this “excel style” design from the business and have been following this through. I am having trouble with the Patch as 2 of my fields are choice fields.
I raised a post on the community before seeing this comments section so I will post the link instead of re-typing if you dont mind?
https://powerusers.microsoft.com/t5/Building-Power-Apps/Patch-Choice-Values-to-Collection-and-SharePoint/m-p/879022#M279096
Thanks!
Aaron,
Check out this video by Reza Dorrani. He covers Choice fields.
https://www.youtube.com/watch?v=8I0Pt_8I6k8
Hi Matthew, thanks so much for creating this post. I’ve been looking for this everywhere!!!?
I’m having trouble patching a lookupfield. I have a main SP list called “Simulation Status”. It has some text fields, choice fields, and lookup field from a second SP list called “Simulation list”.
I have declared my collection in the OnStart of the app like so:
ClearCollect(colUpdates,{
  ID: 1,
  Notes: "A",
  Simulation: {'@odata.type':"#Microsoft.Azure.Connectors.SharePoint.SPListExpandedReference",
         Id: 1,
         SimName: "A"}
});
Clear(colUpdates);
For patching in the save button I have the following code:
// Create a collection to store updated values
ForAll(
  Filter(
    gal_EditableTable.AllIems,
    tog_IsChanged.Value
  ) As ChangedRows,
  Patch(colUpdates,
  Defaults(colUpdates), {
    ID: ChangedRows.ID,
    Notes: ChangedRows.txt_Notes.Text,
    Simulation: {'@odata.type':"#Microsoft.Azure.Connectors.SharePoint.SPListExpandedReference",
         Id: 1,
         SimName: ChangedRows.drp_Simulation.Selected.SimName}
  })
);

// Update SharePoint with new values
Patch('Simulations Status', colUpdates);
Clear(colUpdates);

// Return gallery to view mode
Set(varGalleryMode, Blank());
The “Patch(‘Simulations Status’, colUpdates);” gives me an error Invalid argument type “TABLE”. Expecting a RECORD value instead.
It kind of looks like the same issue as F.G. user, but I don’t know how else to proceed. Any insight would be appreciated.
Thanks
KA
Awesome post, I just have one issue, in the Patch function it shows me the next error
“Invalid argument type (Table). Expecting a Record value instead.
The function ‘Patch’ has some invalid arguments”
And thanks again for this great post and blog…..
Eduardo,
Did you define the collection schema in the OnStart property?
ClearCollect(colUpdates,{
ID: 1,
ItemNumber: “A”,
Description:”A”,
Quantity: 1,
Location:”A”
});
Clear(colUpdates);
Thank you Matthew, something weird happenedd with Power Apps Studio, after saved the app and wait a couple minutes I can execute without issues 😎👍 thank you so much for your attention and comment, kind regards.
Dear MD,
I do facing the “invalid argument type (Table)” error, and did what were the suggestion that you provided. But, still I am facing this issue. I’ve been attached screenshot for your reference.
Hello,
Thank you so much for this great post.
I have only one issue with the save, after editing the values and clicking save, it updates the fields plus adds the same row once again !!
Eman,
I re-created the app in this post and its working good on my side. Keep trying at it!
Hello Matthew,
I don`t understand why do we need to set varResetTextInputs to true first, then set it to false?
// Reset text inputs to erase any edits made
Set(varResetTextInputs, true); Set(varResetTextInputs, false);
Eric,
If we leave varResetTextInputs as true, then the next time we want to reset the text inputs we’ll have to do this:
Set(varResetTextInputs, false); Set(varResetTextInputs, true);
Why? Because the reset only occurs when the variable changes to true.
Hello Matthew
Can we use toggle control to judge if values change in combo box control?
Maybe just me….
I got the error message “invalid argument type (table). expecting a record value instead” at the ‘OnSelect’ function under save icon.
Patch(‘Inventory Count’, colUpdates);
The issue because I was rename the Title to ItemNumber at SharePoint,
In the end, I hide the Title column and create a new column call ItemNumber.
The error message goes away.
Hi, Matthew before anything thanks a lot for all the content! Is amazing!
Currently, I’m doing your tutorial on the Editable Table but using SQL instead of Sharepoint, and is going perfectly except for creating a new item when the table is empty. It gives me the error of “Network error when using Patch function: The requested operation is invalid.” even if everything is done correctly.
I tried to send the ID manually a 0 or 1 but it gives me an error saying “the specific column is generated by the server and cant be specified”
Do you have any solution for it?
Pedro,
The most common cause of a ‘network error when using the patch function’ is a missing key column in a SQL table. Can you please check to ensure this table has a primary key defined?
Just a warning for people trying this:
Do not use a FLEXIBLE Height Gallery!
The row height adjust happens whenever you make a change and resets your updated value to their original one
Ben,
Agreed. Flexible galleries are excellent. Just not in this context.
Great article Matthew. Is there a way to show all existing entries when creating new ones so a user sees full data? Thanks