Power Automate Desktop: Data Entry From Excel To Website

Power Automate Desktop is a free application from Microsoft you can download to automate personal or business-related tasks on any Windows computer. One of the most popular use cases for Power Automate Desktop is taking data from an Excel and file and entering it into a form on website. Its absolutely amazing to watch as your computer quickly completes the boring task that used to take you hours. In this step-by-step tutorial I will show you how automate data entry from Excel to a form on a website.
Introduction: The Insurance Claims Website
A construction company has a list of employee insurance claims in an Excel spreadsheet. Using Power Automate Desktop the company automatically enters each claim into a form on their insurance company’s website.
Create An Insurance Claim Form With Microsoft Forms
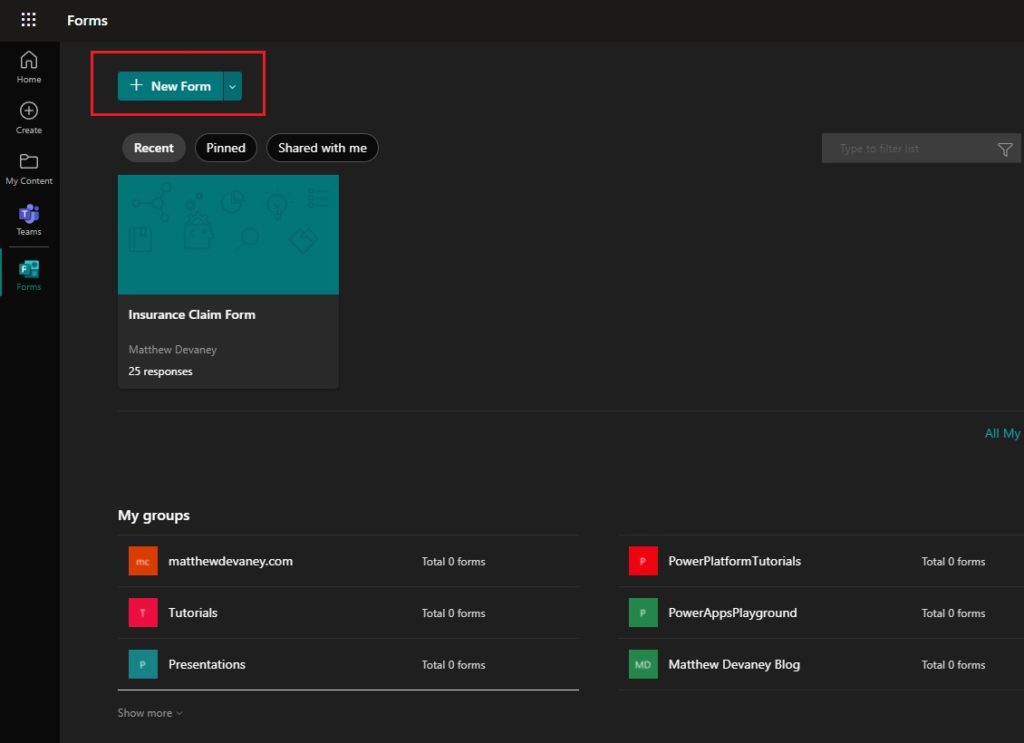
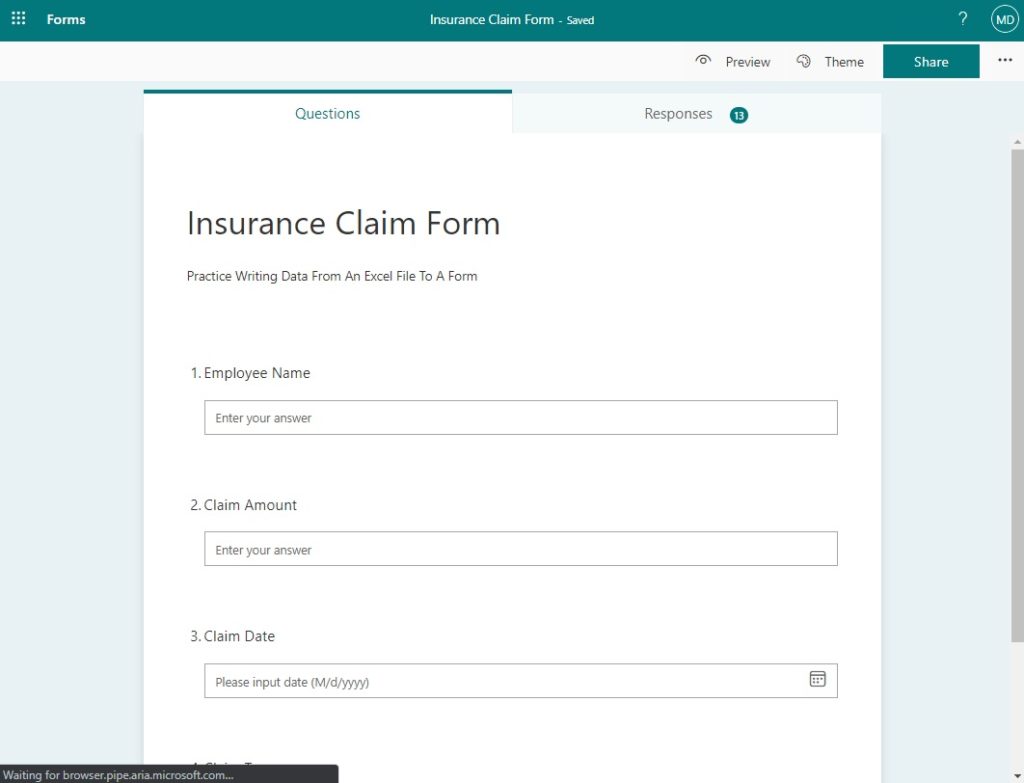
To do this example we need to build an insurance claim form to open in our web browser. We can use Microsoft Forms – a free form builder that comes with your Office 365 license for this purpose. Open http://forms.office.com/ and create a new form.
If you don’t have access to Microsoft forms just use the insurance claim form I created here.
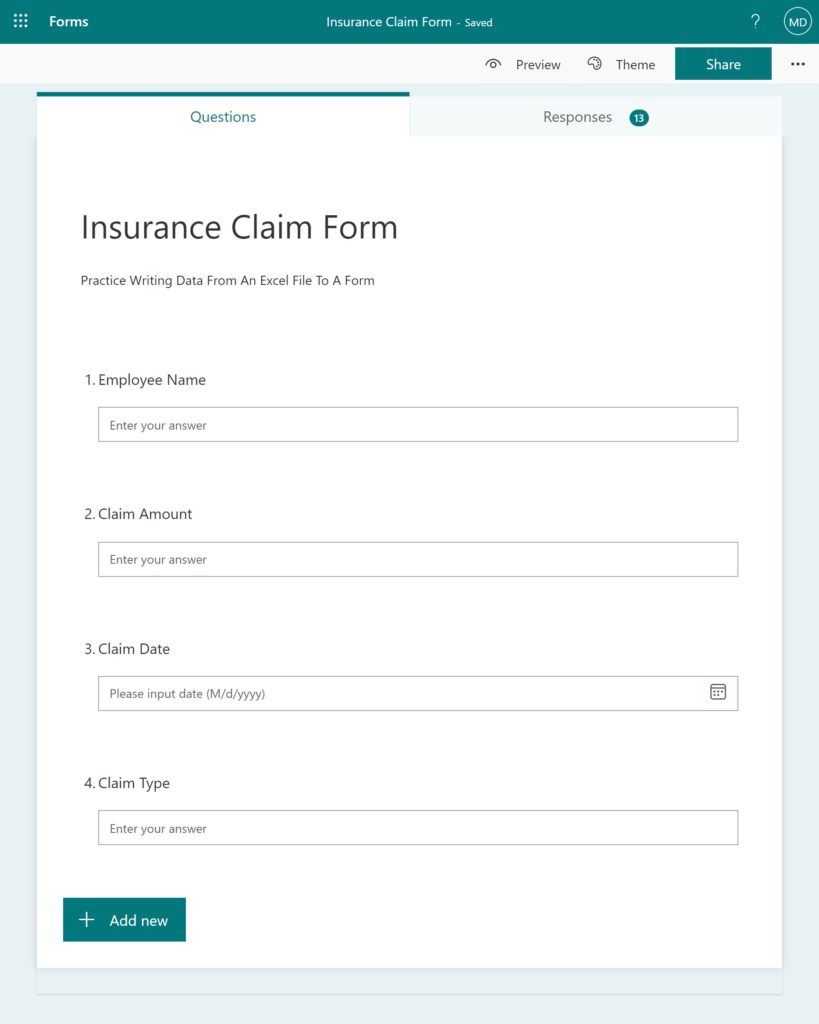
The form should these 4 fields with the following data types:
- 1. Employee Name (text)
- 2 Claim Amount (text)
- 3. Claim Date (date)
- 4. Claim Type (text)
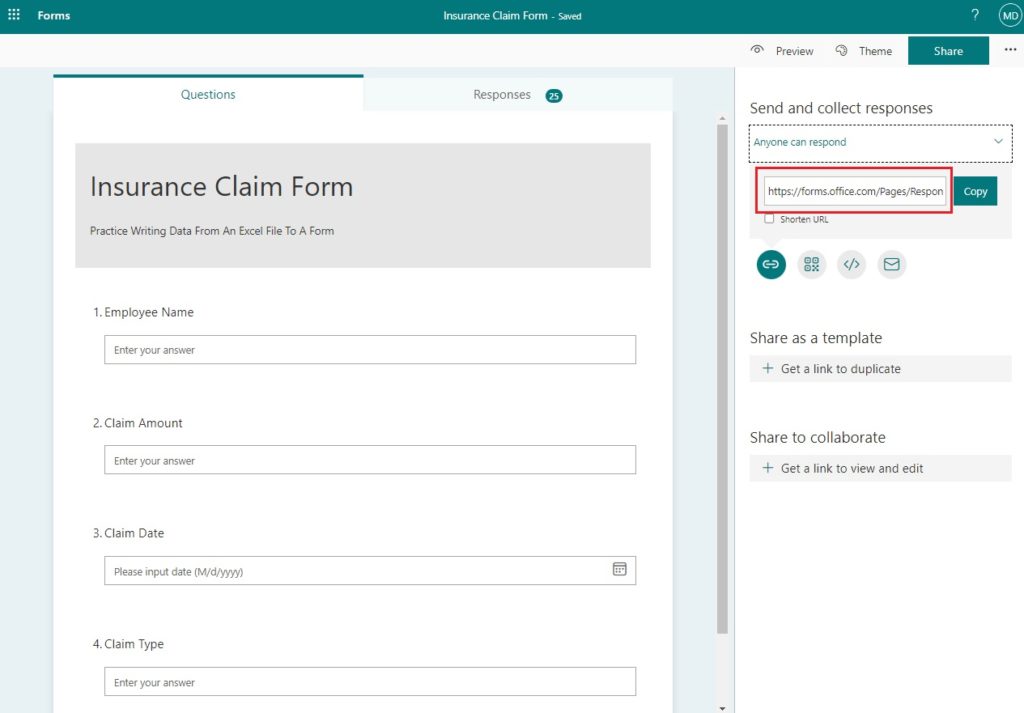
Once we are finished setting up the web form we click on the share button to obtain the form’s web address. We will use the web address to tell our Power Automate Desktop flow where the Insurance Claim Form can be found.
Make An Excel Spreadsheet With Insurance Claims Data
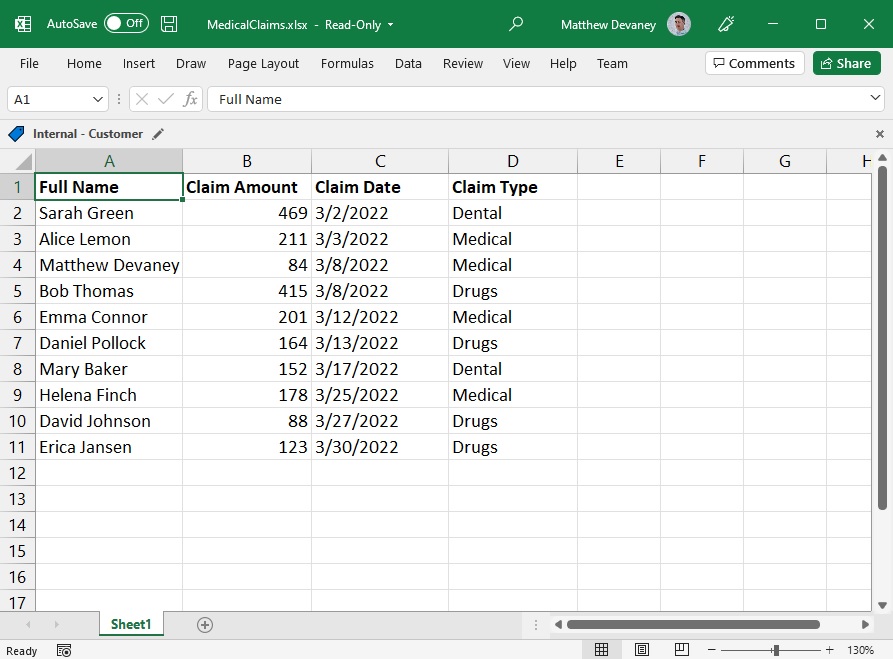
We also require an Excel spreadsheet with insurance claims data to enter into the website’s form. Open Excel and input the following data. When saving the spreadsheet make a note of the filename and folder path where it is stored. The path to my spreadsheet is:
C:RPAWriteExcelToWebFormMedicalClaims.xlsxCode language: CSS (css)
If you don’t want to type this out manually, you can get the Excel file from my Github repository.
Get The Values From An Excel Worksheet
We have now created the insurance claims data in Excel and and the Insurance Claims web form in Microsoft Forms. It is time to build a Power Automate Desktop flow to perform data entry from Excel to a website. Open Power Automate Desktop and create a new flow.
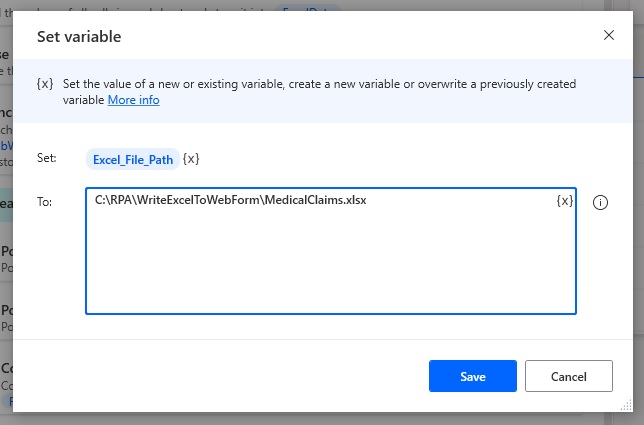
Add the 1st flow action Set Variable. Input the folder path and file name in the To field.
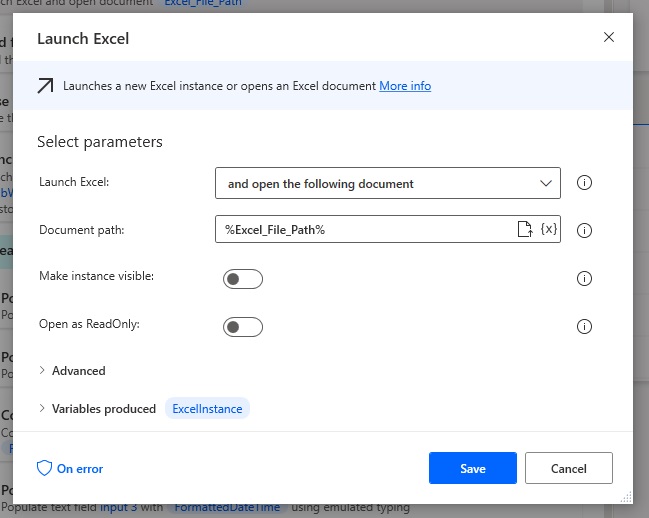
Launch Excel using the 2nd flow action. Change the Launch Excel parameter to and open the following document then make the document path reference Excel_File_Path variable.
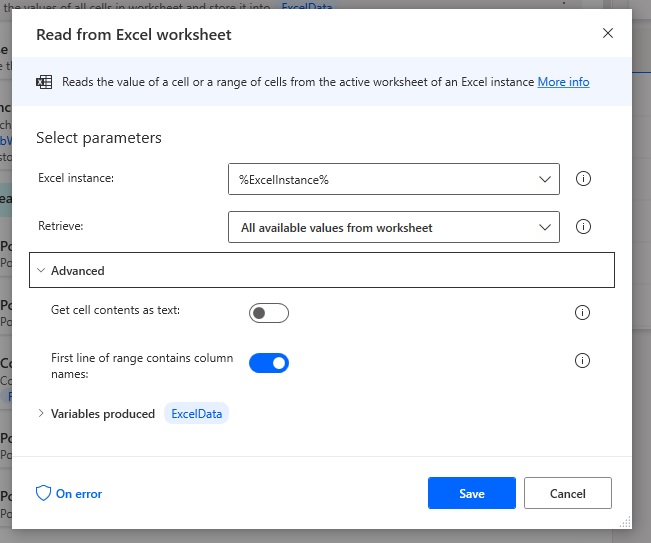
Next we will extract data from the opened Excel file. Insert a Read from Excel worksheet action, point it to the previous step’s Excel_Instance and retrieve all available values form the worksheet. Expand the Advanced options and set first line of range contains column names to true.
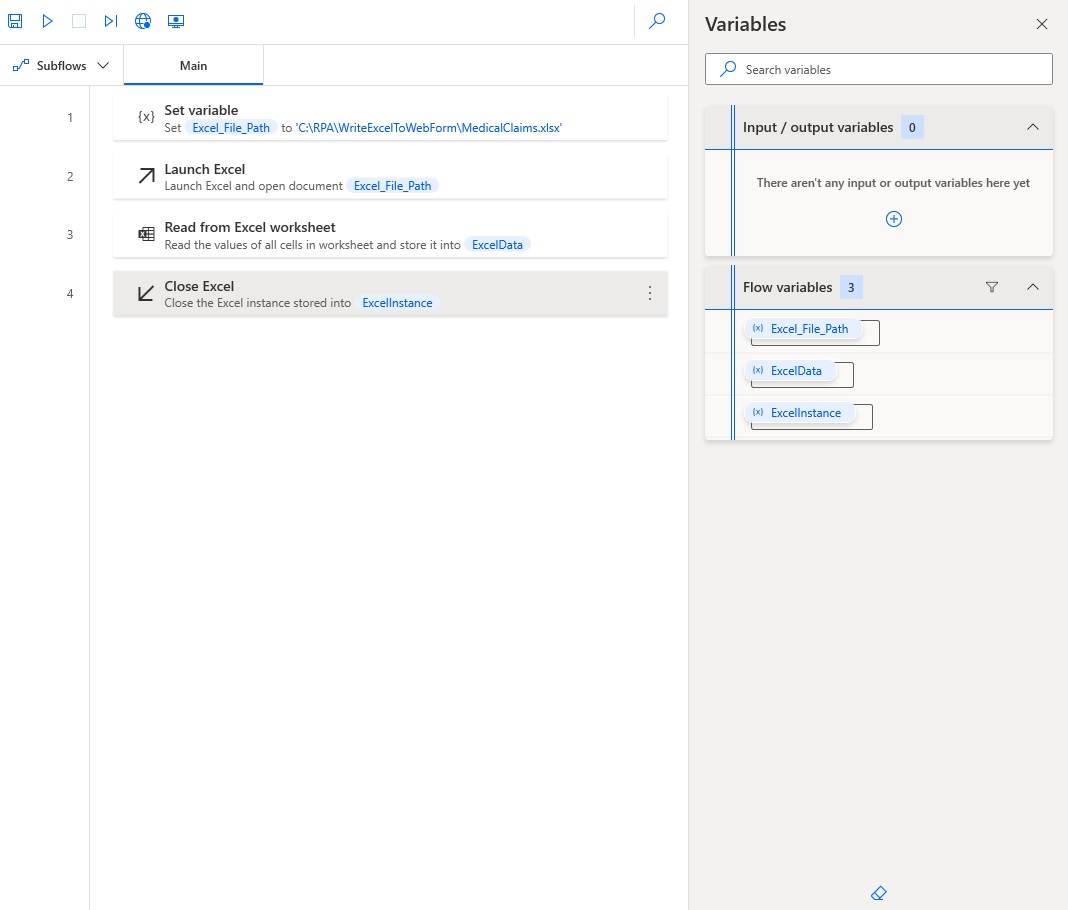
Then close the Excel workbook and do not save it.
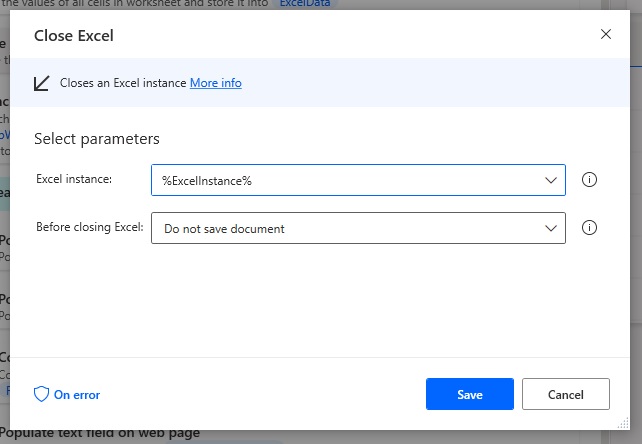
The first 4 steps in our Power Automate flow should look like this.
Test Desktop Flow Actions To Read The Excel Worksheet
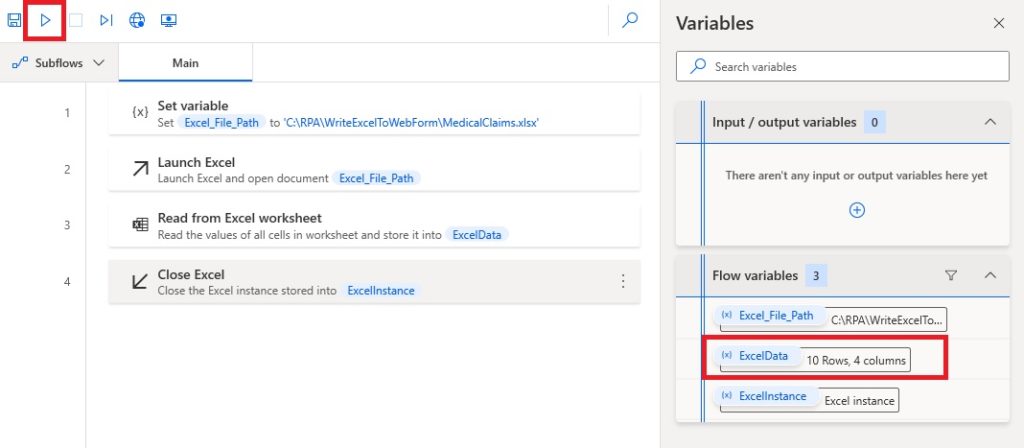
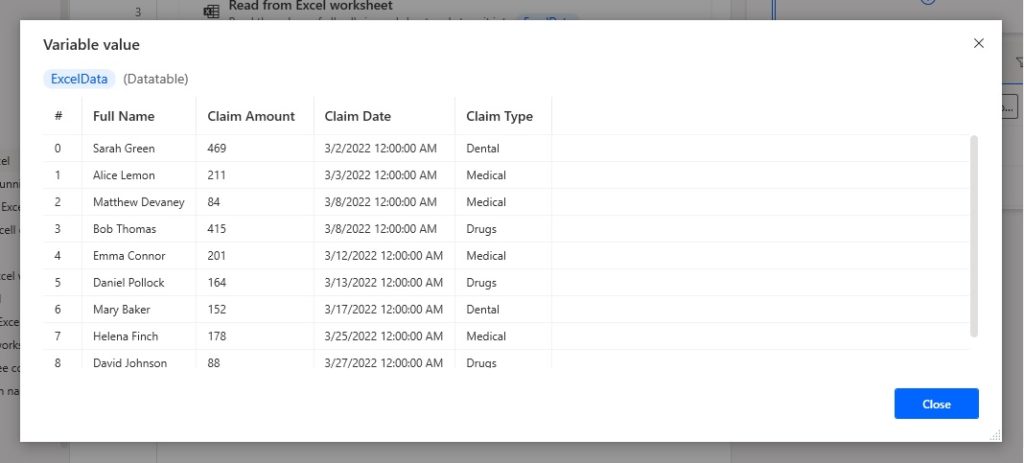
Before we go any further let’s make sure our Power Automate Desktop flow will successfully retrieve the Excel data and store it in a variable. Click the Play button and wait for the flow to run. The ExcelData variable should show 10 Rows, 4 columns once it is finished. Double click on the variable to inspect it.
We can see the data from the Excel worksheet has been saved to the ExcelData varaible.
Launch A New Web Browser Instance
After the insurance claims data is extracted from the Excel spreadsheet we must open a web browser to the insurance claims form. Insert a new Launch new Chrome (or other web browser) step. Choose new instance as the launch mode and supply the initial URL for Microsoft Form we built earlier.
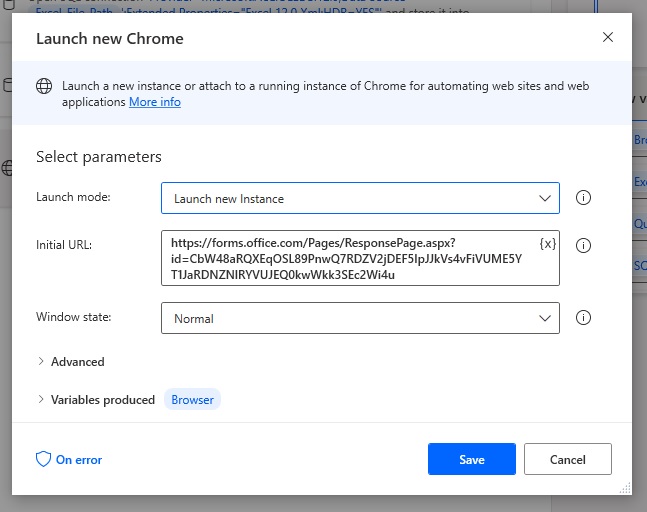
Click the play button to run the flow to verify if the web form opens as expected.
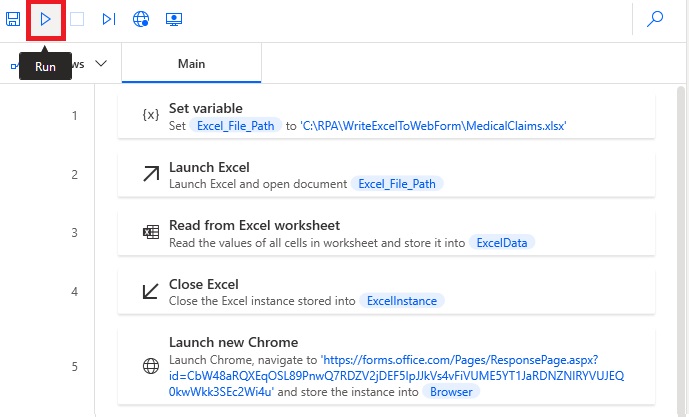
The insurance claims web form should appear a few moments after the flow starts running. Do not close the browser tab with the form. We will require it to be open for the next step.
Use The Web Recorder To Capture Data Entry Actions
Creating the actions to do data entry from Excel to a website is made easy by Power Automate Desktop’s web recorder. When we turn on the web recorder it creates action for each task we performed on website (populating a text field, clicking on a link, etc.). Then when we are done recording those actions become part of our flow.
Click on the web recorder to start icon to start recording.
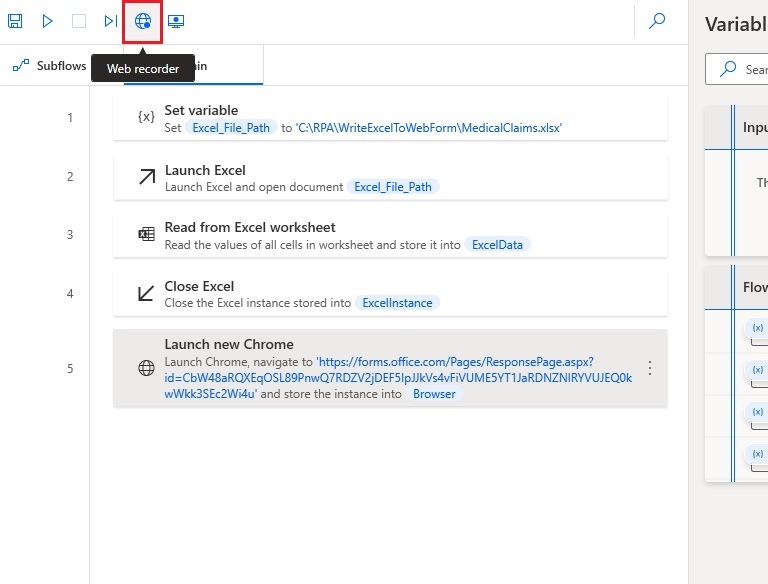
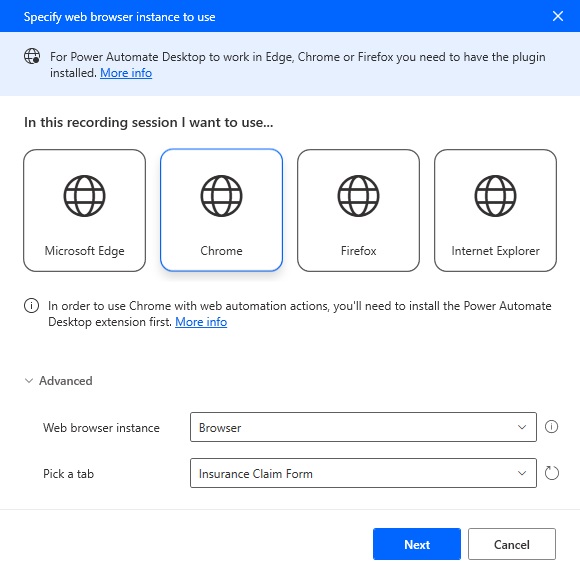
Select Google Chrome as the web browser, choose the web browser instance called Browser and pick the Insurance Claim Form tab. If you do not see Insurance Claim Form as a tab it is because you closed the browser tab with our Microsoft Form.
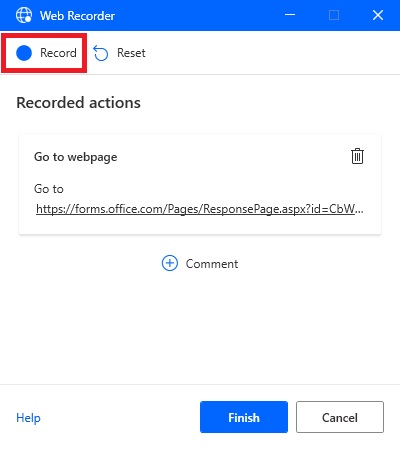
When the Web Recorder menu appears, click the Record button.
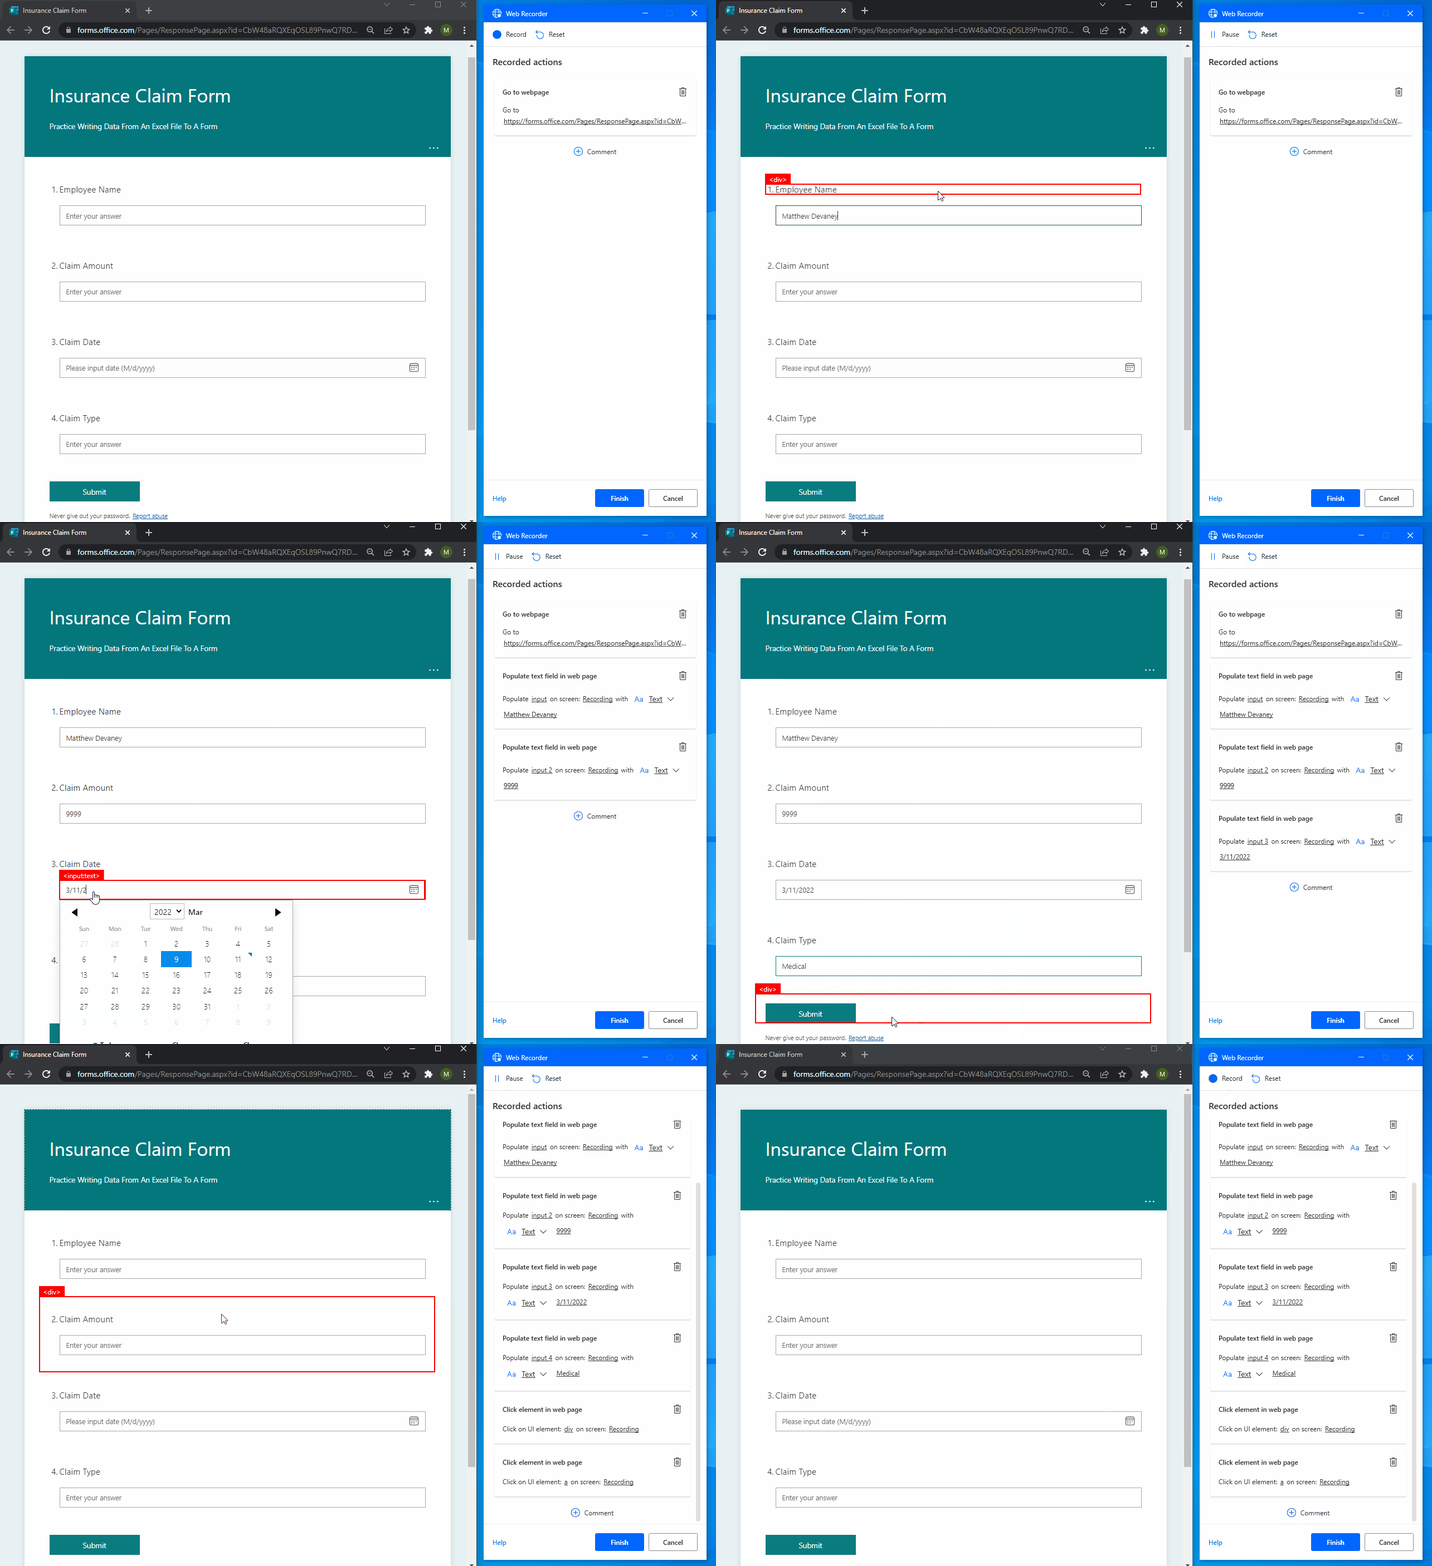
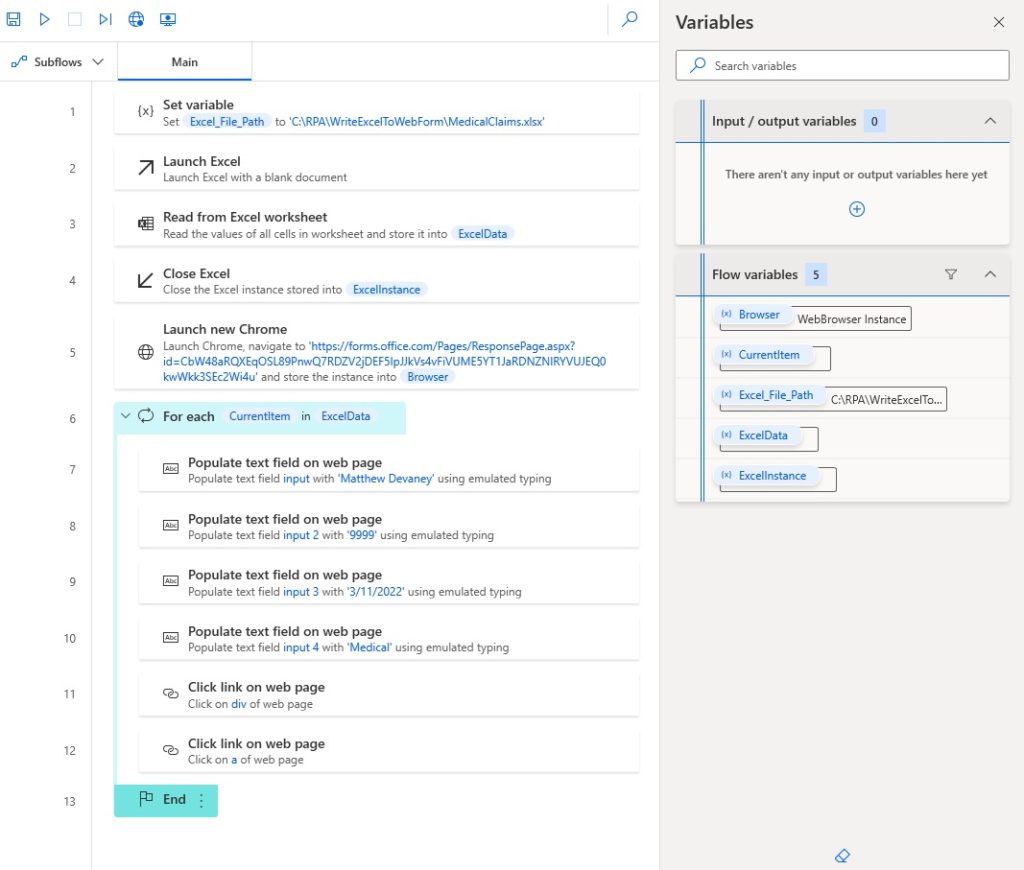
Now go ahead and fill in each field on the insurance claim form with fake values, submit the form, then click the link to start another response. As we do this we can see the actions generated in the web recorder. To finish the recording click the Pause button, then select Finish.
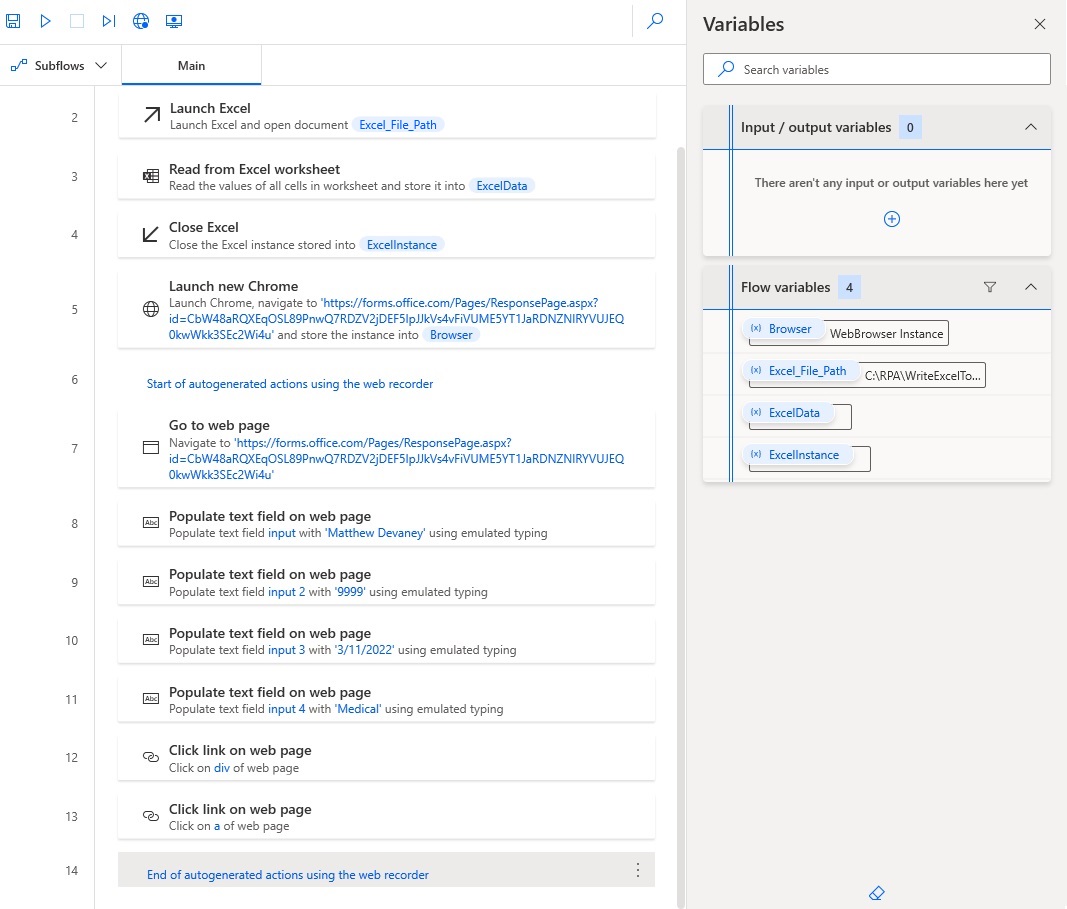
Any actions captured by the web recorder are added to the end of our main flow.
Insert A For Each Loop To Repeat Data Entry Actions
We only submitted one form with the web recorder but instead we want to submit many forms – one for each row in the Excel file. To accomplish this place a For Each loop around the steps autogenerated using the web recorder. Also, delete the flow action called Go To Webpage since we don’t want to open the form several times.
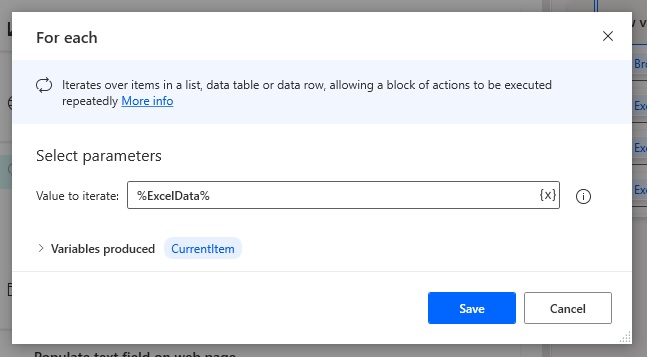
Edit the For Each loop to iterate over the ExcelData variable.
Edit Data Entry Actions To Input Values From Excel File
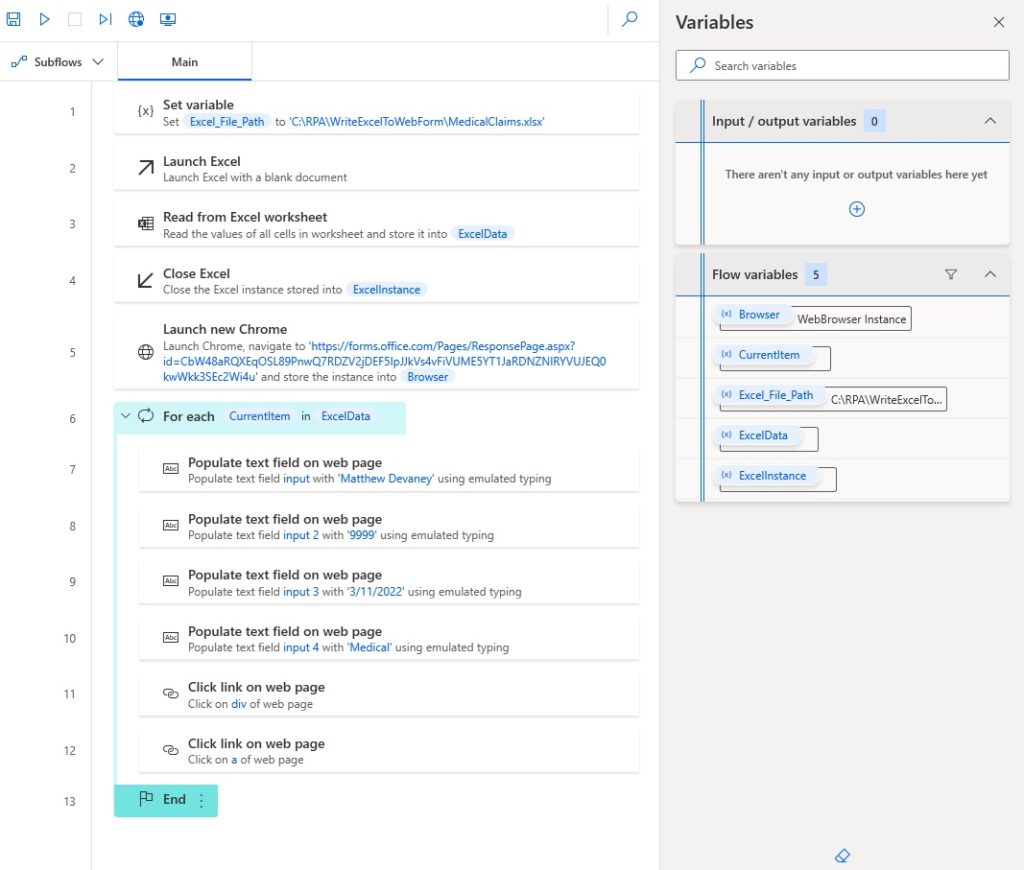
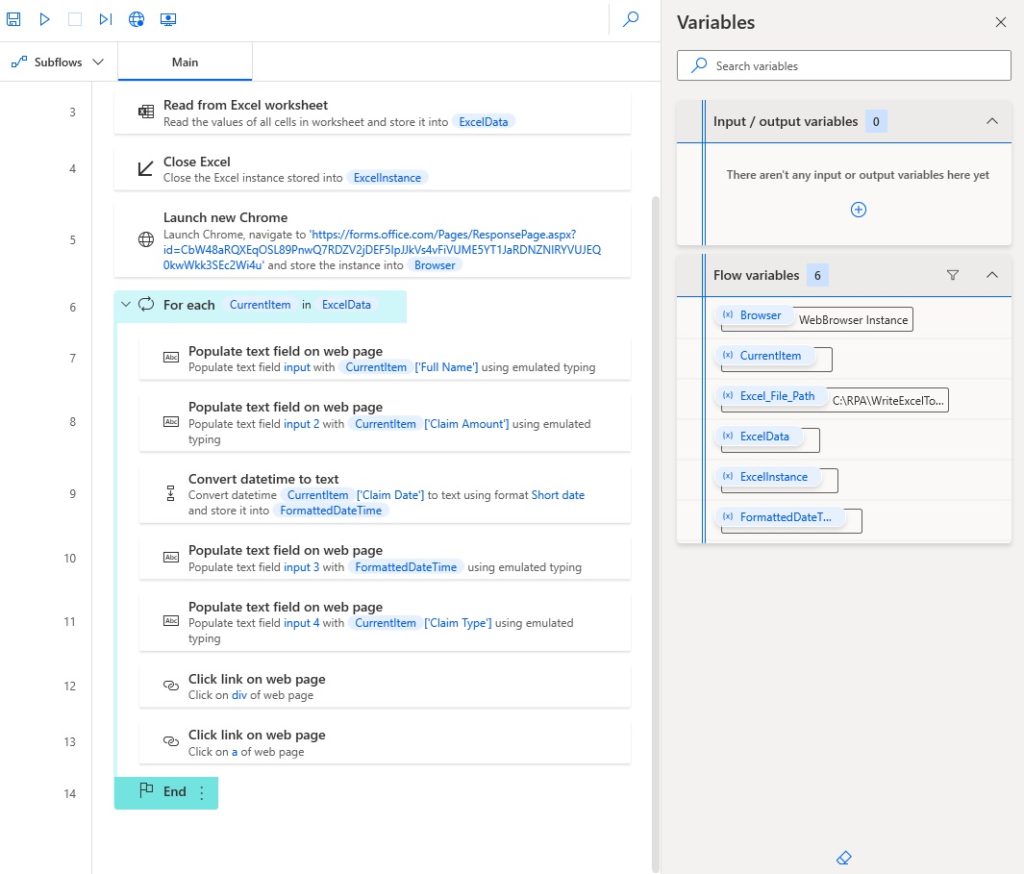
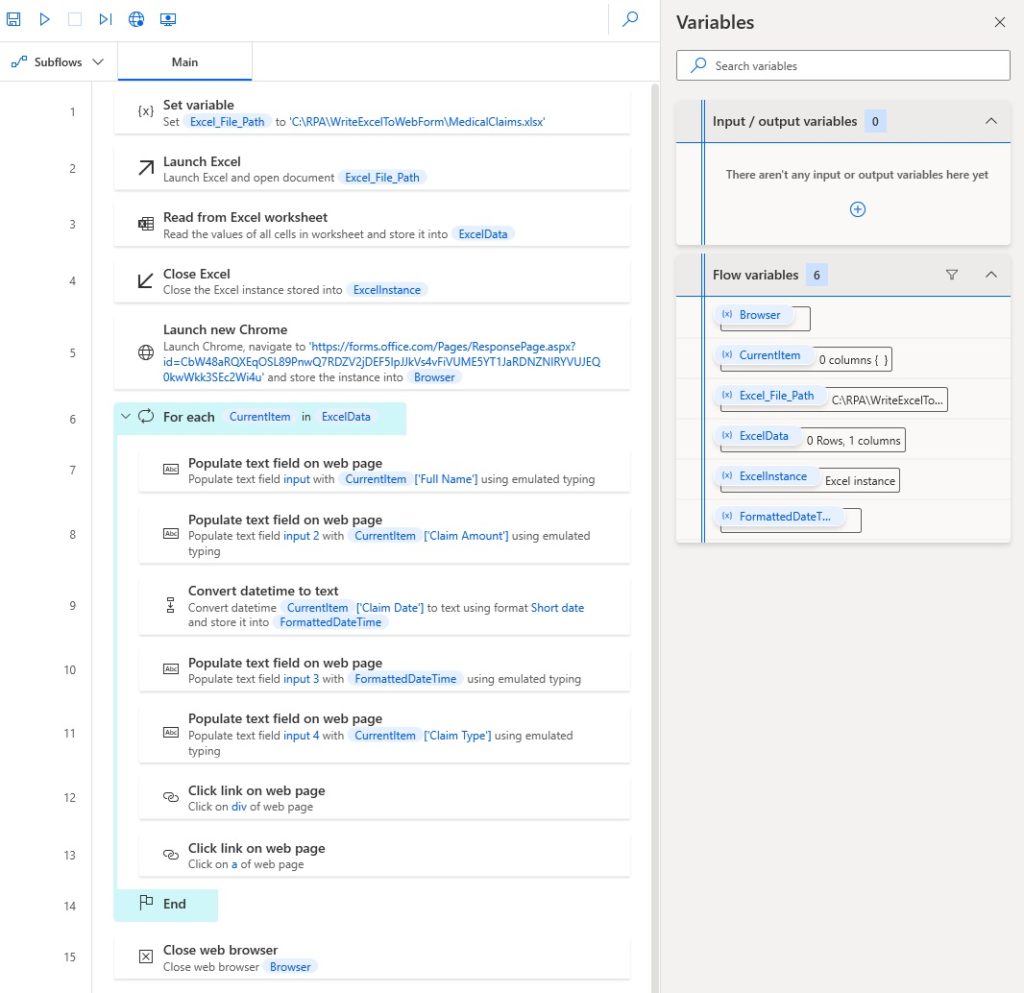
Right now the data entry actions for populating a text field on a web page are using hardcoded values we manually typed in. We want them to use values from the Excel file. To do this we must edit steps 7-10 of our Power Automate Desktop flow.
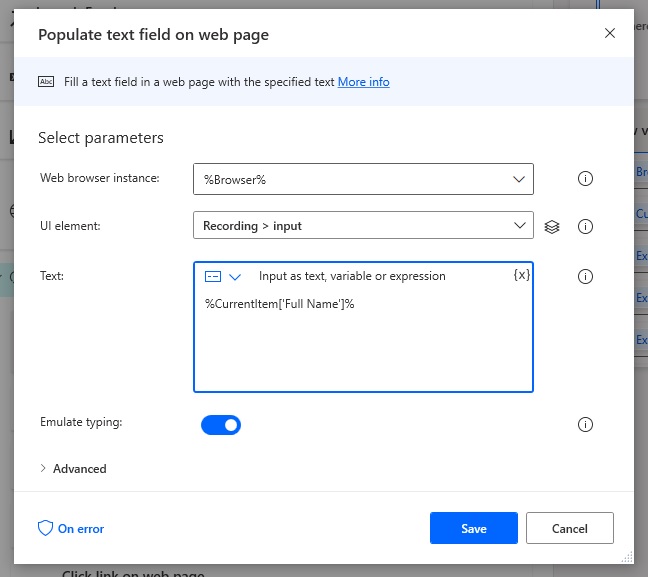
Change the 1st populate text field on web page action’s text parameter to CurrentItem[‘Full Name’].
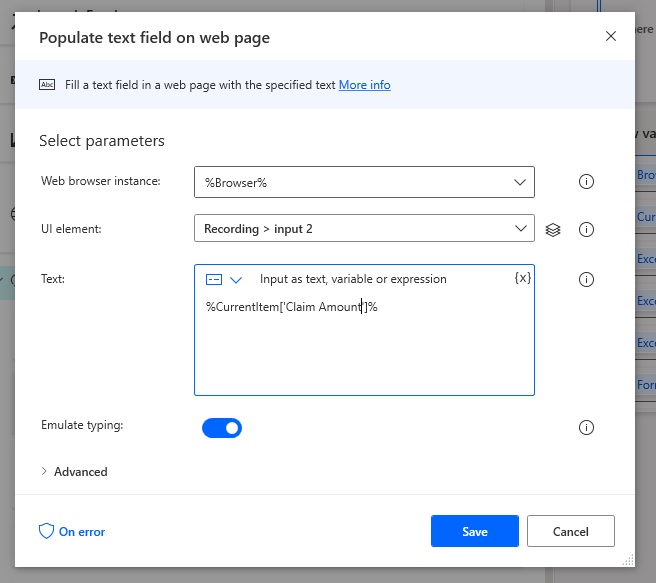
Then update the 2nd action’s text parameter to CurrentItem[‘Claim Amount’].
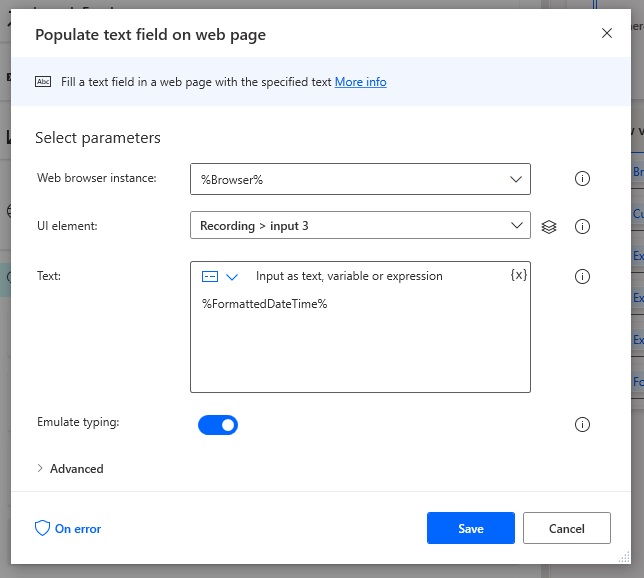
Before continuing to the 3rd action we must convert the datetime value in the ExcelData variable’s Claim Date field to a text value. Add a new Convert datetime to text action to the flow and choose the standard format Short date.
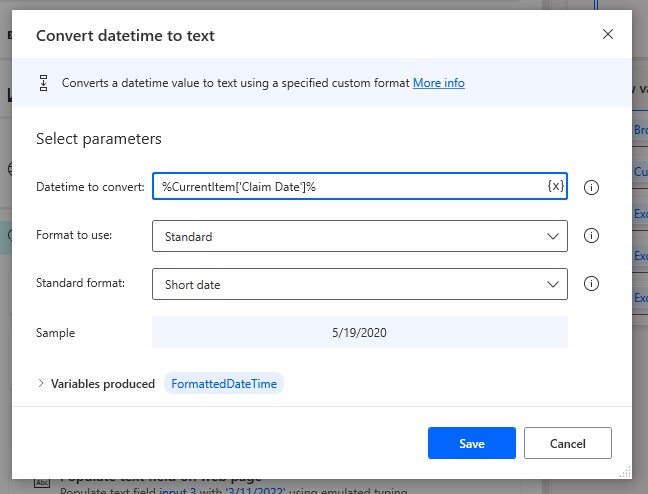
Use the FormattedDateTime variable in the 3rd action’s text property.
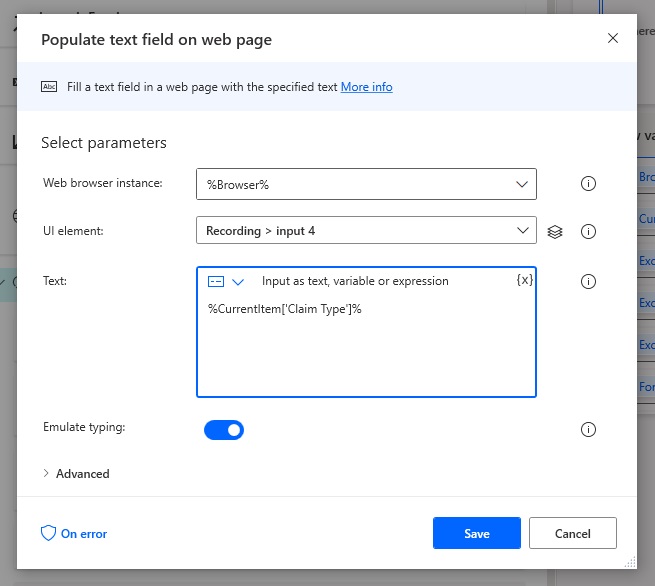
Finally, complete the 4th action’s Text field with CurrentItem[‘Claim Type’]
The result of all our updates should make the flow look like this.
Close The Web Browser Window
We’re almost done. The last action we must do is to close the web browser once the loop has completed.
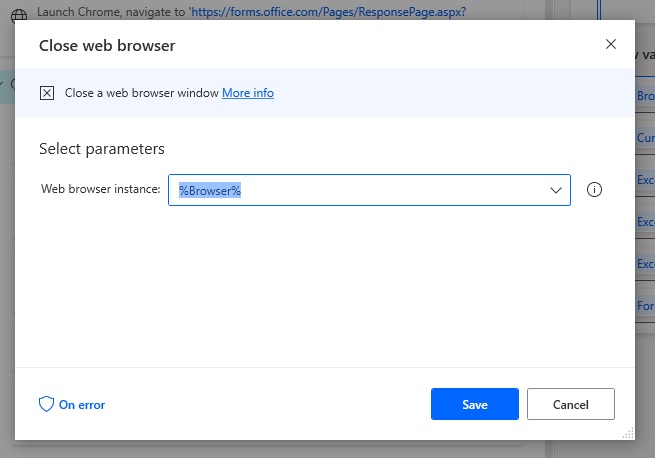
Add the Close web browser action to the end of the flow. The completed desktop flow should look like this.
Run The Power Automate Desktop Flow To Perform Data Entry
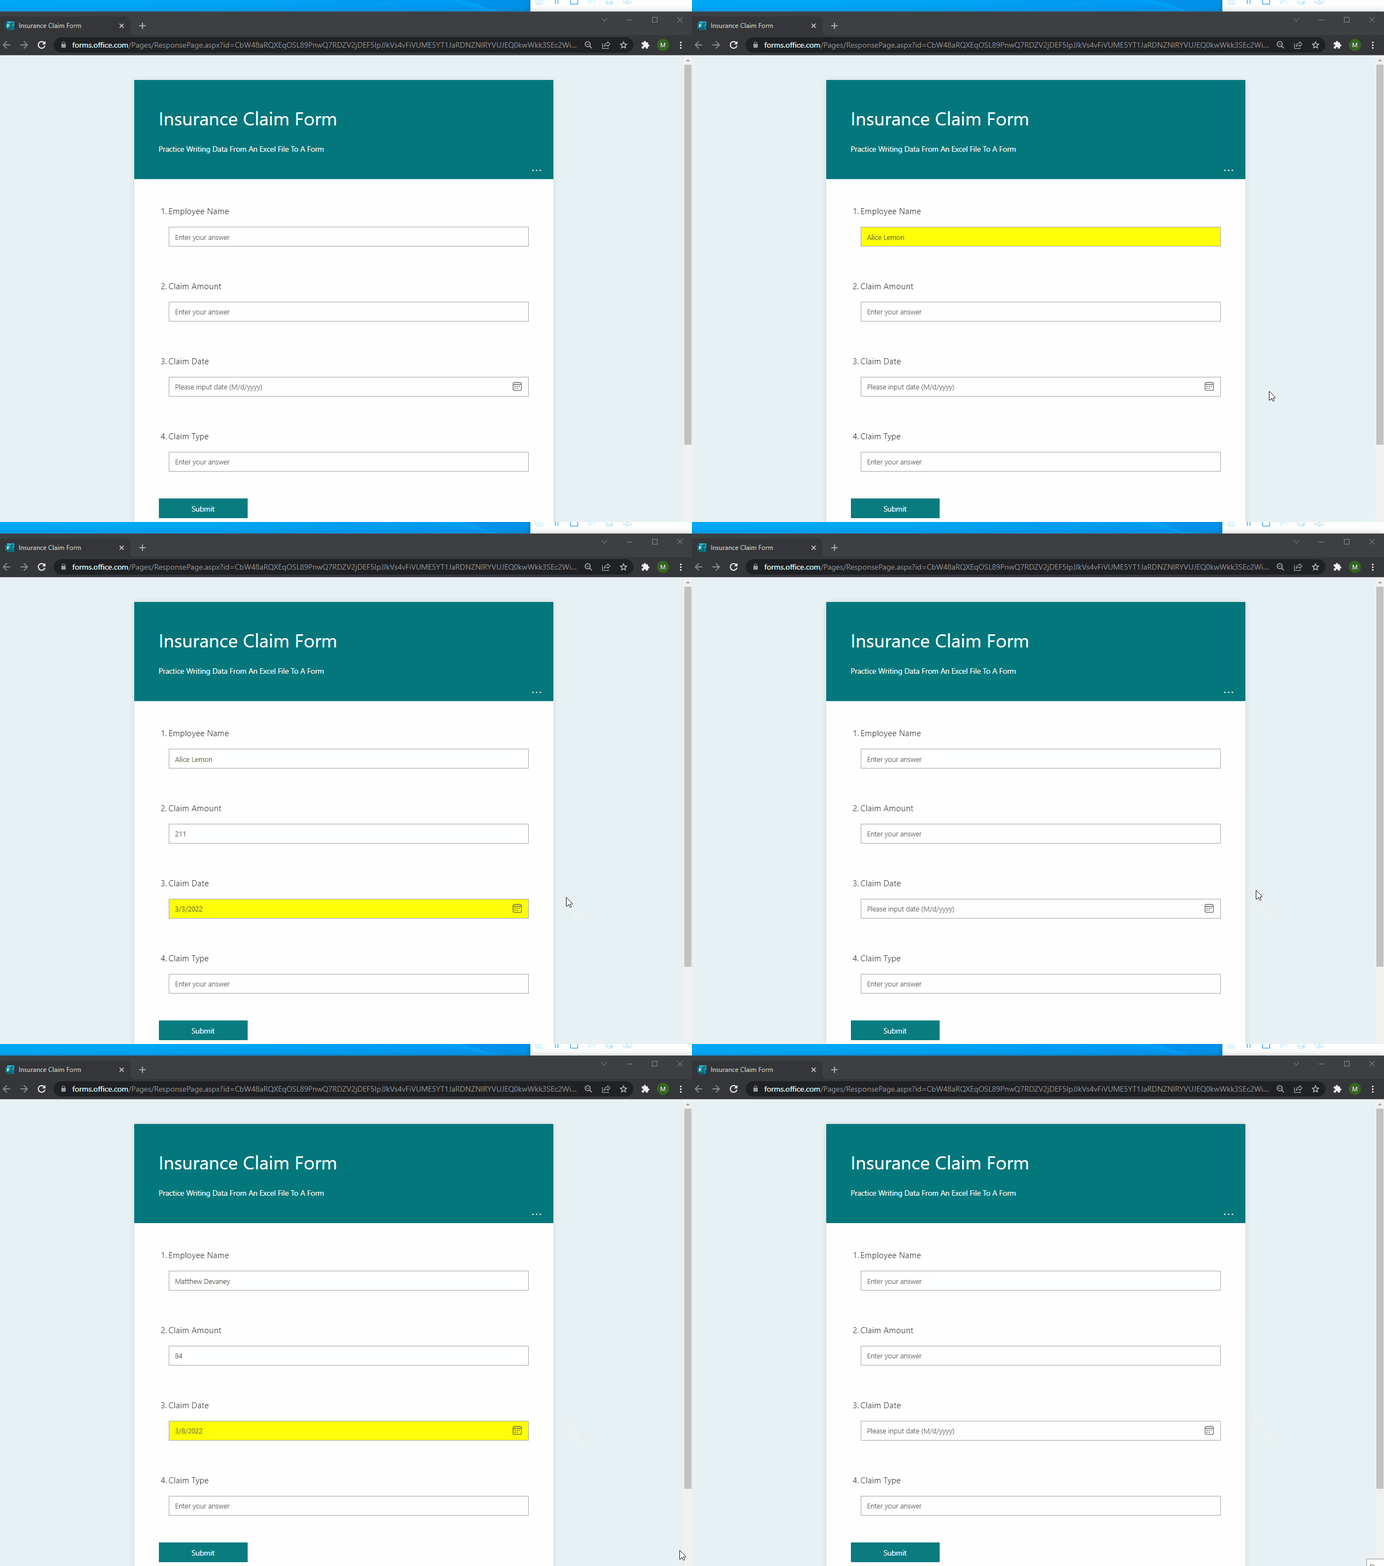
Press the play button to run the desktop flow. It will read-in data from the Excel file, open the the insurance claim form in Google Chrome, submit a form for each row in the table and then close the web browser.
Did You Enjoy This Article? 😺
Subscribe to get new Power Automate For Desktop articles sent to your inbox each week for FREE
Questions?
If you have any questions about Power Automate Desktop: Data Entry From Excel To Website please leave a message in the comments section below. You can post using your email address and are not required to create an account to join the discussion.


Great stuff! You should consider adding some ads your blog. You’re a major contributor to the Power Platform Community and should definitely be rewarded for your hard work!
Oh my! I love this, Matt! I haven’t gotten into PAD yet, because I’m focused on so many other things, but this makes me want to go utilize it. Could it be used to update data in a Microsoft List just as easily (instead of a form)? Because we don’t have access to premium connectors in Power Automate (cloud), we have been downloading tables from MySQL in Joomla with forms made in Fabrik, and then cleaning up the data for our MS List, and then copying and pasting the cleaned data into grid view. If I could get some kind of automation going where new information entered on Joomla is automatically updated in my MS List(s), that would be great. Not for this year’s festival (which is April 2nd), but for next year’s for sure.
Valerie,
Yes, Power Automate Desktop is capable of copy + pasting Excel data into a SharePoint list.
Power Automate Desktop has three ways to run:
1. Attended mode with manual trigger – free
2. Attended mode triggered by a flow – $USD 40/month (premium)
3. Unattended mode – $USD 150/month (premium)
I think your solution requires #2 or #3 which are considered premium. But please, let me know if I’m wrong about that. For #1 you would have to manually start the desktop flow by clicking the play button.
Awesome! I’ll give it a try when I have a chance!
Thanks so much for this article. I have always wanted to play with Power Automate Desktop (PAD) and I have now started.
Also, I must commend the fact that this blog is self-explanatory even for beginners. I would just like to suggest that you can embed a link to direct readers to a material or youtube video to install PAD in case they do not have PAD on their device.
Thanks
Olu,
Excellent idea. I will look into a video on how to install Power Automate desktop. Maybe I can even write an article!
thanks so much for this useful artIcle. I am new to Power Automate and have tried your approach to create a flow that populates web fields. The error I am encountering is with a particular field that is expecting a time input in the hh:mm format while the populate text field is passing over the input as text . Is there a “num enter” key equivalent as in uipath ? In this instance the time field is not significant ie it’s ok to just pass over dummy data 00:00 . Any insight will be much appreciated . Thanks
A-Yeo,
Do you have an example of the time field that I can test the solution to your question on?
Great article! I’d like to use power Automate to request access to software via a website. I normally would have to enter the requested software name then click request and then go to the next. But sometimes items already exist and that would trigger an error message telling me that this software is already installed – that error message needs to be clicked to close and then I can go to the next item. How do you handle this in Power Automate?
Cathy,
This is a great suggestion for a future article. Many people have encountered the same situation as you and wondered how to solve it.
Do you have a website where I can replicate this same issue for myself?
Wow! just came across your page , you are doing a great work, i found exactly what i was looking for in this article. you now have a follower.
Ajay,
Thanks buddy. I hope to write more about Power Automate Desktop soon.
you jump a lot of steps, do a video it is better
Mike,
What step did you have an issue with in the tutorial? Telling me I jumped alot of steps is not helpful. Please tell me where you get lost. I listen to the comments and improve my articles over time.
I disagree – I find Matthew’s tutorials much easier to follow and replicate than a video. Thanks again for your great content, Matthew!
Great tutorial as usual, Matthew! Just a note: for those of us whose countries follow the dd/mm/yyyy date format (aka, the *normal* format 😁), we need to use a custom datetime format in the “Convert datetime to text” step to convert the date to “MM/dd/yyyy”. Otherwise, we get errors in the form, as it’s set up for mm/dd/yyyy input.
Andrea,
Noted. I am a Canadian and we have wacky date formatting sometimes.
I personally prefer the ISO standard yy-MM-dd hh:mm:ss
Nice tutorial; thanks. I’ve got a situation where I need to input a single hospital’s financial data from an Excel tab into a single web form (already opened to corresponding URL for that hospital)… so no loops, etc. I’ve defined 4 contiguous ranges of Excel data via “Read from Excel” steps (see attached JOG)but in your example when you edit it to use your Excel data, you refer to column names … in my case I need to point each web form TXT box to use a particular cell in my Flow variable ranges, do you any other examples you might refer me to? Note: i have exiting VBA code that does all this, but with IE going away, i’ve been looking for alternatives and stumbled Power Automate and your website. Thanks
Thank you Matthew – almost there with my bulk import in to the Microsoft Teams Webinar tool (which offers no such thing) from my Excel sign up list from LinkedIn events.
Rupert,
Good luck on making your import tool!
Hi Matt
Great article I have used the above to do something similar!
1 Question is there a way to write out to a file which lines of the excel the loop was successful against?
Many thanks
Dan
Hi Matthew, the instruction is extremely helpful. Similar to the question Dan had previously, I receive back from the website different messages if something was successful or failed. How can I capture this as output which ones failed. How could the workflow read the success and fail messages and save it in my original excel file for example? Your support is very much appreciated!
Anne,
Is this question related to the Microsoft Forms tutorial used in my website or something else? I have not encountered an error message with MS Forms.
Hi Matthew,
I was so excited when I found your article. This is exactly what I’m looking for. However, there is 1 “small” different thing which causes a problem.
My Excel-file is on a Sharepoint-site. When I try to run the flow, in the 2nd step the following error appears: “filename” is opened in another application. Close it first and try again. (translation from my Dutch error, so I’m not 100% sure if this the right translation 🙂 )
Do you know how I could fix this?
Thanks in advance.
Kind regards,
Mark
Mark,
That error means there is currently a file lock in place. Someone or some process is currently using the file. I’d suggest looking to see if the Excel process is open on your computer. You can kill it using the terminate process action in Power Automate Desktop. That might help.
Additionally, some new SharePoint actions were just added to PAD. You might want to look into those!
Thank you Matt for the great and clear content.
can you pls teach us how to “click ” the survey bar on a webpage based on the data in excel?
For example, if the data is “7”, then we send the mouse click to click on “7” on the website?
Thank you in advance
Wow, Matt, this is fascinating! I haven’t delved into PAD yet as I’ve been tied up with various other tasks, but your description here has me really intrigued. I’m curious, could PAD be used to update data within a Microsoft List seamlessly, bypassing the need for a form? Our current setup involves downloading tables from MySQL in Joomla, creating forms in Fabrik, cleaning the data, and then manually transferring it to our MS List because we lack premium connectors in Power Automate (cloud). It’s quite a process.
Automating the flow so that new information from Joomla could automatically update our MS List(s) would be incredibly useful, especially looking ahead to next year’s festival (April 2nd). Great stuff!
Hello,
This is such great content, thank you! Can Power Automate pull info from an excel spreadsheet, put it into in online form, then read the ‘result,’ then write the result back into the spreadsheet? For example, a sheet contains 1,000 addresses but every row is missing the zip code. Can Power Automate pull the address from the sheet and input it into the USPS’s zip code tool, read the zip code ‘answer,’ and put that back into the sheet? My problem is virtually identical to this sample. Thanks
Patrick,
Yes, your goal is achievable with Power Automate desktop. Best of luck with building your flow.
Hi,
Like suppose if any error is occurring then how flow will stop and user get notification.
Urvashi,
You must build error-handling into your flows to do this.
https://learn.microsoft.com/en-us/power-automate/desktop-flows/errors
I’m evaluating whether Power Automate can work with the webform that I need an autofill to do. I have 3 questions after replicating your “Date Entry from EXCEL to Website” exercise:
1) How does one deal with a CAPTCHA within a Power Automate script?
2) What is the syntax to create a complex Populate text field on web page” Text, with more than one CurrentItem variable and some punctuation/spacing?
3) Can one handle a multiple screen .aspx webpage?
I am able to click its Continue pushbutton (after fulfilling a CAPTCHA manually) on screen 1 to flow to screen 2, but I can imagine a difficulty the .aspx as loop FOR EACH CurrentItem — perhaps I should Open, then Close the browser for each loop’s row/entry?
This was incredibly helpful to me in learning how to link the Excel Table to the loop variables for data entry which worked. Thank you !
I am now stuck with the loop not wanting to end after it read the Excel data i provided. But we have left the launch pad with your help !
i followed all your steps but it fill the same text in my web page that is %CurrentItem[‘DESC’]% what is the problem ?
Ahmed,
Power Automate now uses PowerFx functions. You are using classic
MATTHEW DEVANEY,
SO PLEASE;
WHAT VE I TO DO TO PUT THE CELLS TEXT IN THAT WEB FORM ?
I VE A WORKSHEET CONTAIN 7 COLUMNS AND ABOUT FROM 50 TO 100 ROWS , EVERY DAY THE DATA IS CHANGED , AND I VE TO FILL ALL THE ROWS INSIDE THAT WEB PAGE THAT IS IN THE PICTURE I SENT AS A SCREENSHOT .
COULD YOU PUT ME IN THE RIGHT WAY , PLEASE ?
IS THERE ANY WAY TO MAKE THAT ?
IS THERE ANY ANSWER ?