Power Automate Flow To Host A Web Page/Web Application

Power Automate can be used to display a web-page or even a single-page web application in a web browser. To do this, the flow must be triggered when an HTTP Request is received and output HTML back to the web browser in the flow’s response. If you don’t know how to write the code for a web-page it’s not a problem. You can use a GPT prompt to let AI write the code for you.
Introduction: The Contact Form Web Page
A Contact Form web page is hosted using Power Automate. The form collects the a name, an email, phone number, etc. and submits the information to a SharePoint list.
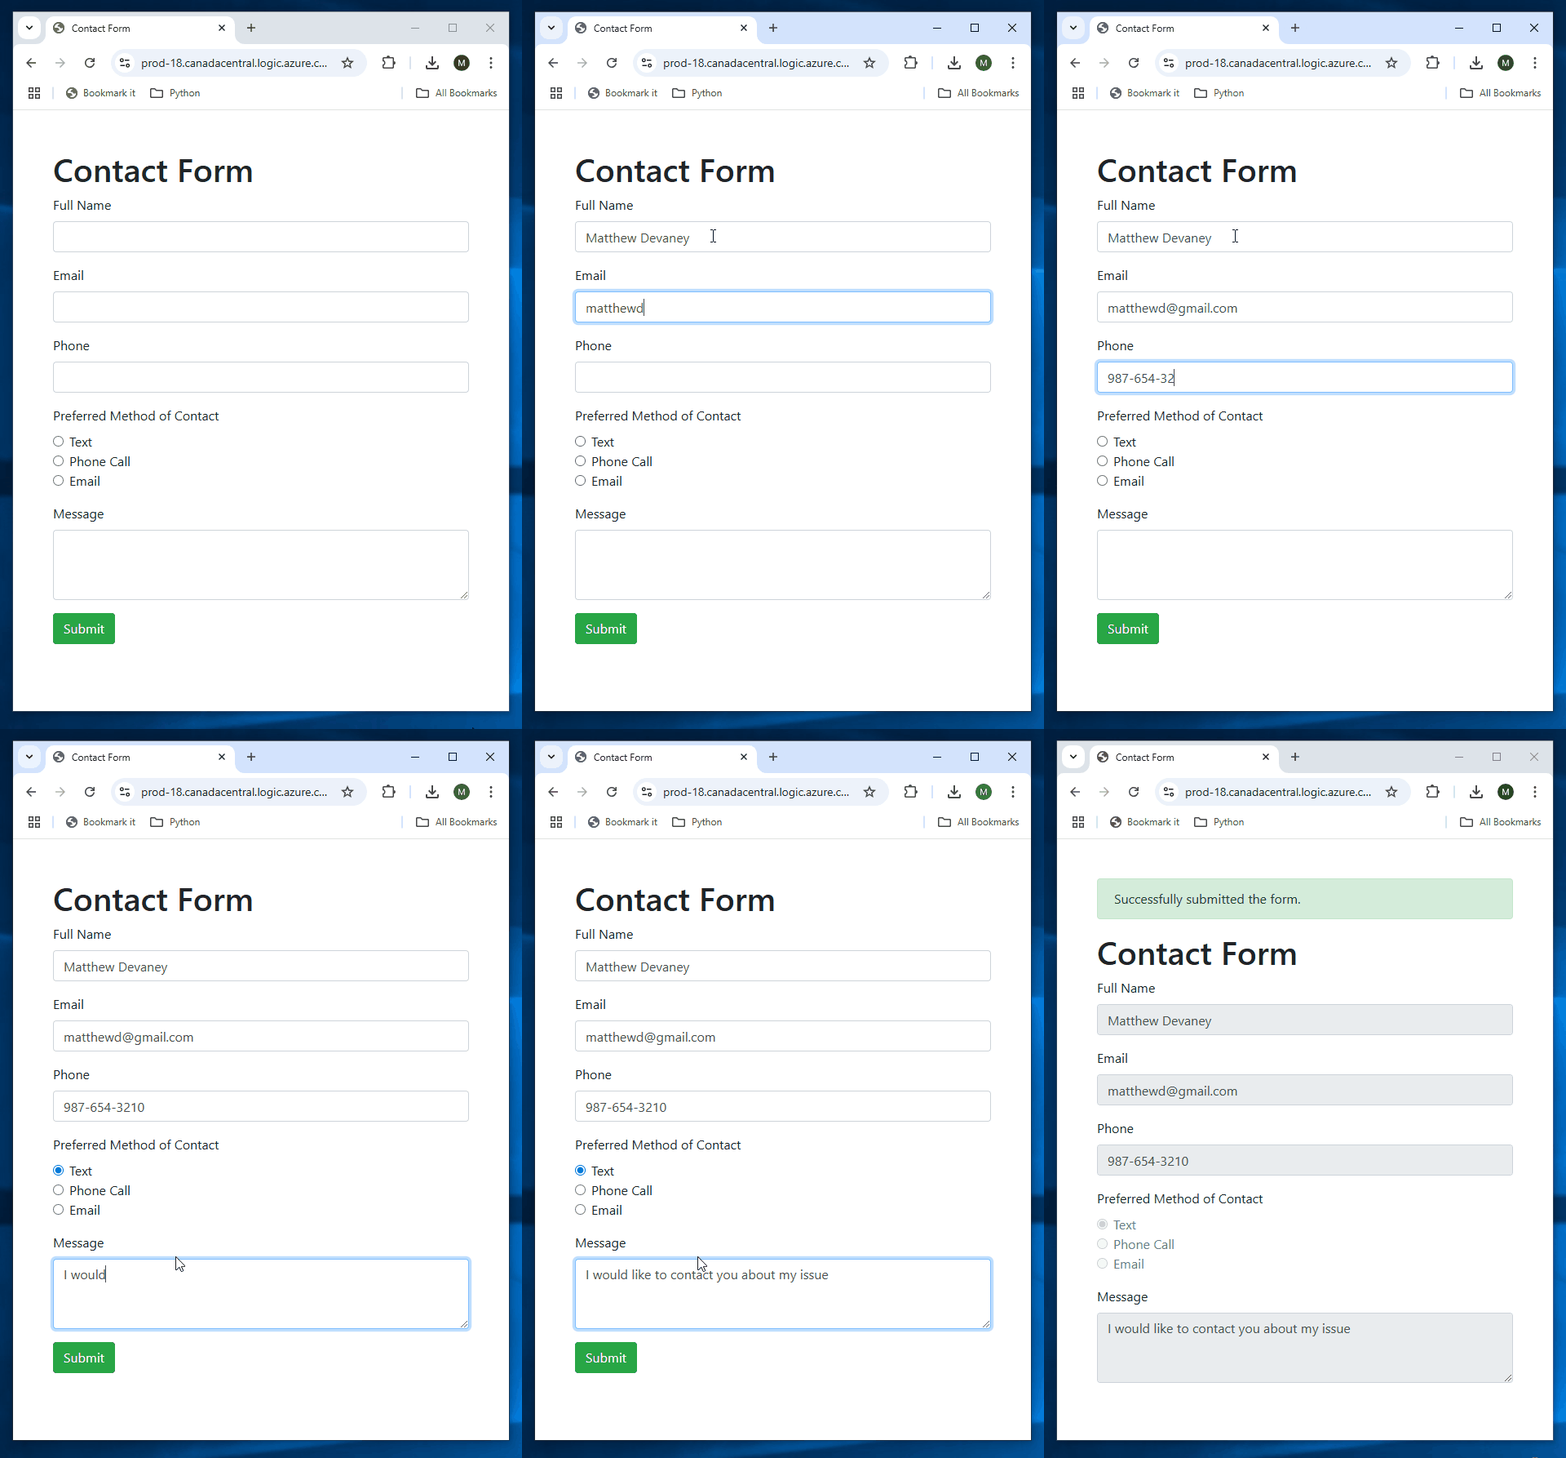
The web page is displayed when a user visits the URL in the When a HTTP request is received trigger.
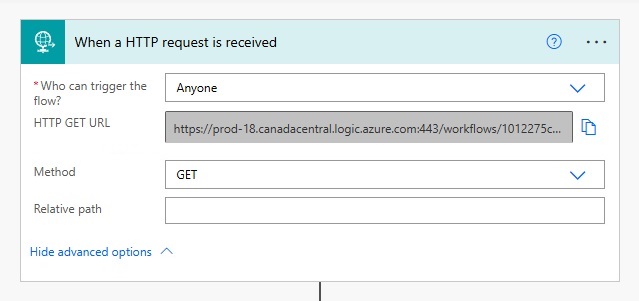
Trigger A Flow When An HTTP GET Request Is Received
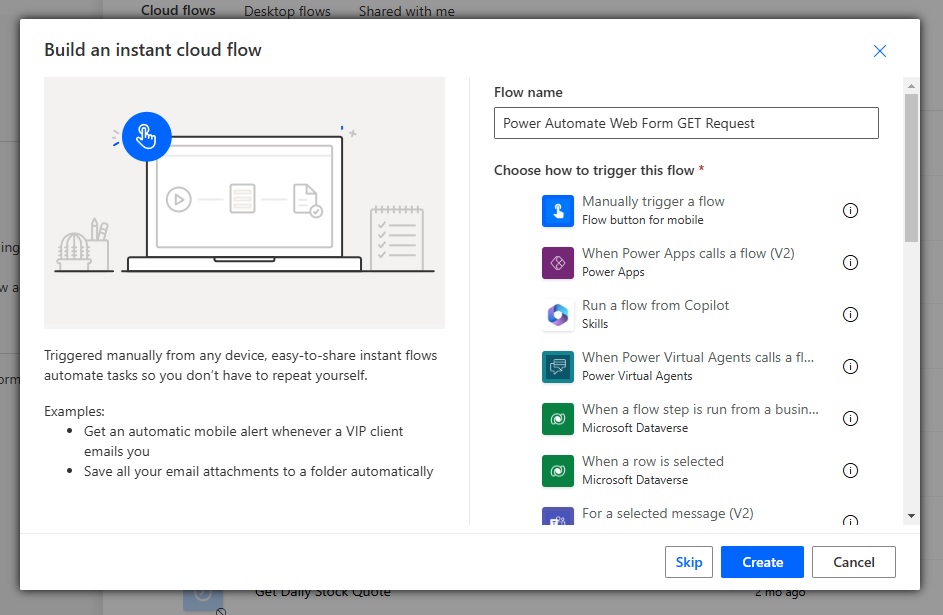
Go to Power Automate and create a new instant flow named Power Automate Web Form GET Request. Select the When An HTTP Request Is Received trigger.
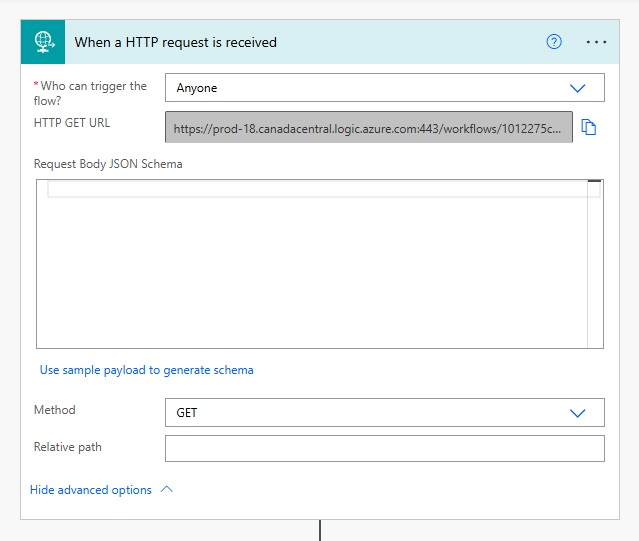
Allow Anyone to trigger the flow and select the GET method.
Generate The Web Page HTML And Javascript Code
When the user presses the Submit button on the form we must trigger a 2nd flow to collect the form data and write it to SharePoint. We will build this flow after we have created the initial web page.
Add a variable named varFlowUrlPostRequest to the flow with a type String. Give it the value https://example.com. The value will be replaced by the 2nd flow’s URL later on.
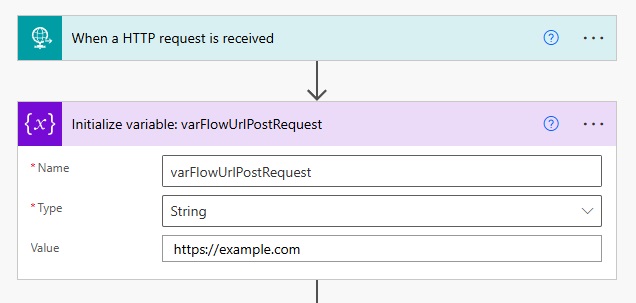
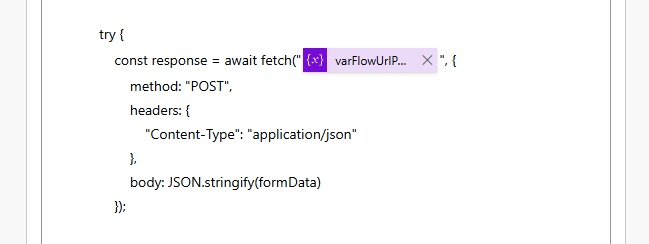
Add a Compose action to store the web page HTML and Javascript code. I generated this code using a GPT prompt that you can find at the end of this article. Note that the URL in the FETCH function must be pointing to the varFlowUrlPostRequest variable.

Copy and paste this code into the Compose action.
<!DOCTYPE html>
<html>
<head>
    <meta charset="UTF-8">
    <meta name="viewport" content="width=device-width, initial-scale=1.0">
    <title>Contact Form</title>
    <link href="https://stackpath.bootstrapcdn.com/bootstrap/4.5.2/css/bootstrap.min.css" rel="stylesheet">
</head>
<body>
    <div class="container mt-5">
        <div id="alert-container"></div>
        <h1>Contact Form</h1>
        <form id="contactForm">
            <div class="form-group">
                <label for="fullname">Full Name</label>
                <input type="text" class="form-control" id="fullname" name="fullname" required>
            </div>
            <div class="form-group">
                <label for="email">Email</label>
                <input type="email" class="form-control" id="email" name="email" required>
            </div>
            <div class="form-group">
                <label for="phone">Phone</label>
                <input type="text" class="form-control" id="phone" name="phone" required>
            </div>
            <div class="form-group">
                <label>Preferred Method of Contact</label>
                <div class="form-check">
                    <input class="form-check-input" type="radio" name="preferredmethodofcontact" id="contactText" value="Text" required>
                    <label class="form-check-label" for="contactText">Text</label>
                </div>
                <div class="form-check">
                    <input class="form-check-input" type="radio" name="preferredmethodofcontact" id="contactPhoneCall" value="Phone Call" required>
                    <label class="form-check-label" for="contactPhoneCall">Phone Call</label>
                </div>
                <div class="form-check">
                    <input class="form-check-input" type="radio" name="preferredmethodofcontact" id="contactEmail" value="Email" required>
                    <label class="form-check-label" for="contactEmail">Email</label>
                </div>
            </div>
            <div class="form-group">
                <label for="message">Message</label>
                <textarea class="form-control" id="message" name="message" rows="3" required></textarea>
            </div>
            <button type="submit" class="btn btn-success">Submit</button>
        </form>
    </div>

    <script>
        document.getElementById("contactForm").addEventListener("submit", async function(event) {
            event.preventDefault();
            const form = event.target;

            const formData = {
                fullname: form.fullname.value,
                email: form.email.value,
                phone: form.phone.value,
                preferredmethodofcontact: form.preferredmethodofcontact.value,
                message: form.message.value
            };

            try {
                const response = await fetch("@{variables('varFlowUrlPostRequest')}", {
                    method: "POST",
                    headers: {
                        "Content-Type": "application/json"
                    },
                    body: JSON.stringify(formData)
                });

                if (response.ok) {
                    showAlert("Successfully submitted the form.", "success");
                    setFormToViewMode(form);
                } else {
                    showAlert("Failed to submit the form.", "danger");
                }
            } catch (error) {
                showAlert("Failed to submit the form.", "danger");
            }
        });

        function showAlert(message, type) {
            const alertContainer = document.getElementById("alert-container");
            alertContainer.innerHTML = `
                <div class="alert alert-${type}" role="alert">
                    ${message}
                </div>
            `;
        }

        function setFormToViewMode(form) {
            Array.from(form.elements).forEach(element => {
                if (element.tagName.toLowerCase() !== "button") {
                    element.disabled = true;
                }
            });
            form.querySelector("button[type='submit']").style.display = "none";
        }
    </script>
</body>
</html>Code language: HTML, XML (xml)
Return HTML With A Power Automate Response
The Power Automate flow will return HTML to the web browser using a response action. Add the Response action and give it a status code of 200. Insert the Compose action outputs into the body of the response.
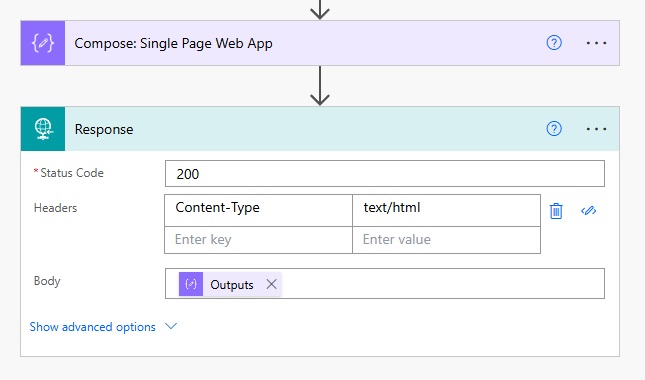
Use the text/html Content-Type in the Headers to tell the web browser to render the web page as HTML.
| Key | Value |
| Content-Type | text/html |
Display The Contact Form Web Page Using Power Automate
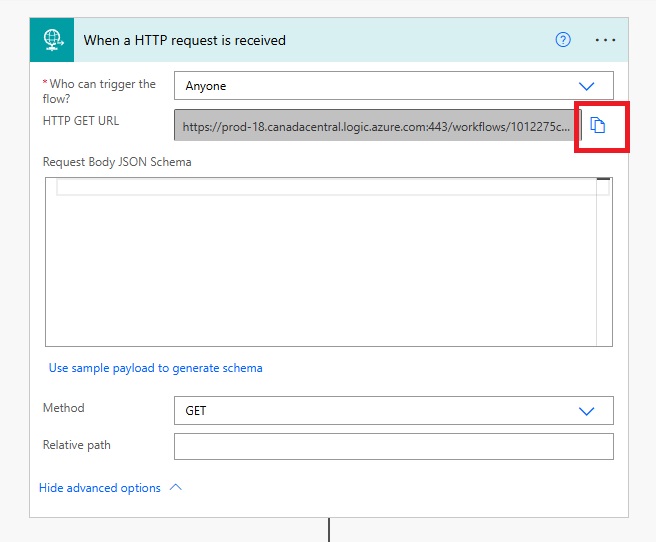
Before running the flow it is important to save and refresh the flow editor in order to regenerate the HTTP GET URL in the flow trigger. Once this is done, copy the URL and paste it into a web browser.
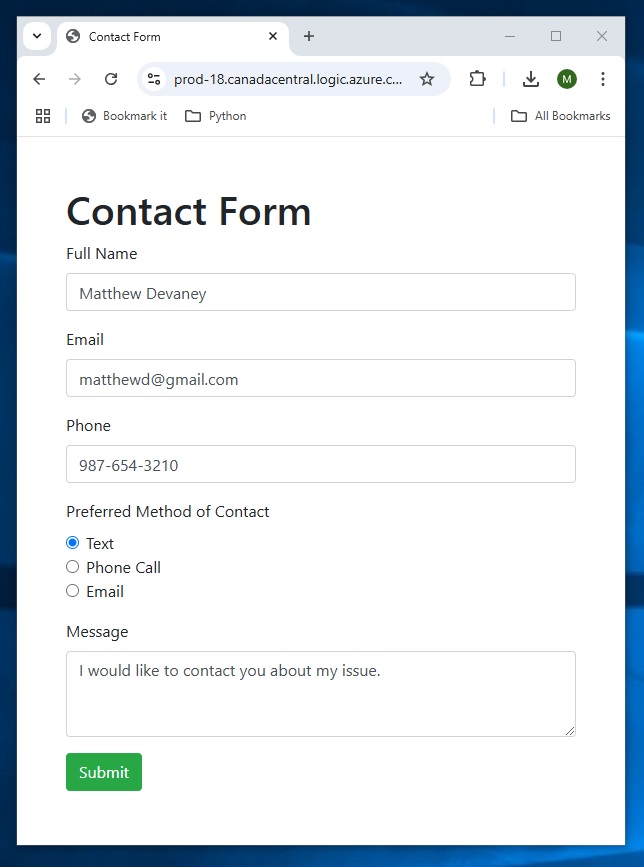
The Contact Form appears web page appears and the user can enter values into it. However, the Submit button will not work until we create the 2nd flow.
Setup The Contact Form SharePoint List
The 2nd Power Automate flow collects the form details and writes them to a SharePoint list. Create a new SharePoint list named Contact Form with the following details:
- Full Name – single line of text
- Email – single line of text
- Phone – single line of text
- Preferred Method Of Contact – choice: Text, Phone Call, Email
- Message – multiple lines of text
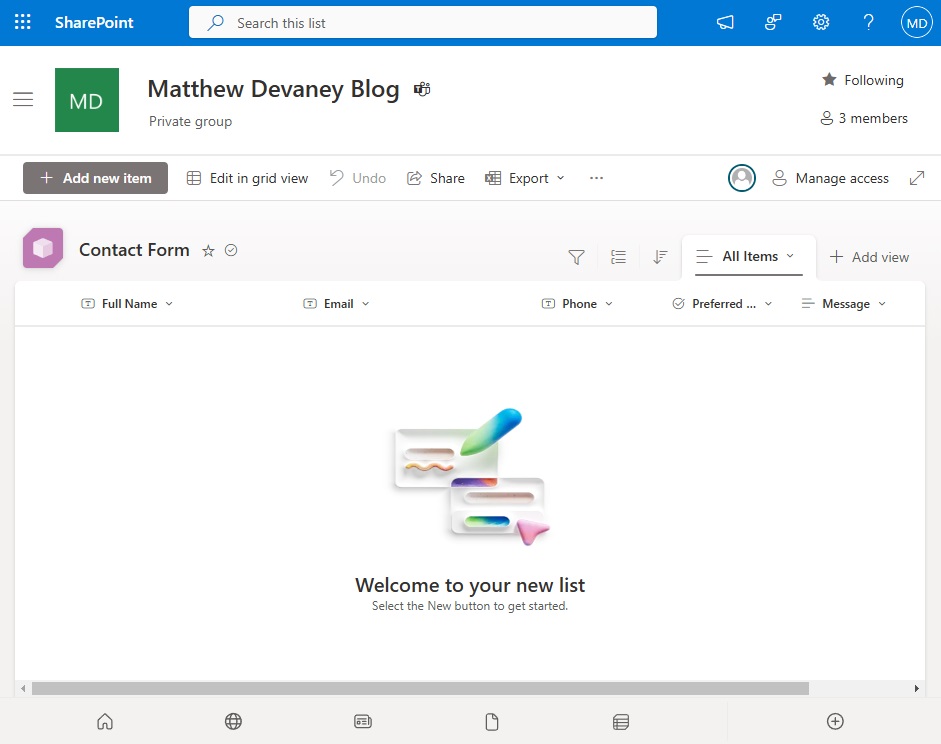
Save Form Data When An HTTP Post Request Is Received
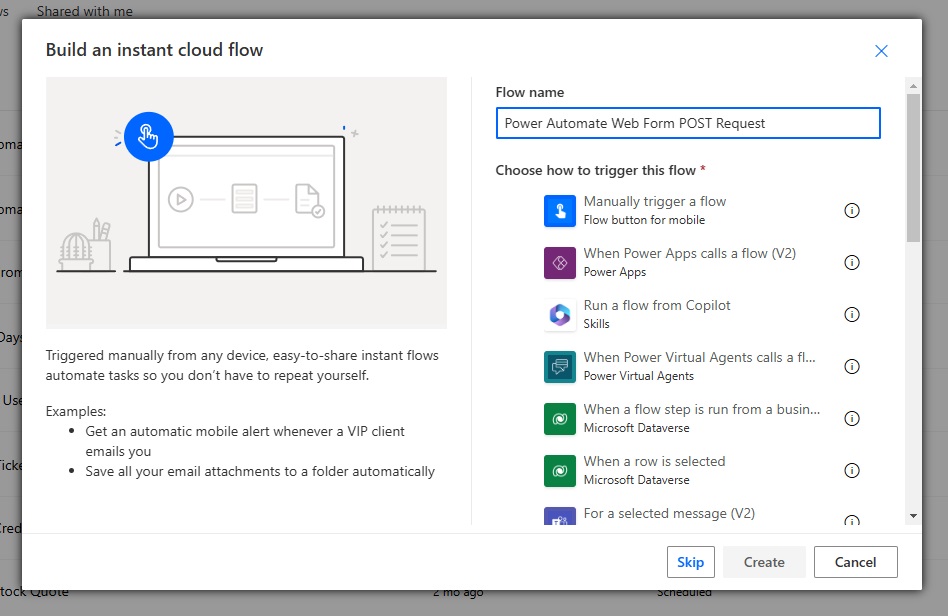
When the Contact Form is completed and the user presses the Submit button we want to save its data to SharePoint. Create a 2nd flow in SharePoint with an instant trigger named Power Automate Web Form POST Request. Select the When An HTTP Request Is Received trigger.
Choose the POST method in the flow trigger and supply the request body JSON schema. Then add a Data Operations – Parse JSON and a SharePoint – Create Item action to the flow as shown below.
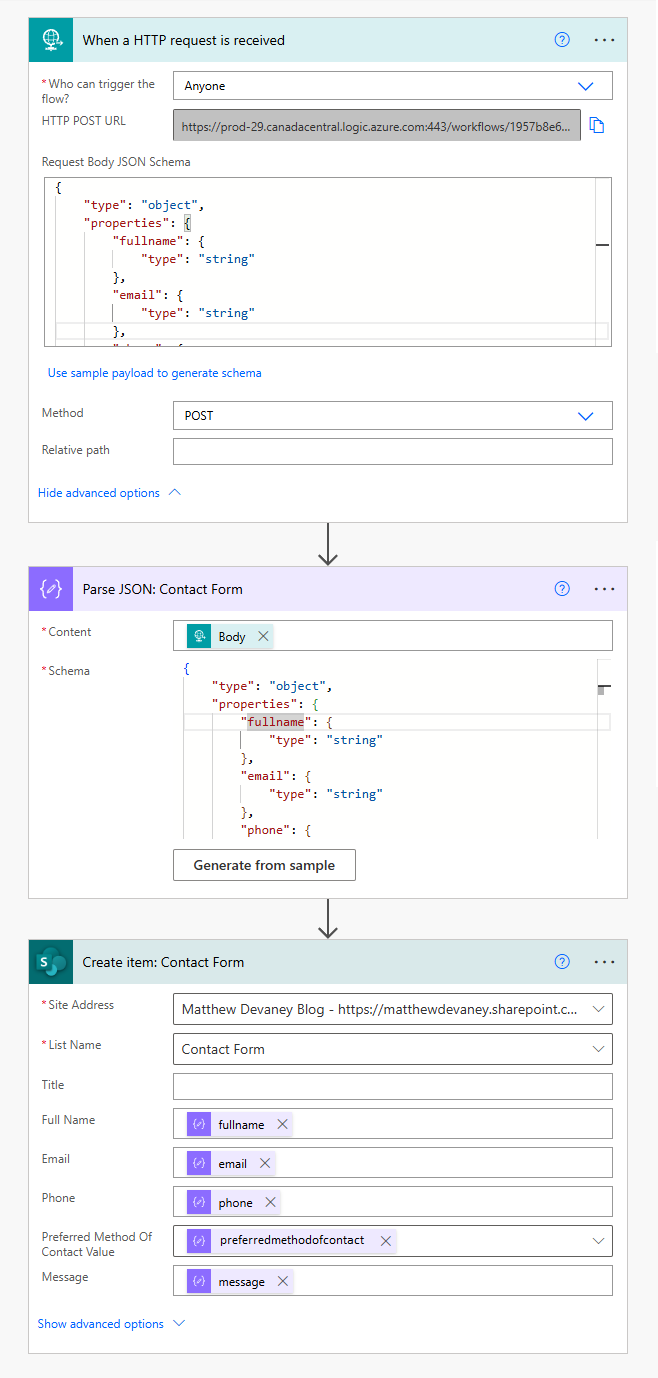
Use this JSON schema in both the flow trigger and the Parse JSON action.
{
    "type": "object",
    "properties": {
        "fullname": {
            "type": "string"
        },
        "email": {
            "type": "string"
        },
        "phone": {
            "type": "string"
        },
        "preferredmethodofcontact": {
            "type": "string"
        },
        "message": {
            "type": "string"
        }
    }
}Code language: JSON / JSON with Comments (json)
Here is a sample JSON that is output when the form is submitted.
{
  "fullname": "Matthew Devaney",
  "email": "[email protected]",
  "phone": "987-654-3210",
  "preferredmethodofcontact: "text",
  "message": "I would like to contact you about my issue"
}Code language: PHP (php)
Call The POST Request Flow On Form Submit
There’s one more step to make this work. Copy the HTTP Post URL and save it to the clipboard.
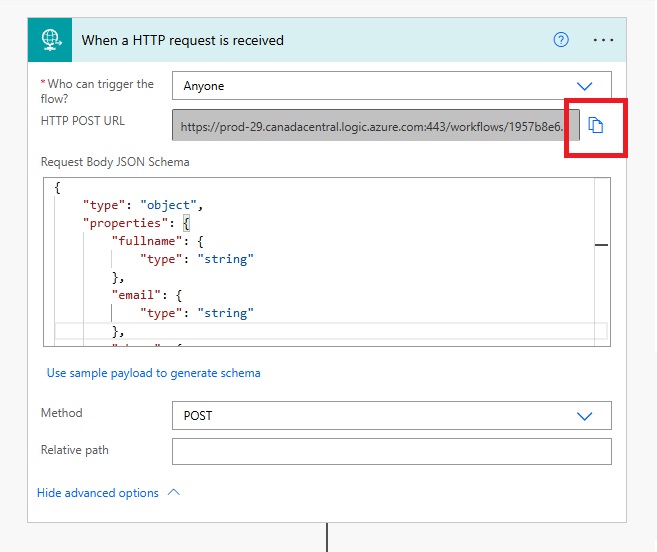
Then paste the POST request URL into the varFlowUrlPostRequest variable in the 1st flow we build (GET Request).
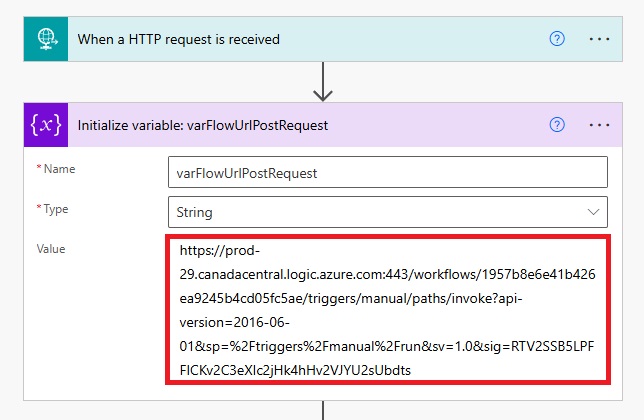
For reference, the varFlowUrlPostRequest variable is using inside of the web page code.
Run The Power Automate Web Page
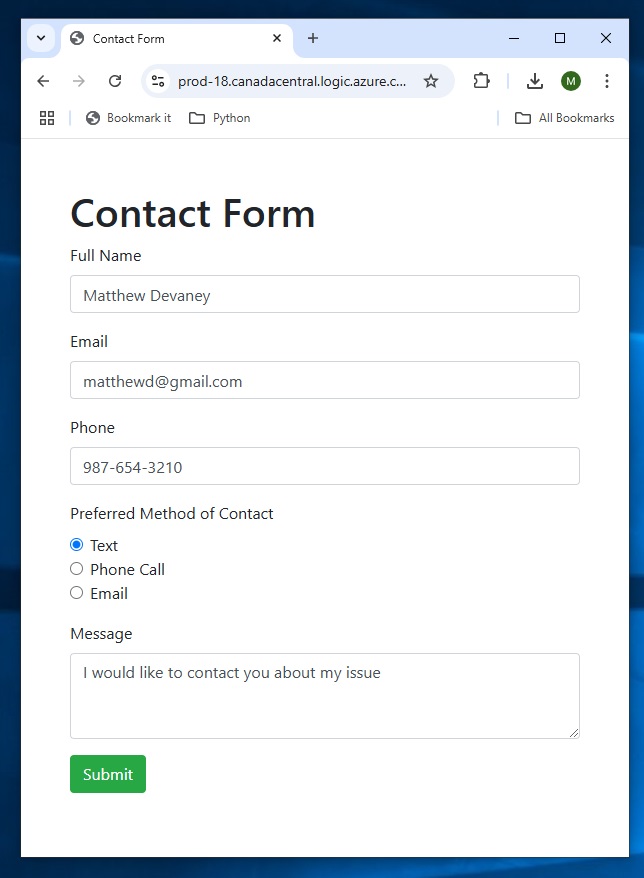
Once the final piece of code is in place we can try out our Power Automate web page. Go to the Contact Form and fill-in all of the input fields with values.
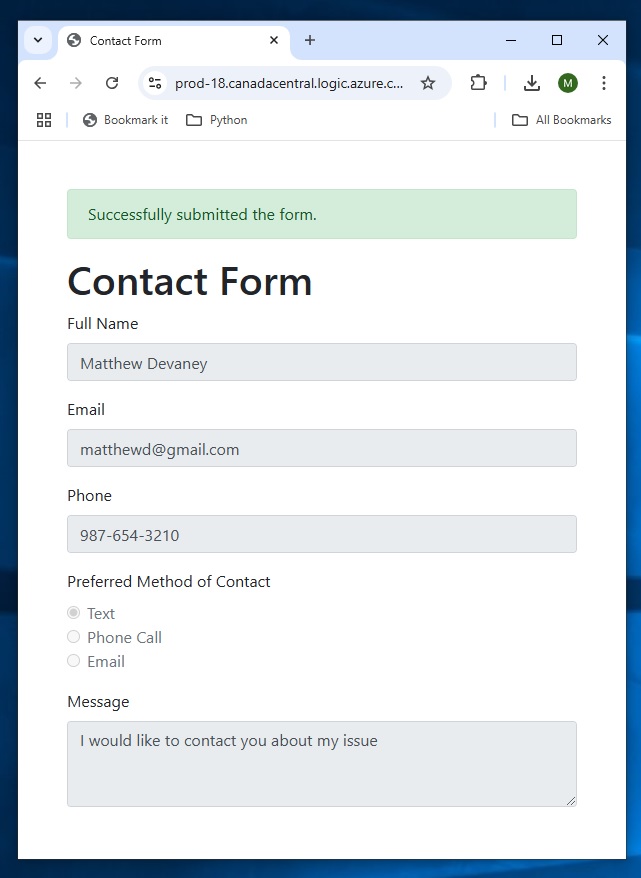
When the submit button is pressed the user receives an alert that the form was successfully submitted.
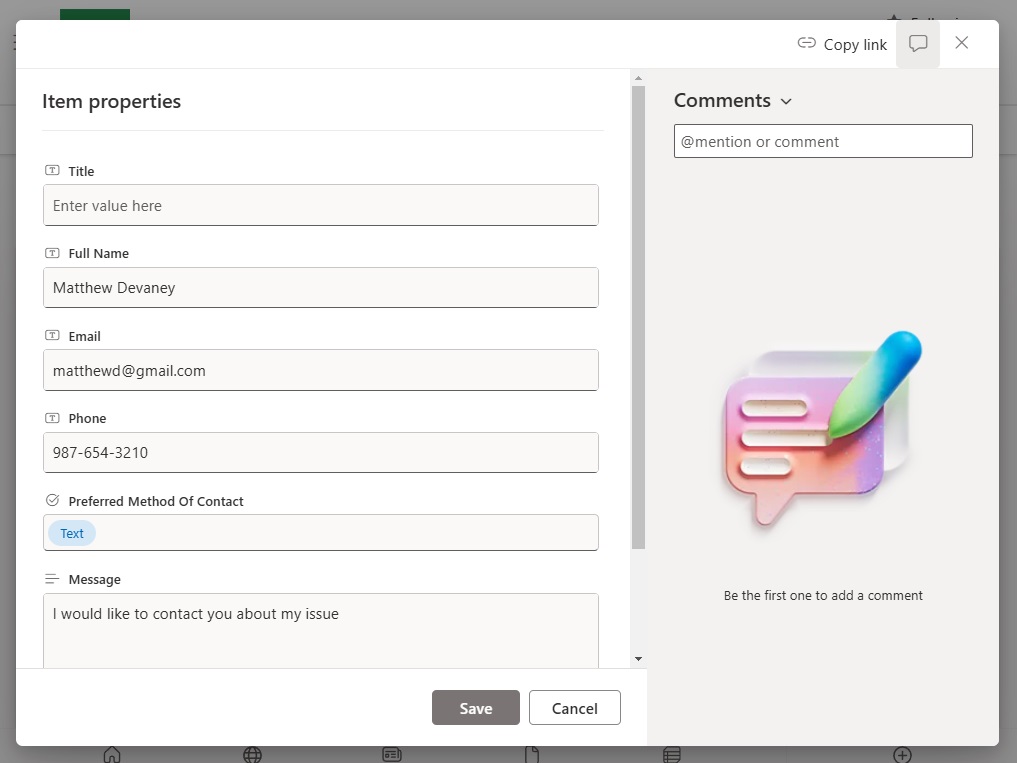
Then the submitted form details appear in a new SharePoint list item.
GPT Prompt To Generate The Web Page Code
I generated the web page code by using the GPT 4o model and this prompt. You are welcome to use it to create your own web page code.
I am a web developer. I want to developer a single page web app. Please help me write the code.

Here are my instructions for the web app:
- Must use the Bootstrap framework to style the app
- Include a form with the title "Contact form
- Has 3 single-line text input fields: Full Name, Email, Phone
- Has 1 radio group input named "Preferred Method of Contact" with the values: Text, Phone Call, Email
- The radio group layout must be vertical
- Has 1 multiple lines of text input  field: Message
- Includes a Submit button having the semantic color for Success.
- When the submit button is pressed it makes a POST request to https://example-flow-url.com with the input field values in the body as a JSON having this structure:

{
  "fullname": "Matthew Devaney",
  "email": "matthewd@company.com",
  "phone": "709-044-4003",
  "preferredmethodofcontact: "phone call",
  "message": "I have a question for you and I would like to know your response"
}

- If the form is submitted successfully show a success alert above the Title that says: "Successfully submitted the form."
- If the form is submitted change all of the input fields to View mode and hide the submit button
- If the form is not submitted successfully show a danger alert above the Title that says: "Failed to submit the form."
- Do use Fetch to submit the form. Do not use AJAX to submit the formCode language: PHP (php)
Did You Enjoy This Article? 😺
Subscribe to get new Copilot Studio articles sent to your inbox each week for FREE
Questions?
If you have any questions or feedback about Power Automate Flow To Host A Web Page/Web Application please leave a message in the comments section below. You can post using your email address and are not required to create an account to join the discussion.





This is cool thanks! I look forward to getting your illuminating Monday morning emails 😊
Now I can do away with my very very clunky Microsoft Forms that feed into Power Automate and implement them this way with exceptional flexibility and simplicity!
Thanks, this is great stuff!
I actually had a CMS website with a form in it. Shared the parameterized URL with external users so I could collect the answers to Dataverse through a Dataflow.
This is so much easier!
Hey Matthew, this is very interesting. What if I would like to let the user modify their input after the first submission. Can i do this with power automate ?
Hi Matthew, thank you for this post, I’m excited to learn this is possible. With the selection of ‘Anyone’ in the trigger, is the user required to have a Power Automate license? Or does this run under the flow owner’s account?
I just triggered a flow like this by pasting the GET URL from a Private Browser window and it worked fine so it seems Anyone means Anyone, even without a 365 account!
https://prod-30.australiasoutheast.logic.azure.com:443/workflows/366g693yyld06…. (etc)
I would keep an eye on your Flows Analytics however since Anyone can trigger the Flow it may become subject to over-use.
Cheryl,
Anyone can trigger the flow even without a license. That means both inside and outside of your org.
Paulie Murana posted a great article on how to whitelist IPs for using this flow. I believe there is also a path to checking whether someone is logged into an organization account but haven’t seen any articles on that.
This is fantastic, amazing work! Is there anyway to incorporate attachments into this or is that a step too far?
Keane,
Yes. Modify the prompt to create the HTML and say you want an attachments field.
after some to and fro with Chatgpt I have nailled it, this has solved the age-old MS form for externals with attachments. Big thanks 🙂
I am trying to upload a document but so far no luck. The post api doesn’t accept multipart/formdata.
How to get or save uploaded attachment? from the second flow, there is empty on this filed.
Hi Guys,
Use https://www.youtube.com/watch?v=-_D7WnL4glU&t=10s, I was able to create a Job Application Web App with attachments etc into Microsoft List.
Check it out.
thanks- got this working great, often find my self coming back to this post and sharing with others. real game changer.
Questions- do you forsee any issues with high numebr sof people accessing simultaneously and submitting? i.e. botht he form sid eof things and the backed process?
It works! Does specifying “Anyone” in the trigger raise security issues? I also tried “Any user in my tenant,” which seemed safer, but the flow failed. It asked me to add an authentication step but didn’t explain how.
Power Otto,
I’m not sure how to use the “Anyone In My Tenant” option yet but there must be documentation somewhere.
Yes, choosing anyone allows any user with the URL to access this. Inside or outside the org.
Great solution!
Do you have any ideas on how to get the email of the “responder” like using Forms?
Eddie,
No, I do not. Other than asking them to input their email.
Love this, is there a way to add a file upload option? That has been our biggest hang up for using Forms externally.
First off, I’m a huge fan of what you do and how you provide guidance to all. #Props
I’m curious, with this not being a premium license from what we see, and only a standard license, or something in that range, what would be your business rationale for taking this approach vs a simple app in Azure Blob storage? Concession, I see the benefit of the built in SharePoint layer within Power Automate, Yet, since we are having GPT produce the HTML, CSS and JS in this case, why not have it do the API call and error handling for that too between us and SharePoint assuming we are inside a VPN and it’s an organizationally authenticated user (which is similar to your case).
This is just a curiosity, I applaud your creativity and for again sharing your how-to-solve-a-problem mindset.
Hi Matthew, Thanks for this tutorial great stuff! I want to prepopulate a field in the form with a unique reference using the Relative Path of the HTTP request URL. This is to enable me to match responses easily. I can send the value to the flow via the URL and extract it, but I haven’t been able to prepopulate the form with this value – any ideas please?
nice job
I really like this possibility. I know about the option to block IP’s but was wandering if it is possible to make it possible to let this approach work for some people in the tenant.
struggling with that part, maybe a crucial gap in my knowledge.
Is there a way to use the authorization functionality ‘only some users of my tenant’ is this kind of usecase? It could be a gap in my knowledgebase so if possible some help setting this up would be adorable.
You’ve knocked it out of the park with this one, amazing stuff!
Didn’t knew this was possible with Power Automate, I have a few usecases that will benefit from this.
Thank you very much!
fantastic, has anyone managed to do this with attachments? i just wish MS Forms allowed uploads from outside organisations and then my problems would be solved!
This is awesome, really handy. How would I get the user to upload a file and capture that into power automate?
chat gpt can help you work that out- definitely doable!
Hey Matthew, This is interesting for someone like me who is a semi-tech kind of person.
Infact, this article (where i accidently landed browsing through linkedin) prompted me to ask for a quick help. I am currently in process of building a performance review process which can be done digitally within microsoft ecosystem instead of word and excel which we have been using so far.
Team of around 100 employees
Employee submits a self review with rating and comments on a form.
His/her manager receives email/notification with view rights to employee inputs.
On same form for manager should be able to give his ratings and comments on parameters where employee submitted his ratings and comments.
HR gets an email at each stage.
Security parameters
Employee can only view/edit his own data.
Manager can view/edit his own as well as his respective team members data.
HR can view/edit everyones data.
I am in process of trying this using a combination of Lists, Power Automate & Power Apps. But power apps is getting little complicated for me.
Please suggest.
Prashant
Hi Matthew, someone recently flagged with me that this an insecure action? Would you agree and are there any steps we can take to secure it in your view? Especially when attachments are involved.
thanks!