Reassign An Approval In Power Automate

You can reassign an approval in Power Automate by using a single flow action. This ability is not included in the standard approvals actions. However, we can invoke an HTTP request to call the Microsoft Teams approvals API and reassign the request.
Table of Contents
• Introduction: The Reassign An Approval Flow
• Choose An Approval To Be Reassigned
• Get The Approval ID For The Approval To Be Reassigned
• Set The Approval ID And Flow Environment Variables
• Make A Connection To Microsoft Teams Approvals
• Reassign An Approval In Power Automate Using An HTTP Request
• Run The Reassign An Approval Flow In Power Automate
Introduction: The Reassign An Approval Flow
An employee at an insurance company makes a work from home request using Microsoft Teams and then their manager goes on vacation. We will reassign the approval by creating a Power Automate flow.
Choose An Approval To Be Reassigned
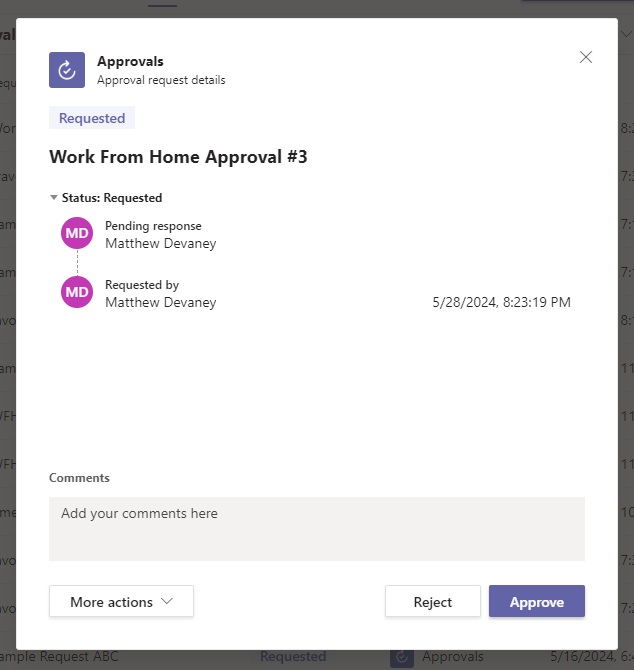
An approval may only be reassign when it is in requested status. Open Microsoft Teams approvals center and find a “requested” approval.
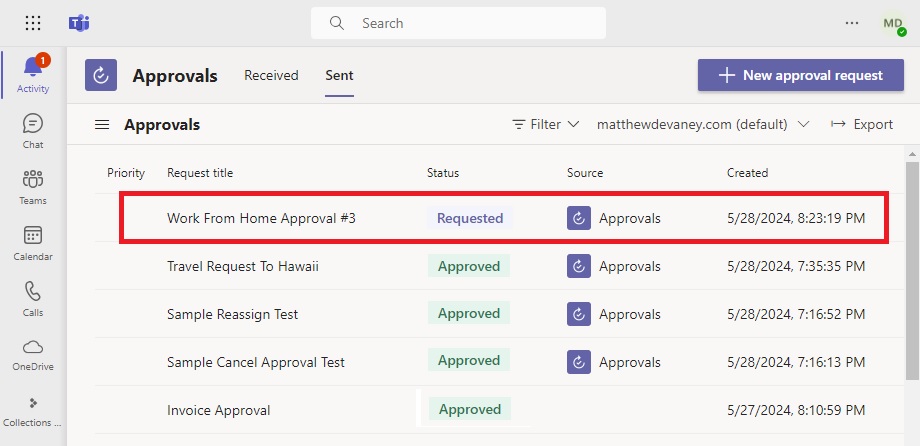
Or create a new approval request if there are no approvals with a requested status. Here’s an example that can be copied if needed.
Get The Approval Id For The Approval To Be Reassigned
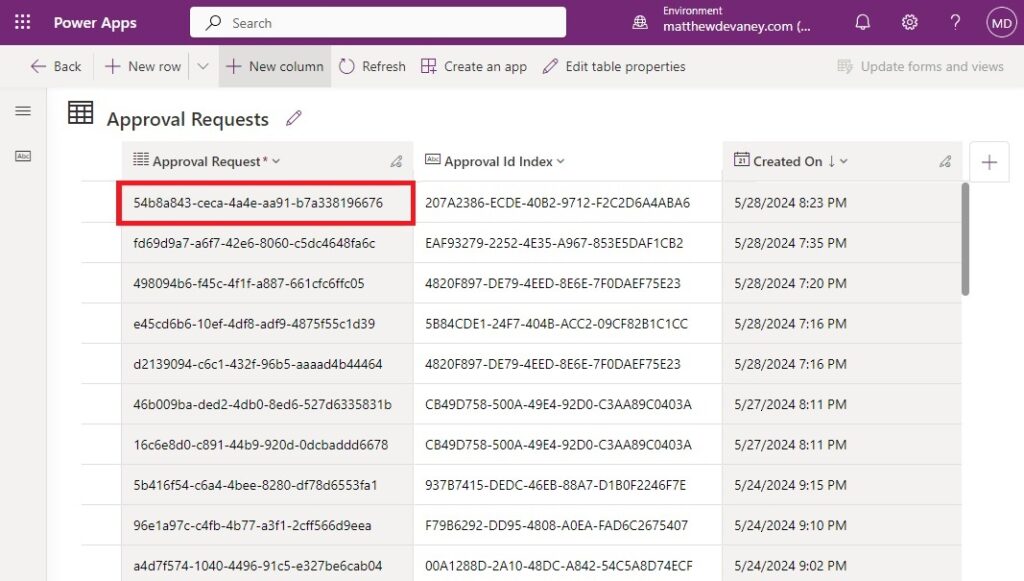
To reassign an approval using Power Automate we will need to get the Approval’s unique ID. Go to make.powerautomate.com and navigate the Approvals table (in Dataverse). Search the table for the record with a matching Title. The unique identifier is located in the Approval field of the record.
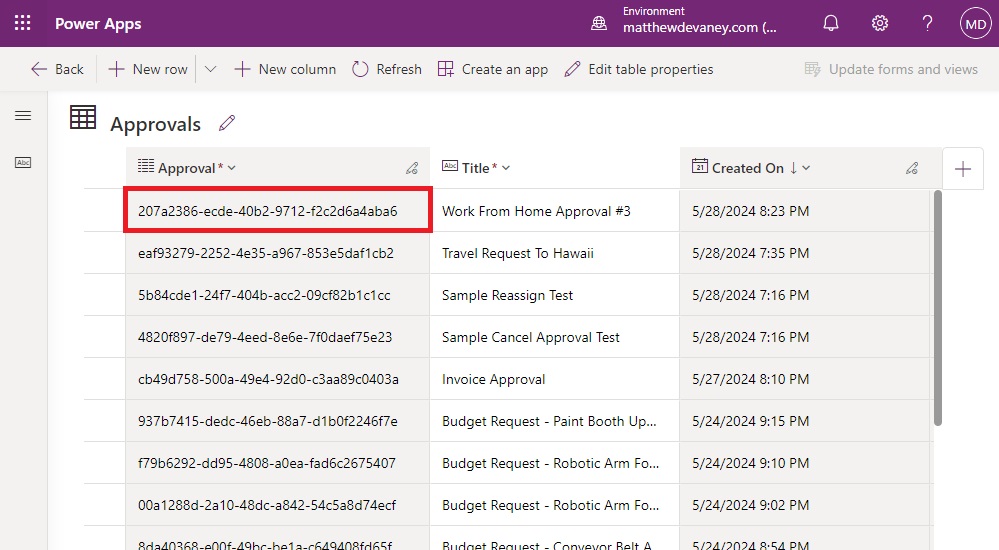
We will also need the unique identifier for the Approval Request. Go the the Approval Request table and look for a record with an Approval Id Index that matches the Approval unique id. Then make a note of the Approval Request unique identifier for it.
Set The Approval ID And Flow Environment Variables
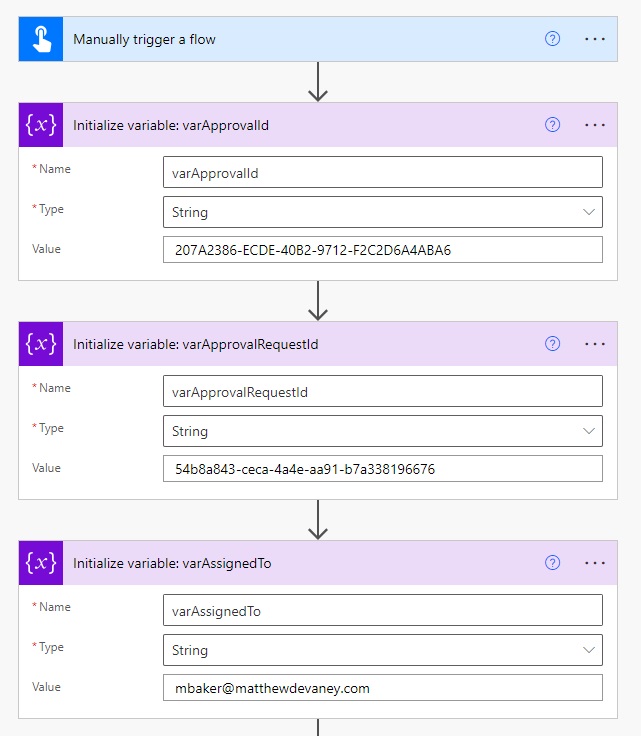
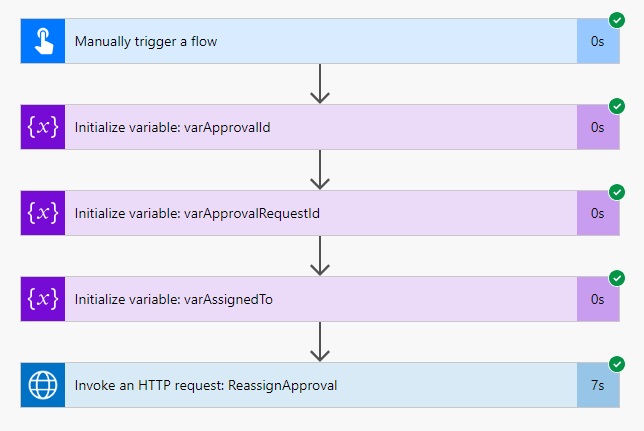
Now we have the information we need to make a Power Automate flow to cancel the approval. Start a new instant flow and add an initialize variable step. Create a variable named varApprovalId and set the value to the unique identifier of the approval.
Also create a variable named varApprovalRequestId and set the value to the unique identifier of the approval request.
Finally, initialize one last variable named varAssignedTo and load it with the email address of the person who the approval should be reassigned to.
Make A Connection To Microsoft Teams Approvals
An approval cannot be reassigned using the standard Microsoft Teams actions included in Power Automate. We will use the HTTP With Microsoft Entra ID (Pre-authorized) – Invoke An HTTP Request action to cancel an approval instead.
Upon adding the action we will be asked to setup a connection.
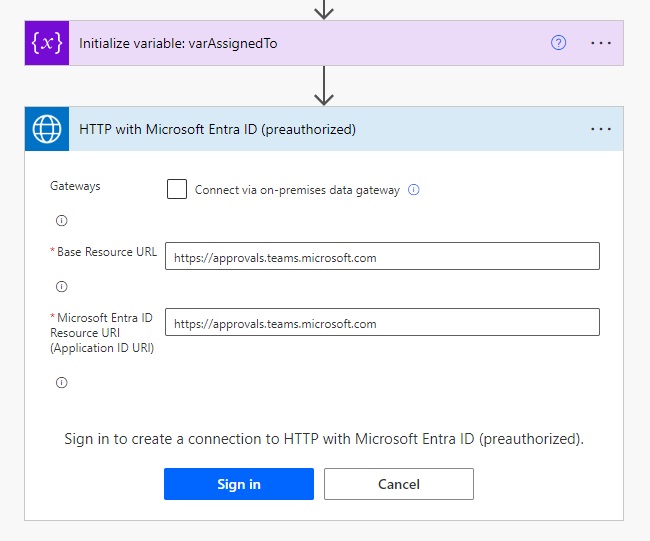
Use the following URL in both the Base Resource URL and Microsoft Entra ID Resource URI fields and press the Sign In button.
https://approvals.teams.microsoft.com
Reassign An Approval In Power Automate Using An HTTP Request
Fill-in the flow action with the following values to reassign the approval request.
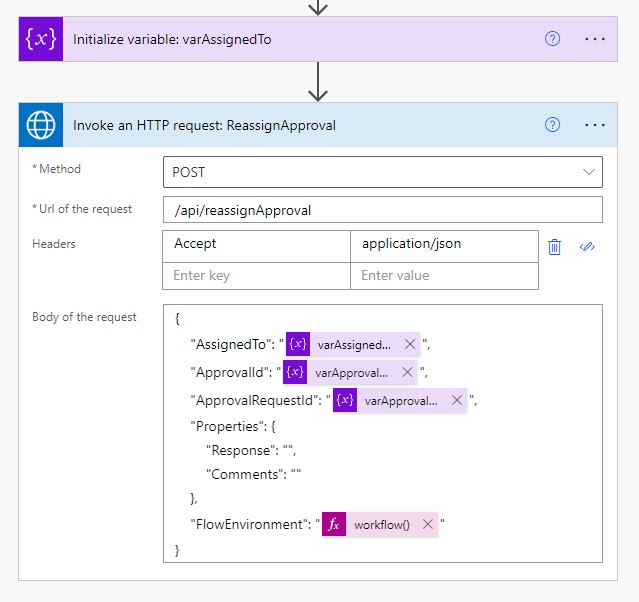
Method:
POST
Url of the request
/api/reassignApproval
Headers:
| Key | Value |
| Accept | application/json |
Body of the request:
{
    "AssignedTo": "@{variables('varAssignedTo')}",
    "ApprovalId": "@{variables('varApprovalId')}",
    "ApprovalRequestId": "@{variables('varApprovalRequestId')}",
    "Properties": {
        "Response": "",
        "Comments": ""
    },
    "FlowEnvironment": "@{workflow()?['tags']?['environmentName']}"
}
Run The Reassign An Approval Flow In Power Automate
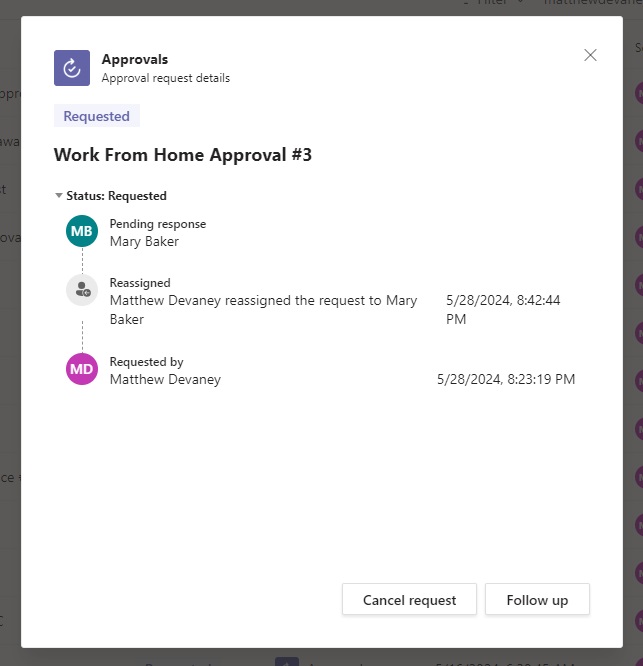
We’re done. Save the flow and give it a run to reassign the approval.
After the flow is completed we can see the approval has been reassigned in the approval details along with who it was reassigned to and the timestamp.
Did You Enjoy This Article? 😺
Subscribe to get new Power Apps & Power Automate articles sent to your inbox each week for FREE
Questions?
If you have any questions or feedback about Reassign An Approval In Power Automate please leave a message in the comments section below. You can post using your email address and are not required to create an account to join the discussion.


Which permissions are needed for the account executing the flow?
Approvals Administrator (Security Role) assigned from the Power Platform Admin Center should cover it 🙂
Sorry, ignore my last comment! At this point I believe you need to be the owner of the Approval Request (The person who has had the Approval requested of them) in order for this method to work. There are more complex ways to Reassign on behalf of another use but unlike those this method acts as a proper reassign and sends the notification which is neat!
Great Post!
Is this really usefull API as user can also re-assign through Teams approval app? I implemented it but its only working if the approval is assigned to the same user who is re-assigning to somone. Looks like we cannot re-assign on behalf of someone.
I think you should update this blog and mention this point so that others will not try to implement this without knowing actual requirements.
Hi Matthew,
Thank you for sharing this. I’ve tried to get it working, but I’m getting an error and wondered if you have encountered this one?
{“$”:[“The JSON value could not be converted to Approvals.Common.Models.ReassignApproval.ReassignApprovalControllerInput. Path: $ | LineNumber: 1 | BytePositionInLine: 16.”]}}
Regards,
Steve
Steve,
Please supply the full JSON string you used so I can inspect it. The error message is complaining of an error on line 1 byteposition 16.
I figured it out thank you – I was missing the opening curly brace.
Now I’m getting a 403 forbidden, which I think relates to the other comments on this post.
FYI I figured this out – you need to update the Approval and Approval Request to allow reassignment. I did that in my flow before sending the HTTP request and it works.
Can you give any details on what you updated in these tables?
Thanks
When you create an approval you can choose whether reassignment is allowed. In my case that was not selected when the approval was created. So I enabled it in my reassignment flow like in the screenshot.
I am still getting Forbidden issue, Changed the owner of Approval and Approval Request and update to allow reassignment.
I am missing anything?
{“ErrorMessage”:”Exception thrown by dependency.”,”Properties”:{“message”:”Exception thrown by dependency.”,”status”:”Forbidden”,”innerMessage”:”ApprovalRequestReassignmentAccessDenied”,”showUserExceptionMessage”:”False”}}
I am getting the same error. Did hou manage to solve?
Hi, is this resolved for you. Am also facing same error..
Hi Matthew – I’ve been trying to get this working today and the ONLY way I have had any success is if the ‘Invoke HTTP request’ action uses the same account (connection) as the original approval was assigned to. Using an admin account/service account did not work at all (even with the Approvals Administrator security role applied).
Hi Matthew – great article, thank-you
I tried to implement this but the only way I can get it to work is by using the configuring the ‘Invoke HTTP’ action to use the same account as the one the original approval was assigned to. If I configure the connection for this action to use a service account then the reassignment fails.
I have given the service account ‘Approvals Administrator’ role in the environment and this doesn’t resolve it 🙁
Any thoughts? I notice in your example you are using the same account, have you managed to get it working successfully using different accounts?
Hi,
great post as always. But you need only one table to check: Approval Request.
Not only you can find there “Approval unique ID” (under Approval ID Index), but it is also returned in the flow as the output of the action that creates the flow.
Hi Matthew,
I think it would be good to point out at the start of the article that this only works with approvals that are owned by the user running the flow.
Even if you have Approvals Admin or System admin role on Dataverse, you will get a 403 forbidden HTTP error code if you attempt to reassign any approval owned by someone else.
If anyone can figure out a way of circumventing that limitation, please let me know. At the moment what I do when the business process requires re-assignation is to cancel the pending approval and create a new one.
Hi All,
I am getting a different error. The approval is assigned to me and I am wanting to assign it to another member of my team.
Error is:
{
“ErrorMessage”: “Exception thrown by dependency.”,
“Properties”: {
“message”: “Exception thrown by dependency.”,
“status”: “BadRequest”,
“innerMessage”: “BadRequest”,
“showUserExceptionMessage”: “False”
}
}
Request is:
{
“AssignedTo”: “[email protected]”,
“ApprovalId”: “75A030CA-95B3-40DB-8C11-7672A4FB63D2”,
“ApprovalRequestId”: “720592cd-c18b-483e-8855-b67bf5f50547”,
“Properties”: {
“Response”: “”,
“Comments”: “reassigned from Power Automate flow!”
},
“FlowEnvironment”: “3db4579d-354b-4926-badd-171b02565b42”
}
Any ideas??
Thanks – Monty
Hi there. So this is exactly the solution im looking for and ive followed the steps outlined as above. However im getting the following issue on the Invoke an HTTP request step. The error im getting is ‘Invalid version: api’. I wondered maybe i needed to change the URL field so it was the url of the actual approvals in teams but this gives me a BadRequest error
Hi there, so weve followed this example and have been able to attain the Ids and build the flow as this is the exact solution we are after. However im getting the error ‘Invalid version:api’ on the ‘Invoke an HHTP request’ action when i try and run the flow. It looks like the URL is wrong but weve followed it as the article states.
I had changed it to a teams URL but just got a ‘badrequest’ error. Im wondering is this something thats permissions related? Thanks
Rob,
Please post a screenshot of the connection showing the Base Resource URL you’ve used.
Hi Matthew, please see the screenshot below – it was showing connected to https://approvals.teams.microsoft.com when i was getting the original error but I then selected my details on that screen and the flow changed and so im now getting a ‘forbidden’ error on the update a row action and an ‘invalidtemplate’ error on the ‘Invoke an HTTP request’ action
This is the ‘new’ issue im now seeing
Reassignment not Working all the requests, it working only request assigned to Me without any issue, we cannot resend other user requests
Great post, do you also get auto email notification with Actionable message? somehow we are not getting the email from Power automate when we re-assign any task, user can still see in teams/power automate but no email, is there any setting which we can enable to send default email?
Hi Matthew,
Thank you for this. I am struggling with a couple of issues: