Show A Route On A Power Apps Map

When Power Apps interactive maps launched at the start of this year it was a huge improvement over Bing’s static maps. However, a key feature was missing – the ability to draw a route between two points on a map. Now we have it! Power Apps maps have reached their full-potential and can now show a route, include multiple waypoints, optimize a route between those waypoints and much more.
In this article I will show you how to draw a route on a Power Apps map.
Introduction: The Route Finder App
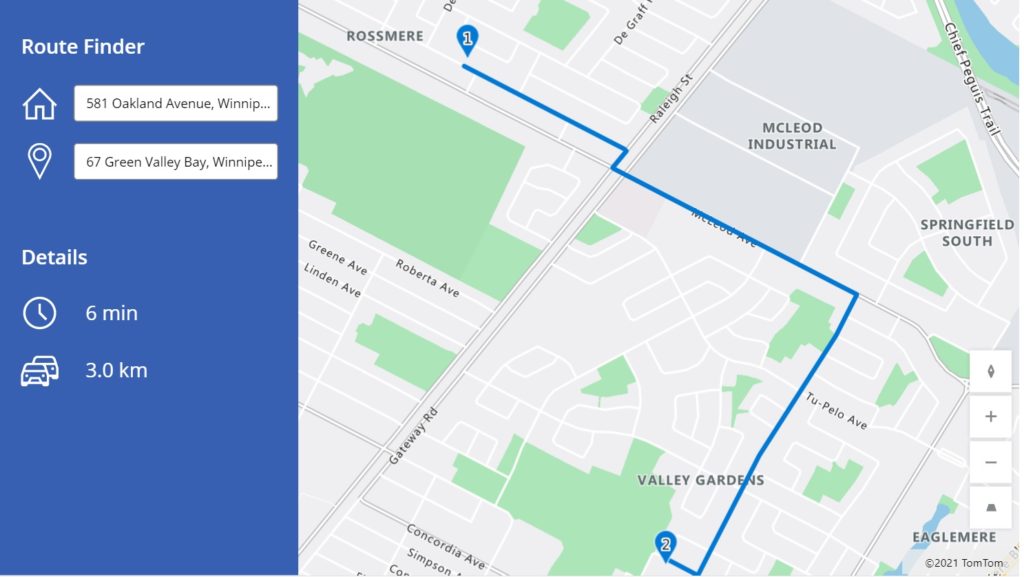
The Route Finder App is used by delivery drivers at a courier company to get directions. Drivers input a starting and point and a destination then the map displays the shortest route between both points.
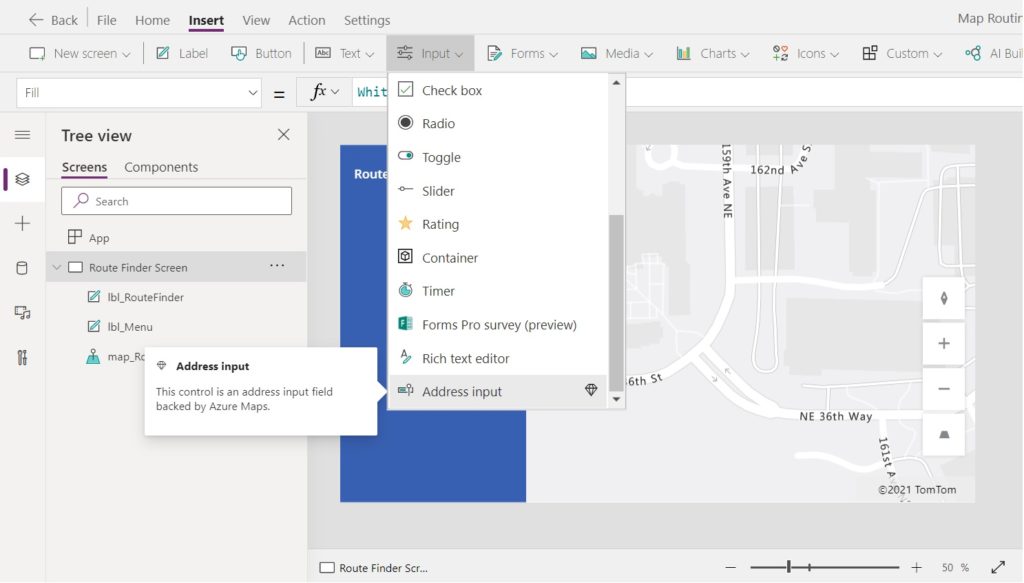
Create A Map Control
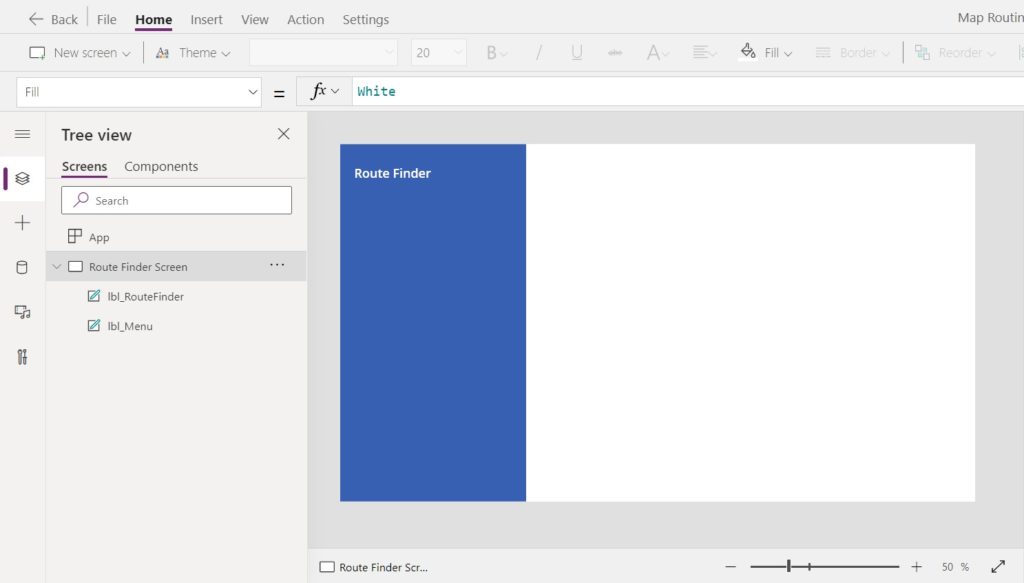
In Power Apps Studio create a new tablet app from blank then insert a label with a blue fill on the left-side of the screen to act as a menu. Make another label with the text “Route Finder” and place it at the top of the menu.
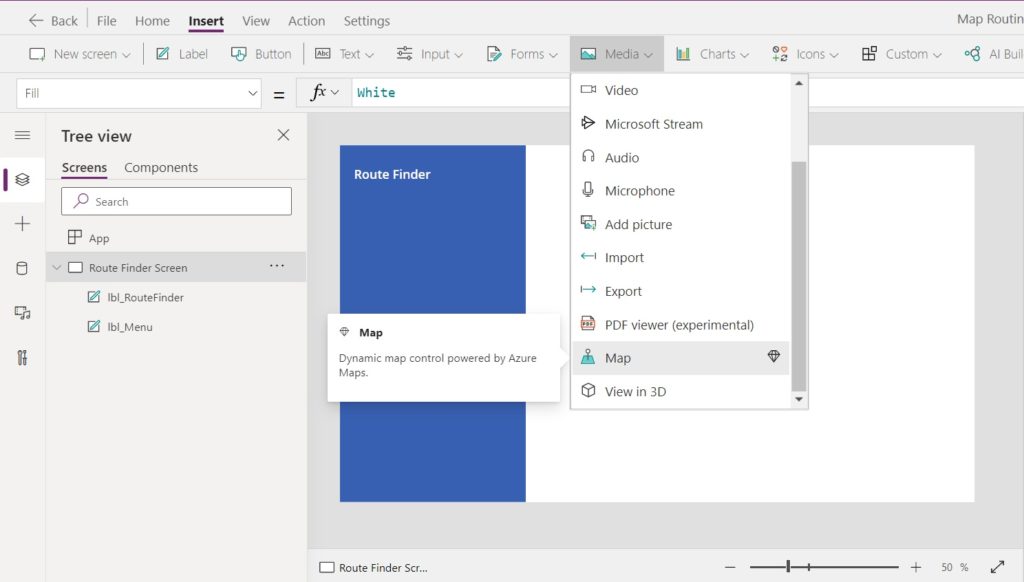
Then click on the media dropdown and select the Map control.
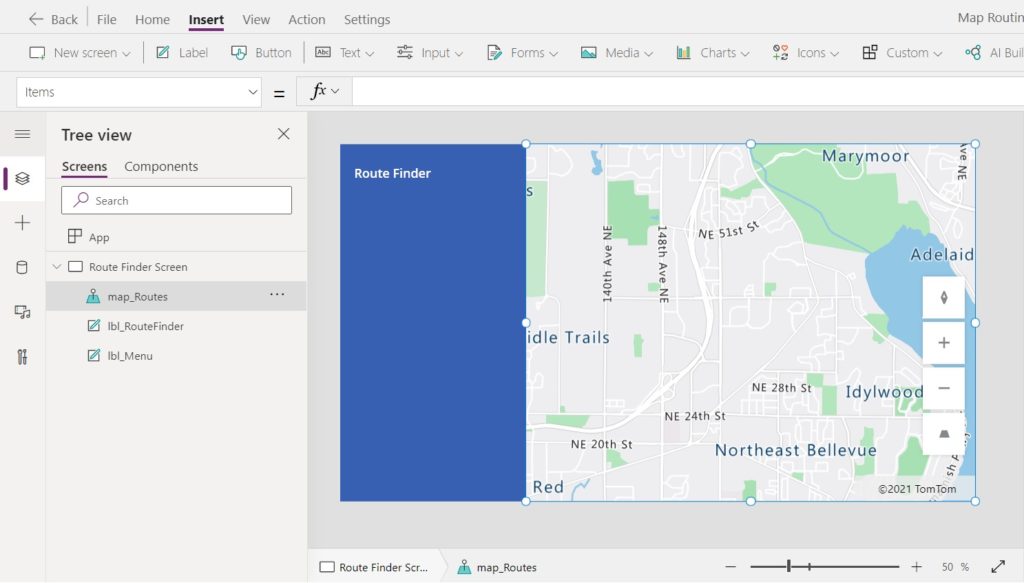
Position the map so it fills all of the remaining whitespace
Use Address Input Controls To Capture Starting Location & Destination
A delivery driver inputs a starting point and a destination then a route appears on the map. Calculating the route requires the latitude & longitude of the starting point and destination. The simplest way to get this is by using the Address Input control.
Place an address input control to capture the starting point inside the menu and insert a new home icon beside it.
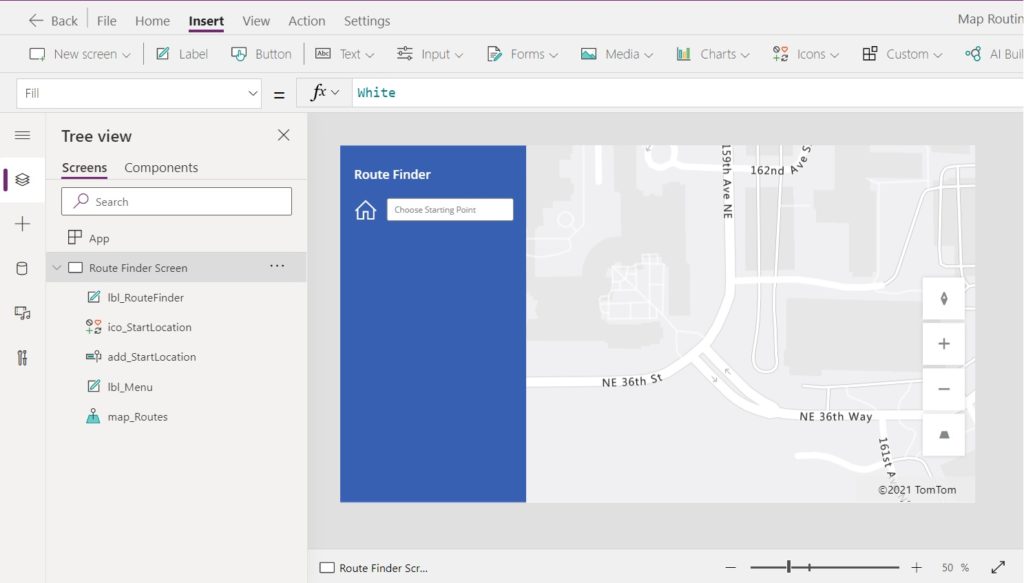
Use this code in the HintText property of the address input to describe its purpose.
"Choose Starting Point"Code language: JSON / JSON with Comments (json)
We also need another address input to capture the destination. Position a new address input underneath the previous one and put a waypoint icon beside it.
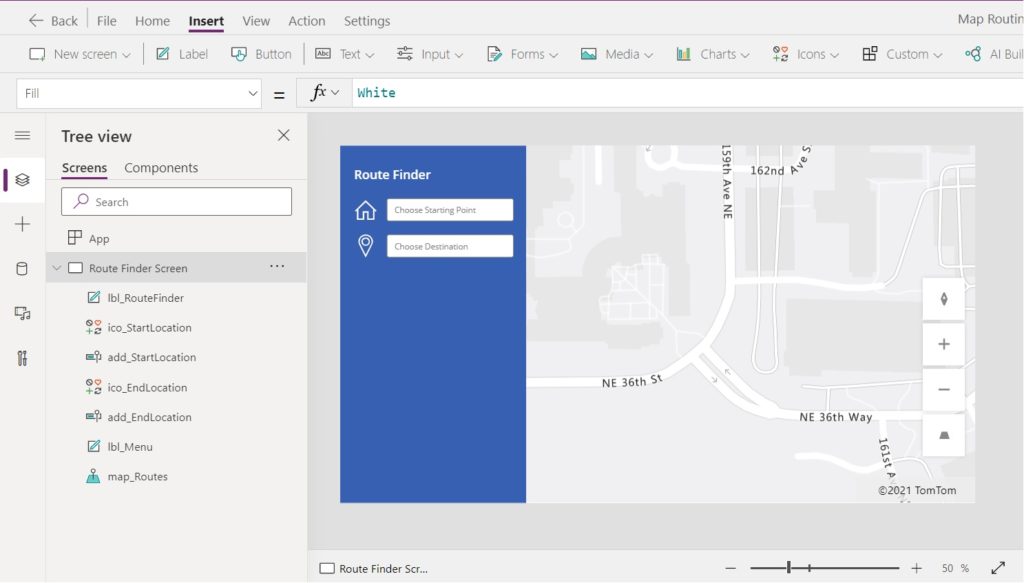
Write this code in the HintText property of the 2nd address input to describe its purpose.
"Choose Destination"Code language: JSON / JSON with Comments (json)
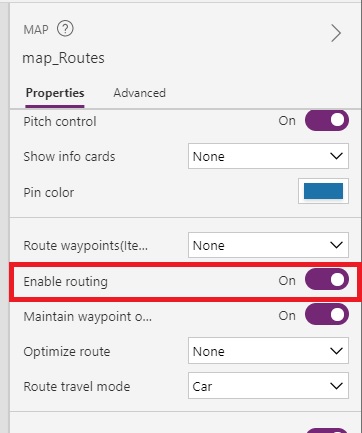
Draw A Route On The Map Between Two Points
A line must be displayed on the map to show the best route between the starting point and destination once both address inputs are filled-in.

Select the map control and change the Enable Routing property to true. This setting tells the map whether it should attempt to draw a route line.
Use this code in the map’s RouteWaypoints_Items property to define the starting point and destination. Each waypoint must have a name, latitude and longitude.
Table(
    {
        Name: add_StartLocation.UserInput,
        Latitude: add_StartLocation.SelectedLatitude,
        Longitude: add_StartLocation.SelectedLongitude
    },
    {
        Name: add_EndLocation.UserInput,
        Latitude: add_EndLocation.SelectedLatitude,
        Longitude: add_EndLocation.SelectedLongitude
    }
)Code language: CSS (css)
Write this code in the RouteWaypoints_Latitude of the map…
"Latitiude"Code language: JSON / JSON with Comments (json)
and put this code in the RouteWaypoints_Longitude on the map.
"Longitude"Code language: JSON / JSON with Comments (json)
A route will now show on the map between the starting point and the destination.

Display The Estimated Travel Time For A Route
The Route Finder app shows delivery drivers an estimated travel time between two points on the map. Insert a clock icon into the menu and then place a label beside it.
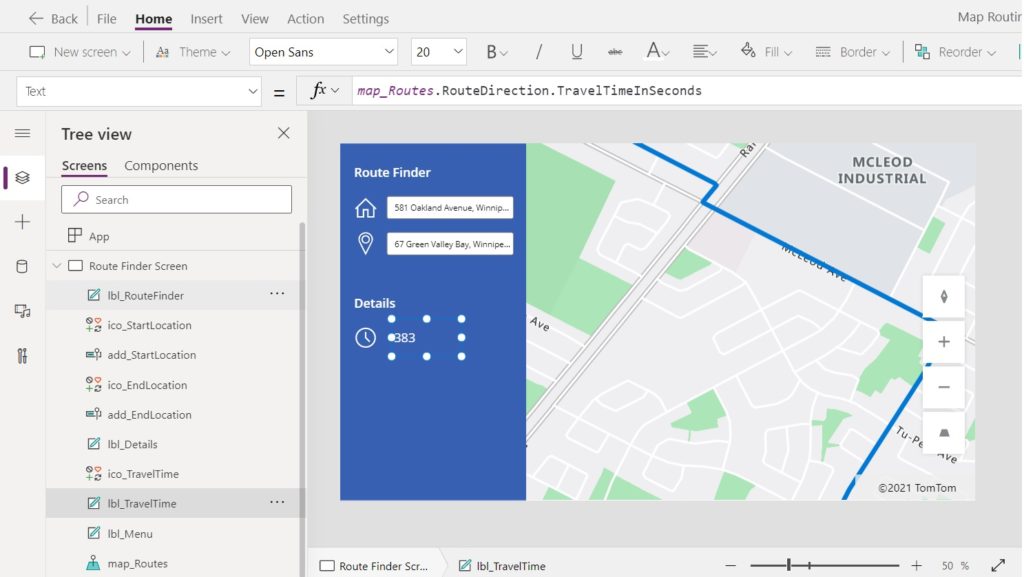
Use this code in the Text property of the label to show the travel time in seconds. The travel time is automatically computed by the map when the route is created.
map_Routes.RouteDirection.TravelTimeInSecondsCode language: CSS (css)
Travel-time can be shown in a more user-friendly manner if we convert seconds to hours and minutes.
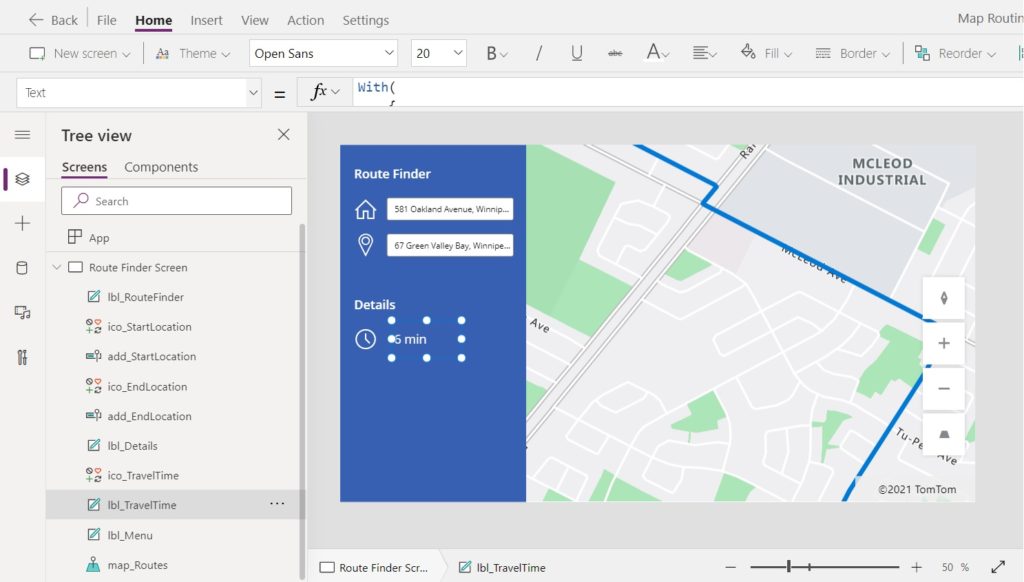
Re-write the code in the Text property of the label to format travel-time into hours and minutes.
With(
    {
        varTravelTime: Time(
            0,
            0,
            map_Routes.RouteDirection.TravelTimeInSeconds
        )
    },
    With(
        {
            varHours: Hour(varTravelTime),
            varMinutes: Mod(
                Minute(varTravelTime),
                60
            )
        },
        Coalesce(
            Concatenate(
                If(
                    varHours <> 0,
                    Text(
                        varHours,
                        "0"
                    ) & " hr "
                ),
                If(
                    varMinutes <> 0,
                    Text(
                        varMinutes,
                        "0"
                    ) & " min"
                )
            ),
            "0 hr"
        )
    )
)Code language: CSS (css)
Show The Distance Between Starting Point & Destination
Delivery drivers also want to see the distance of the route in the Route Finder app. Insert a cars icon into the menu and then place a label beside it.
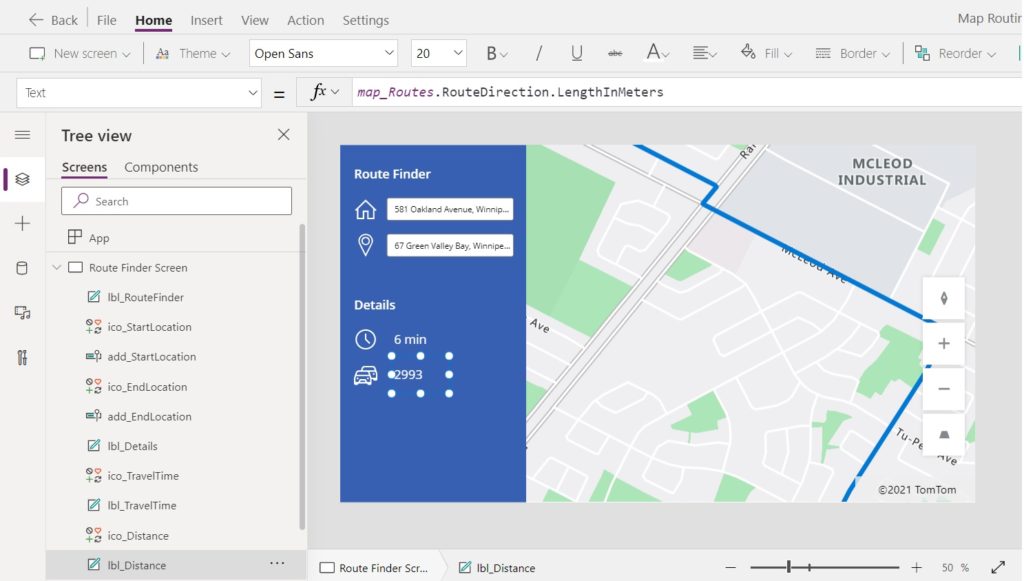
Put this code in the Text property of the label to display the route length in meters.
map_Routes.RouteDirection.LengthInMetersCode language: CSS (css)
Meters is not a standard unit-of-measure for distance when driving. Instead, we want to show kilometers.
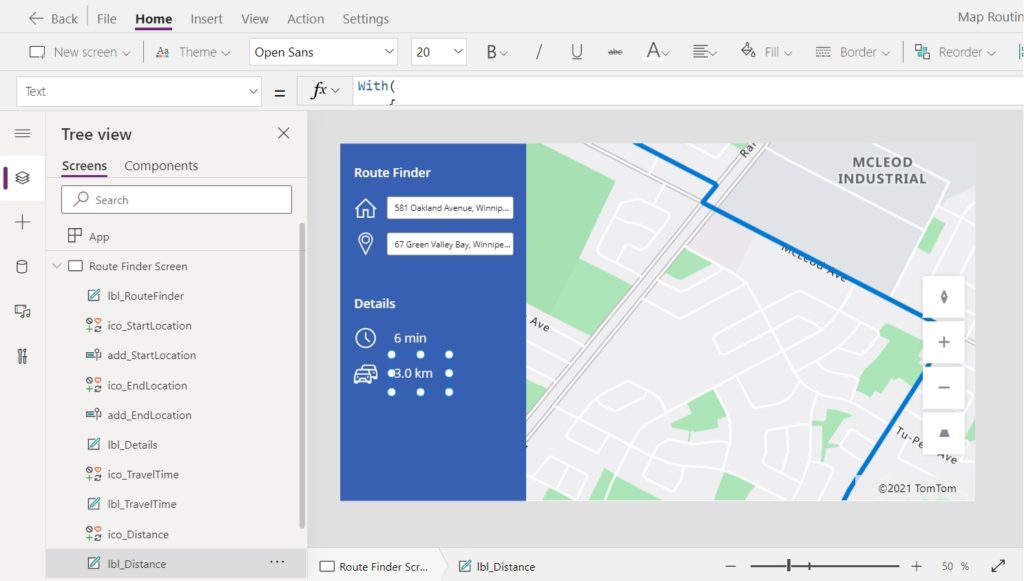
Re-write the code in the Text property of the label to convert meters to kilometers and apply number formatting.
With(
     {
        varLengthMeters: map_Routes.RouteDirection.LengthInMeters
    },
    If(
        varLengthMeters>1000000, Text(varLengthMeters/1000, "#,##0")&" km",
        varLengthMeters>0, Text(varLengthMeters/1000, "#,##0.0")&" km",
        Text(varLengthMeters, "0")&" m"
    )
)Code language: JavaScript (javascript)
We are now finished building the Route Finder app!

Did You Enjoy This Article? 😺
Subscribe to get new Copilot Studio articles sent to your inbox each week for FREE
Questions?
If you have any questions or feedback about Show A Route On A Power Apps Map please leave a message in the comments section below. You can post using your email address and are not required to create an account to join the discussion.


Nice post. I’m just about to have a go with this control in a development – can this be used to plot a number of waypoints on a single route? Can we use different colours for the pages?
Tony,
Yes to all of your questions. Here’s the official documentation which shows how to plot multiple waypoints on a single route (Link: https://docs.microsoft.com/en-us/powerapps/maker/canvas-apps/geospatial-map-routing)
Thanks Matthew
Great post Matthew!
This post came along at the most perfect time! however I need us mileage not kilometers. How do I convert that?
Dorinda,
One mile is equal to 1600 meters. I think you could do it like this:
With(
{
varLengthMeters: map_Routes.RouteDirection.LengthInMeters
},
If(
varLengthMeters>1600000, Text(varLengthMeters/1600, “#,##0″)&” miles”, Text(varLengthMeters/1600, “#,##0.0″)&” miles”
)
Hello Matthew. Your Post helped me a lot but raised further questions, but I can’t find anything in the web regarding my “problem”.
Maybe you know the answer:
Tobias,
Truck-Routing with inputs for length, width and weight is not a feature of Power Apps maps currently. Over the past year I’ve seen them slowly roll-out new features but I don’t know the road-map. All I can say is “fingers-crossed” for the future. It would be super helpful!
What is a Route Range Selector?
Hey Matthew. Thx for your answer!
A Route Range Selector lets you drop a pin and define how far you want to travel for e.g. 15 minutes.
Maps will then show you a radius of how far you can travel with your car, truck, bicycle etc.
Here is a sample from Azure Maps: https://azuremapscodesamples.azurewebsites.net/Controls/Select%20shapes%20with%20selection%20control.html
Tobias,
Hmmm, not yet I’m afraid. But Power Apps maps are based on Azure Maps so there is cause for optimism about the future. It would be possible for Microsoft to add.
I love it. Thanks, Matthew
Awesome post Matthew, this will make some of our app’s a lot simpler. Had no idea they included the Address Input option now
Great Article about Map and routing
Nice post, and thanks! I’d like to be able to output the map, with the route, as a static image. In my case, I want it as an image for receipt purposes.
Any ideas on how to do that?
I could see lots of reasons to be able to output the map, basically the current view, as an image…
Tim,
There’s not any way to do this currently in Power Apps. You can use the Bing Maps connector to in Power Automate to output a map image with a location pin so that may be a path to victory if you investigate it.
This was very helpful! I do have a question about whether its possible to show route options or not. Bing Maps gives you the top 3 suggestedroutes and selects the shortest route (by time) by default. It would appear the Bing Maps connector GetRoutes() function also automatically defaults to the shortest route (by time). Is it possible somehow to display alternative routes in the app and allow users to select from those options (the date point I’m wanting to collect is distance between 2 points)? Or if that’s not possible, it is possible to adjust the auto-selected route generated by the GetRoutes() function to select the route based on shortest route by distance rather than time?
B K,
Alternative routes are not supported by the maps component at this time. However, maps have come a long way since their release in January 2021. I assume the Power Apps team is working on this feature. I want to have it too!
Wonderful Post
I have coordinates already stored in a table for different customers
I want the app to pop customer details as I approach the customer premise
Is that possible with this?
Peter,
I this is definitely possible. You could use a Timer control with autostart and repeat properties enabled to execute code every 1 minute that compares your current location to the customer’s location.
Here’s some code that uses trigonometry to detect if the customer is within approximately 1 km and flashes a notification once the app user is within range. It depends upon having the customer latitude and longitude stored in a record type variable called “Customer.” You could use a modified approach to make it work for a table.
If(Power(Abs(Location.Latitude-Customer.Latitude),2) + Power(Abs(Location.Longitude-Customer.Longitude),2) < 0.008, Notify("You are close to the customer's location!"))
Hi,
I have a drop down with street addresses (complete address including city, state and zip). I want that when user selects an address, it goes as input to the address input field (destination). How can i do that?
Hi Matthew, amazing post! Maybe a bit of a stupid quesiton, but where am I able to find the RouteWaypoints_Longitude and RouteWaypoints_Latitude?
Matthew,
it appears that something may have changed that would cause this to maybe not work now? Is there any way you could help me? I am trying to calculate a distance in hours and pop that number into a calculator of mine. But after completing your first steps i can not get the route to show.
Exactly what I was looking for. I have a question on this. Lets for instance say I am looking to route to an object and that object has a name in a sql database. This object also has a latitude and longitude field, thus I want the destination location to match the lat and long field in the table and add that as my destination. Do you perhaps have any idea how you would go about doing that?
Hi Matthew. Love the blog post – as always, it’s quality!
From what I can tell I should be able to create a shape in the map and collect only the points that are within the area of the shape. Do you have any more information or documentation on how to use the Area and Perimeter properties for this?
All the best,
Fangirl,
Ulrikke
Ulrikke,
I don’t see any tutorials on it but you are right that the documentation that says you can use the SelectedShape.Area or the SelectedShape.Perimeter properties.
https://learn.microsoft.com/en-us/power-apps/maker/canvas-apps/geospatial-component-map#output-properties
Hi, Matthew, can you help me check why this is not working?
Mashi,
What error message did you receive?
oh thanks for the response, Matthew! This actually works now, and the culprit is the map name, I followed map_routes, wherein my map name is Map1. 🙂
Hi mathew i ma using the app to caluclete filterd value s from sql table data to by calculate from current loaction for the given table value at propert of RouteWaypoints_Items gives me error for water waypoints as app gets staretd how i can rid of that notification i beleive i havee used Variables for Map1.ClickedLocation.Latitude,
but it wont work as neede any sugetion thanks in advance .
Table(
{
Latt: Map1.ClickedLocation.Latitude,
Long: Map1.ClickedLocation.Longitude
},
Hi Matt,
Thank you so much for this! This is a big help!
Just wondering how can I calculate the distance and time between waypoints if I have multiple in a single data source? Like in colWaypoints, I have 4 locations. I want to calculate the distance and time between 1 and 2, then 2 and 3, then 3 and 4.
Thanks in advance, Matt!
Great post. Thanks Matthew
Hello Matthew, I am having difficulty making the map responsive to different type screens. Do you have any tips?